

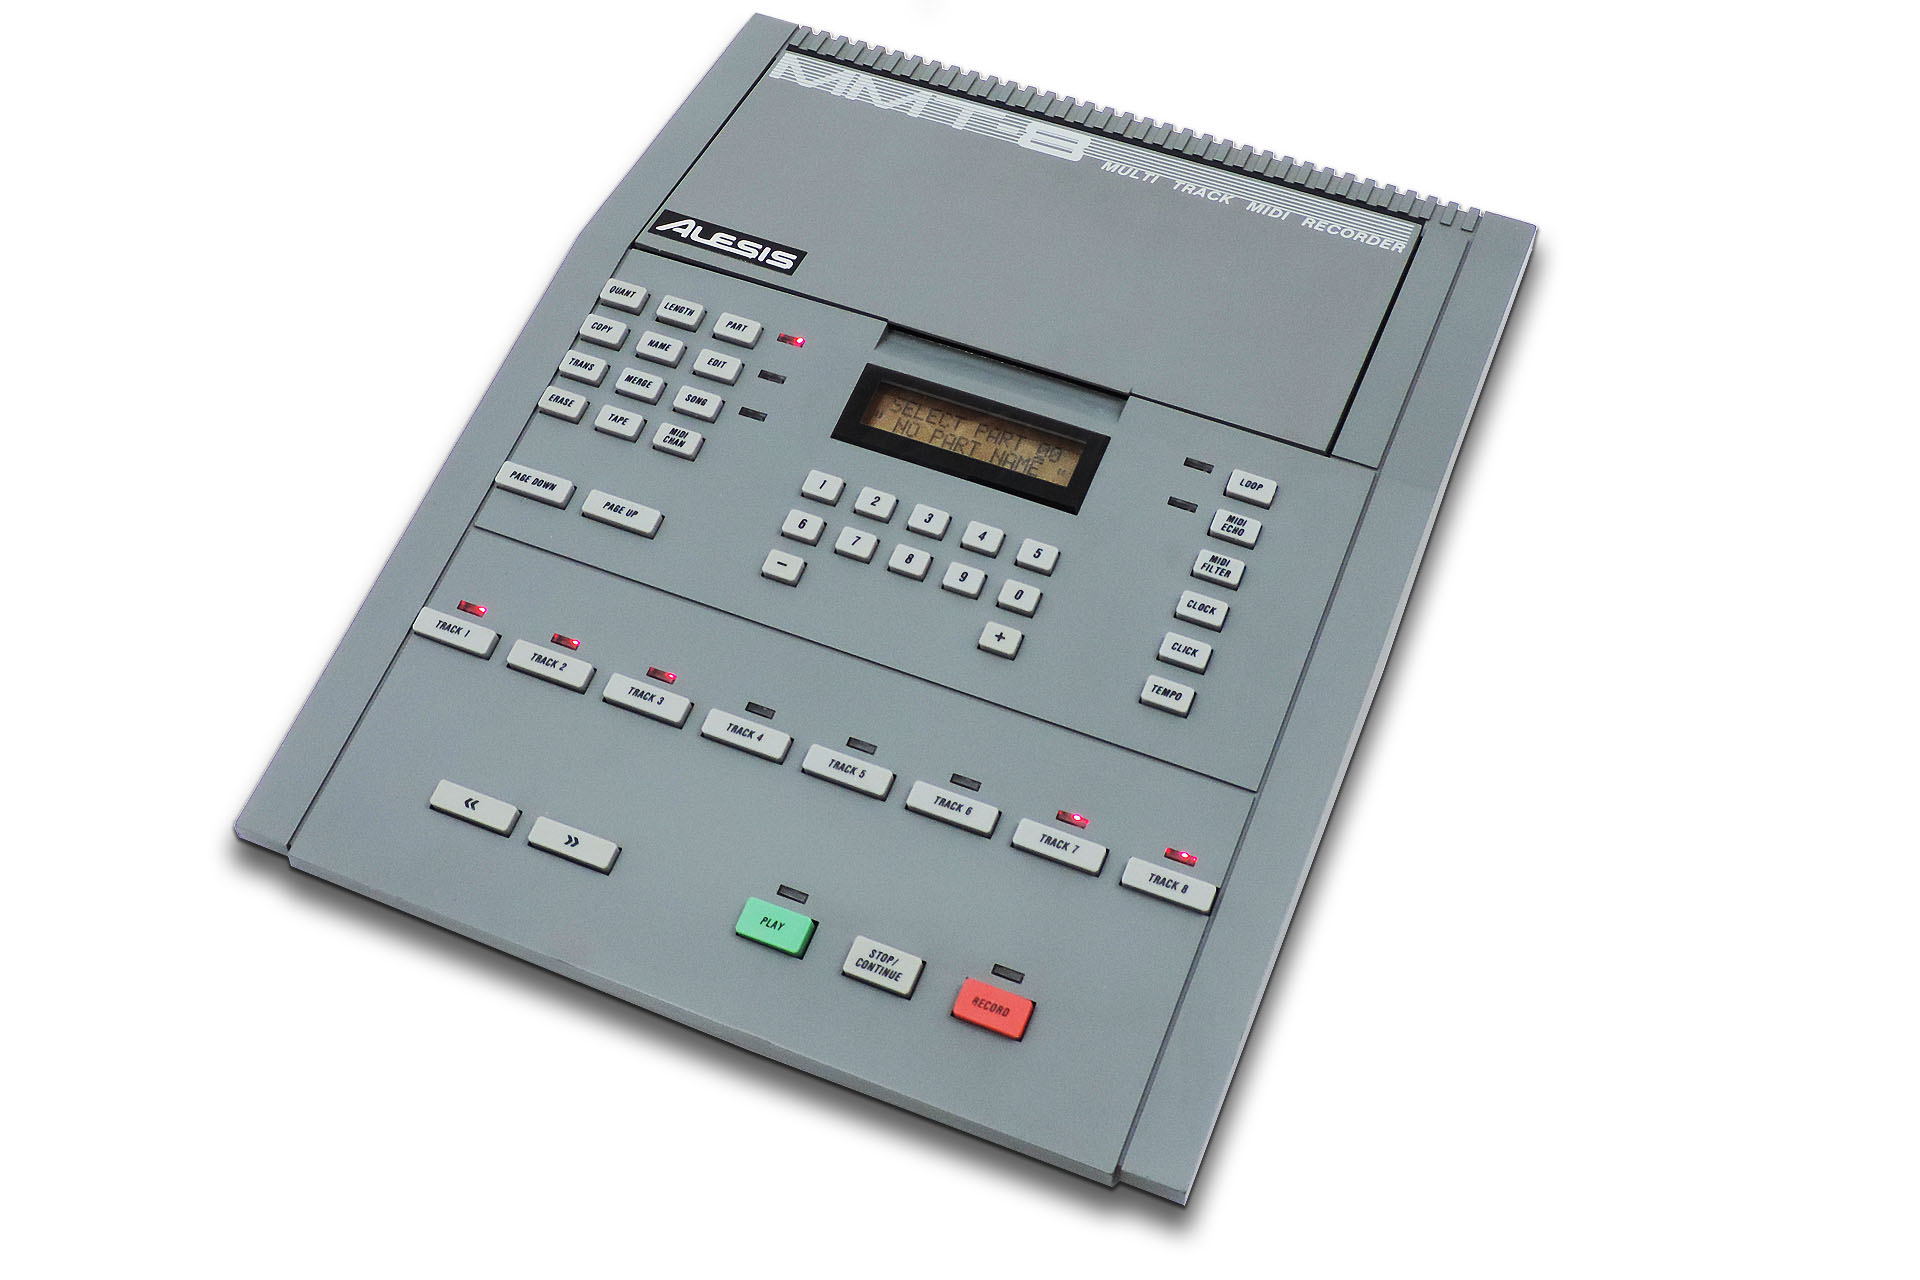
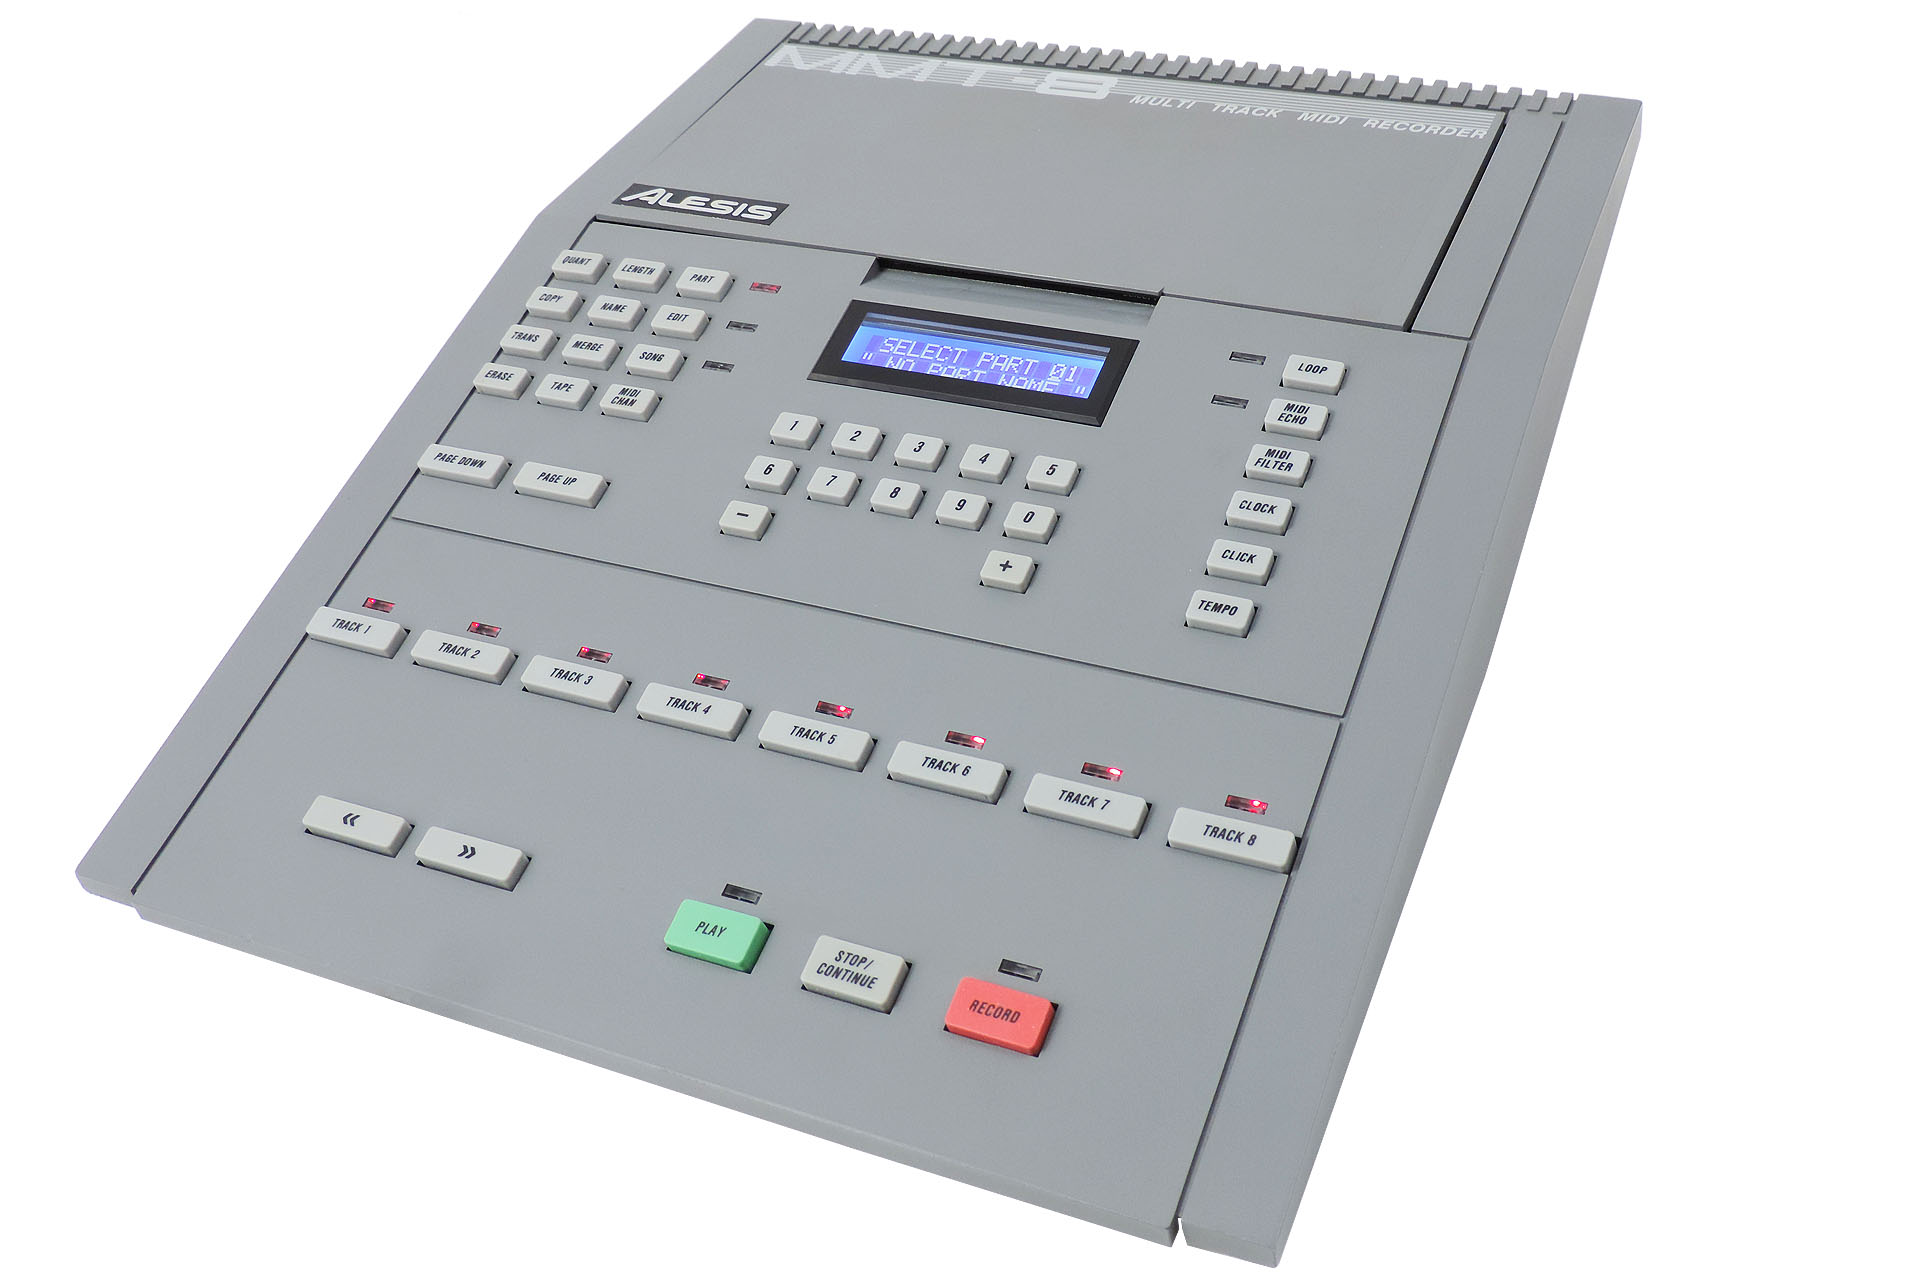
My first stand-alone sequencer was the Alesis MMT-8, so when I recently got one of these in for a full repair and refurbishment, it brought back a lot of great memories.
In the late eighties, I had a couple of Roland S-550 samplers. If you remember this machine, you might also remember the monochrome (green) screen, the mouse and the sequencer software. All quite superb but even back then, I didn't always want to 'boot up' my 'sequencer' S-550, just to get down an idea.
Stand-alone sequencers at the time, like the Roland MC-500 for example, were quite expensive until that is, Alesis released the 'MIDI Multi-Track 8' or MMT-8. Small, easy to use, no fuff and above all, very cost-effective, the MMT-8 soon became a big hit and I find it's popularity today not just amusing but a testament to it's design. A quick look around Google reveals that many named artists, specifically DJs, are using this machine even today!
Others soon tried to bite back and in 1990 for example, Roland brought out the MC-50 (shortly followed by the MC-50 Mk II). Although hugely powerful, machines like the MC-50 were still considerably more expensive than the humble MMT-8. In fact, the MC-50 was my second stand-alone sequencer and I recall not regretting hanging on to my humble MMT-8.
Sure it's got a couple of drawbacks; limited memory (100 songs, 100 parts, 10,000 notes), external storage via MIDI or tape only (no on-board floppy disk drive) and a small 16 x 2 screen. The thing was, the MMT-8 was instantly familiar to many as it kind of felt like a multi-track recorder so once you accepted its limitations, you realised that you had a tight little sequencer which actually contributed to a healthy workflow.
So this MMT-8 was definitely looking worse for wear and things just weren't working like they used to. In fact on power-up, although it came on, it was just all locked up. Seeing as it didn't have any knocks, dents or scratches though, the first thing to do was to completely take it apart and give the casing and the switch contact membrane, a good wash. At least it's going to look the business so if nothing else, I could turn this classic into a bit of modern art! 🙂
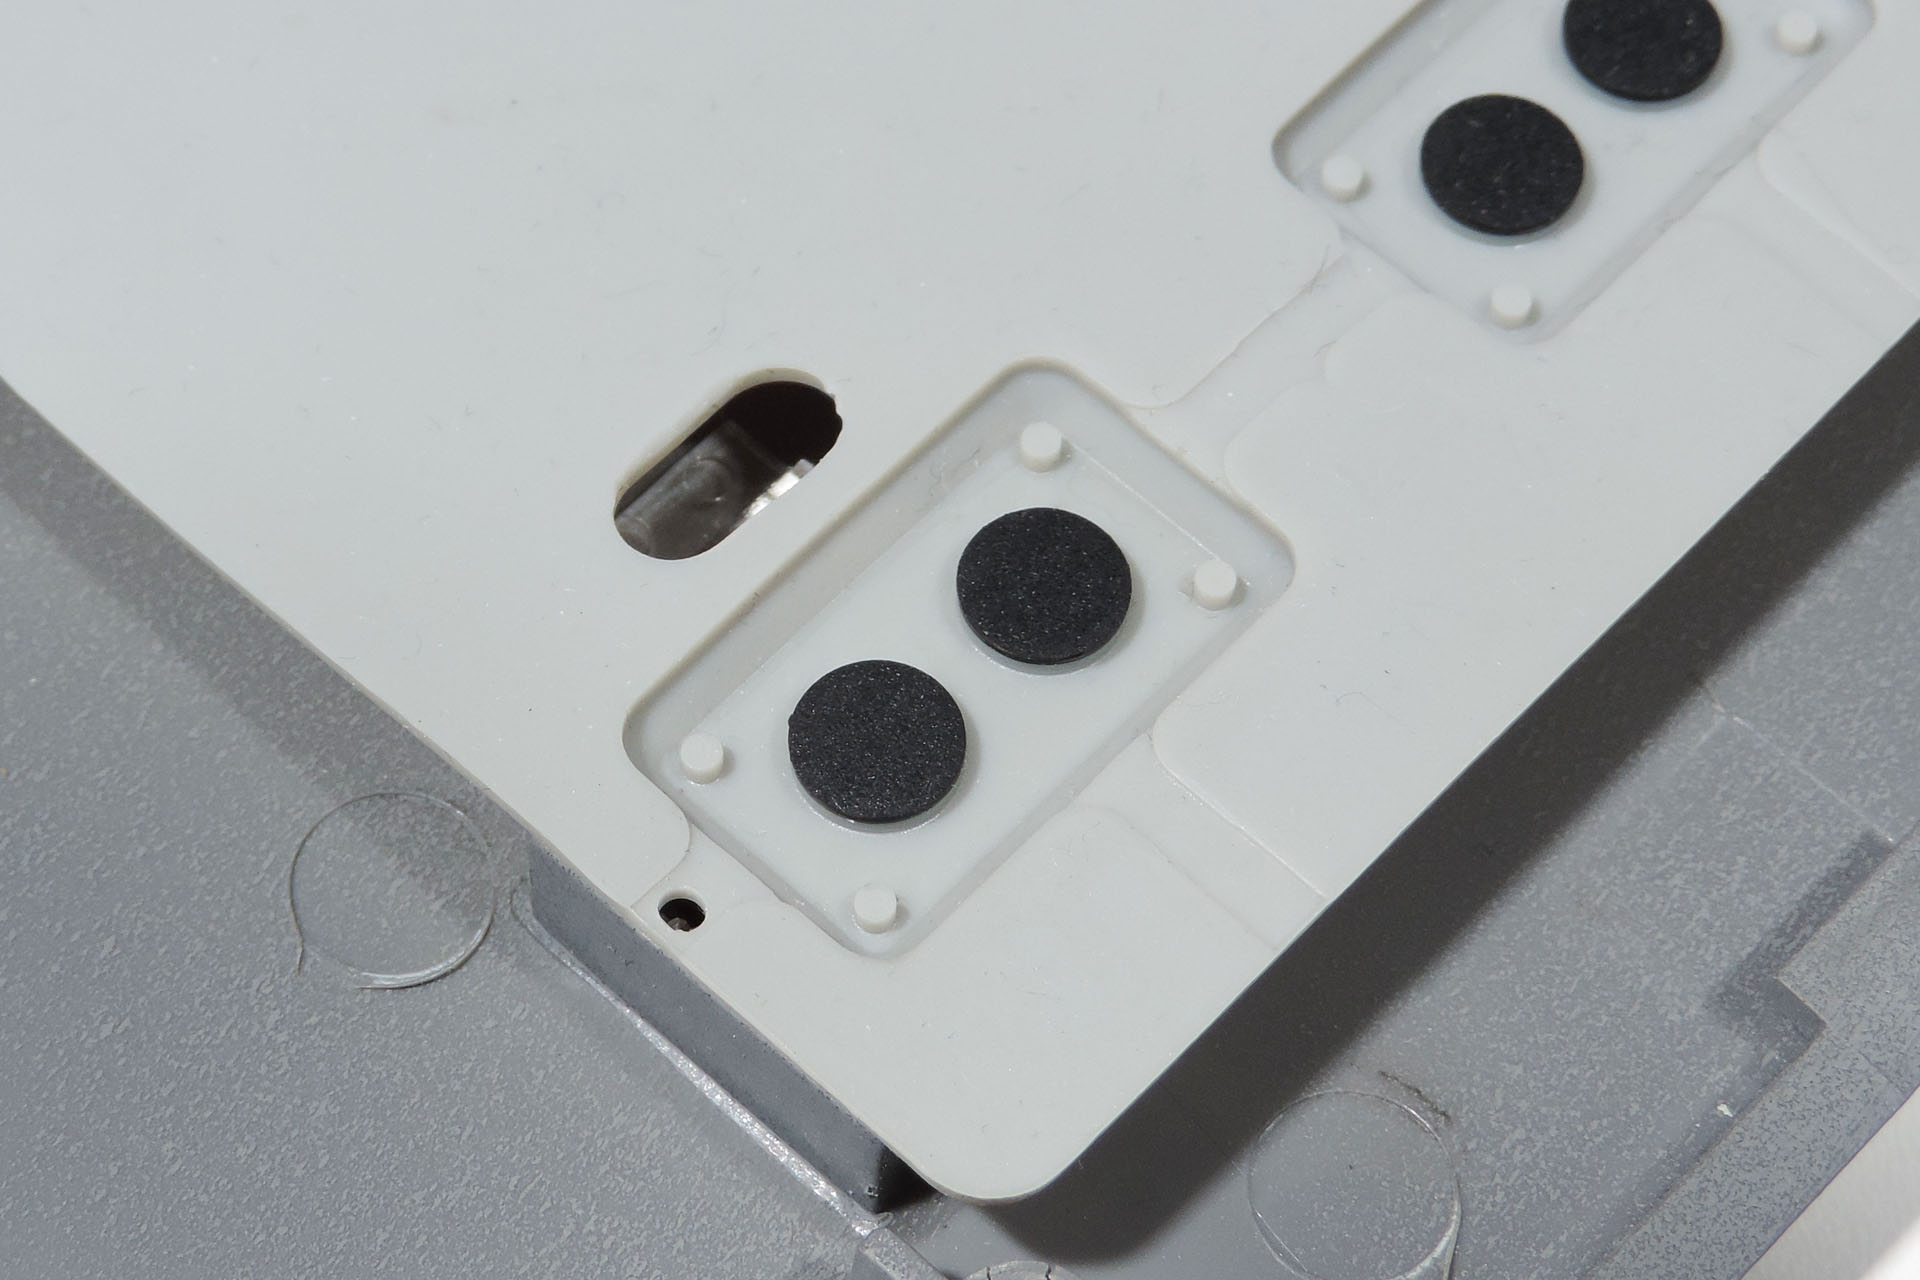
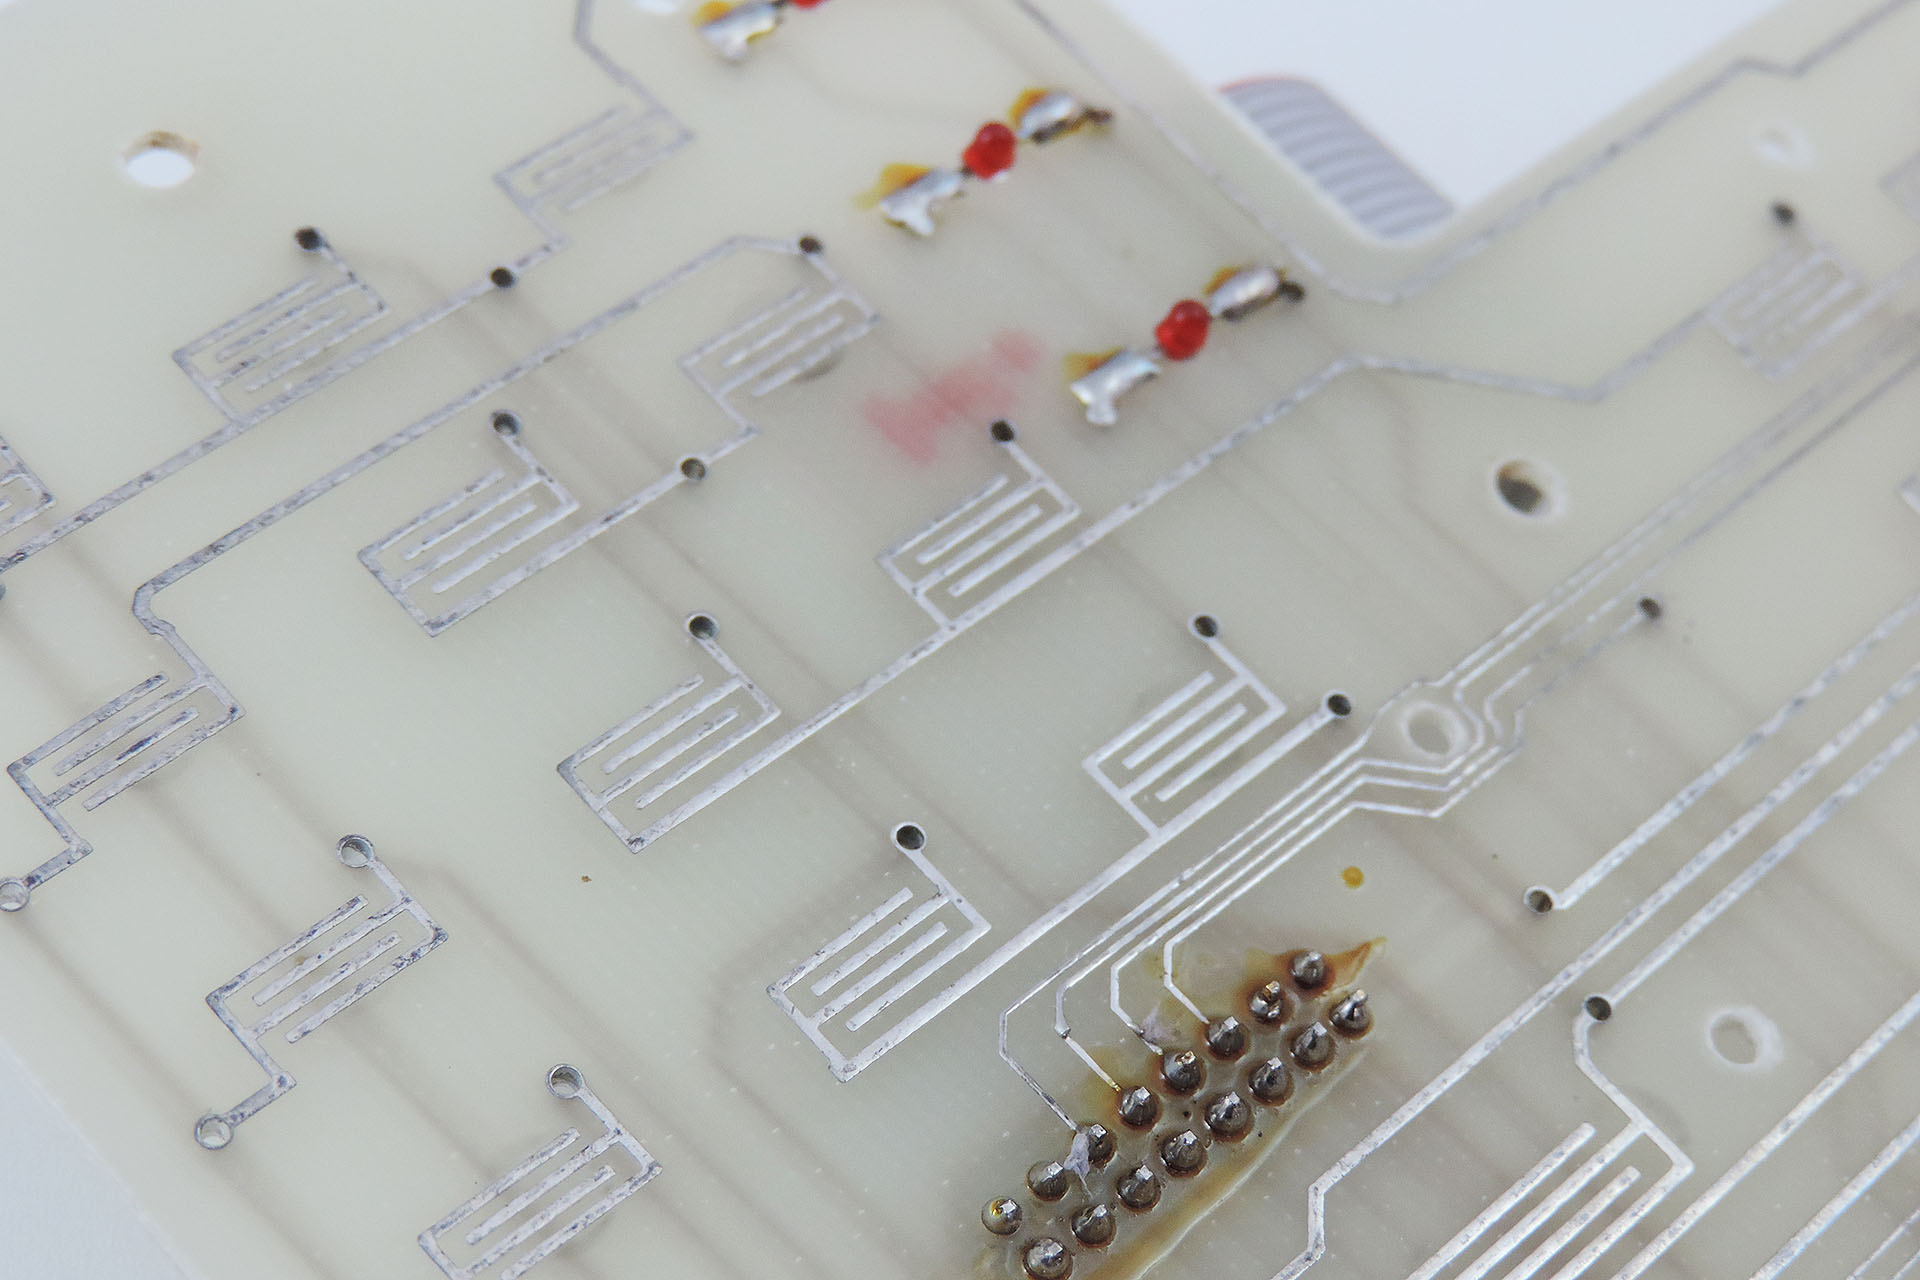
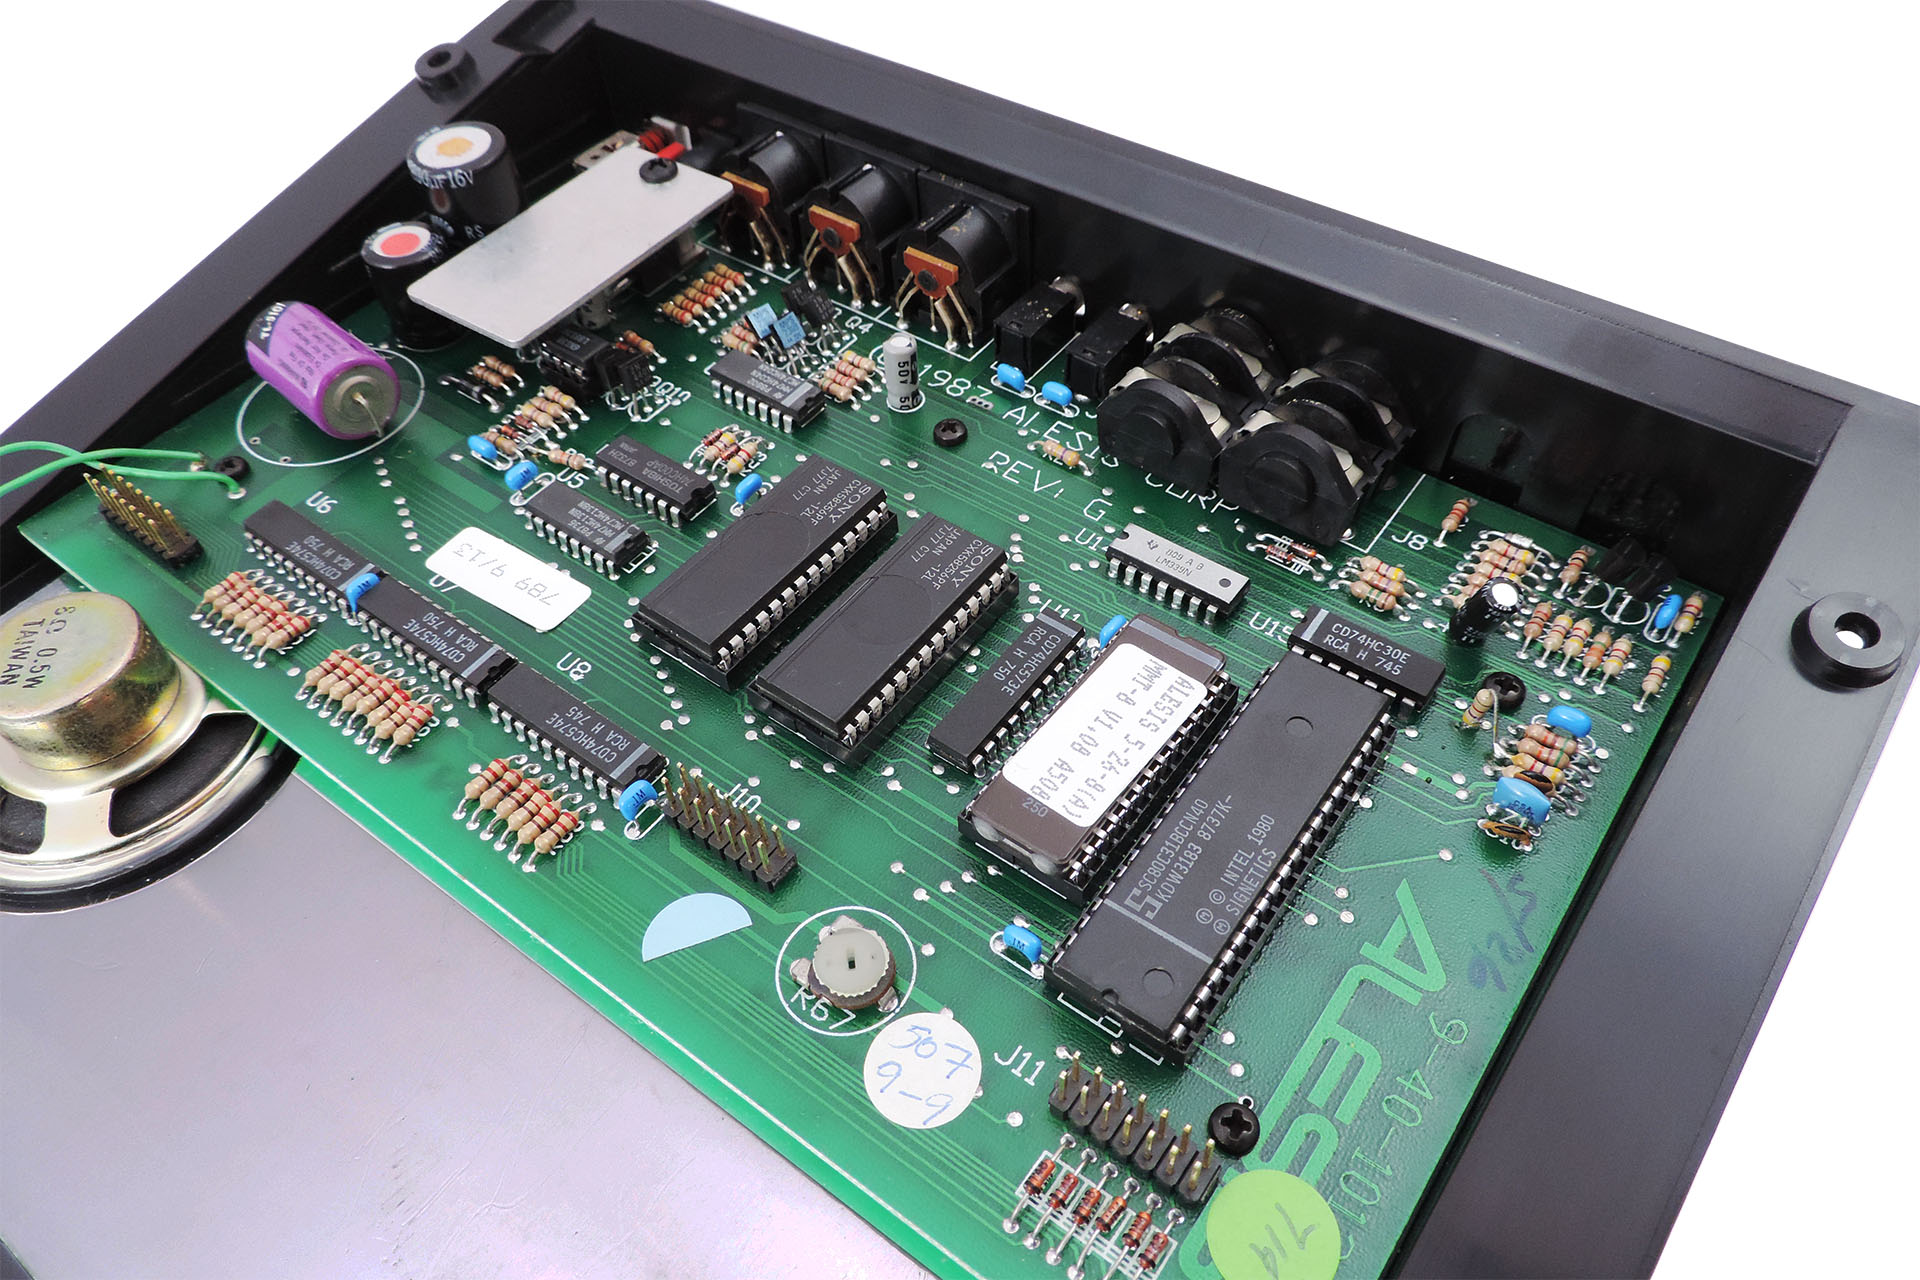
After several decades, even a well kept MMT-8 will suffer badly from intermittent and / or none functional keys. The problem is that while the switches on the back of the rubber contact membrane use small carbon-coated pads similar to those used in keyboards, the complimentary contact PCB just had metal track, like the track side of an old PCB.
So the next thing to do was to make sure that this aspect of the machine was fixable. Well, having had one of these myself, you guessed it, of course I knew it was fixable!
Cleaning and treating the switch contacts on both the contact membrane and the contact PCB, is well worth it, making an old MMT-8 respond like it did when it was taken out of its box for the very first time but... it's got to be done properly.
The MMT-8's casing is plastic, which is now old plastic, the point being that it's become quite brittle. Hence, care should be taken when disassembling this box and removing the contact PCB in particular. It's not difficult to break the screw pillars and they really aren't easy to repair if at all. When reassembled, if the contact PCB is not tight to the contact membrane due to a missing or badly fitting screw, then you might have cleaned and treated the switch contacts but you'll have some play when depressing the switches and you'll kind of be back to square one. It's equally important when replacing the contact PCB that the screws are NOT overtightened.
I then checked the battery which had years of capacity left on it. Next, the dreaded freeze. As previously mentioned, when you switch on, a bunch of LEDs light up, there's nothing on the screen and the machine is quite unresponsive. Let's try a factory reset first; hold down <ERASE>, <PAGE UP> and <PAGE DOWN> simultaneously, while powering up. Hmm... well that didn't fix anything. Probably cleared the memory, though. 🙁
This is actually a fairly well-known issue and one of several components that comprise the processor reset circuitry, is usually the problem so that's where I looked and low-and-behold...
After ensuring that the contacts were good, both on the rubber contact membrane and the contact PCB, it would appear that I still had a couple of 'switching' issues.
You'll notice on the first image at the top of this post, that track LEDs 4,5 and 6 are out. That's not because they're switched off. In fact the buttons actually work. It's the LEDs that aren't working. Also, a couple of other buttons were still faulty and not doing anything however hard I pressed.
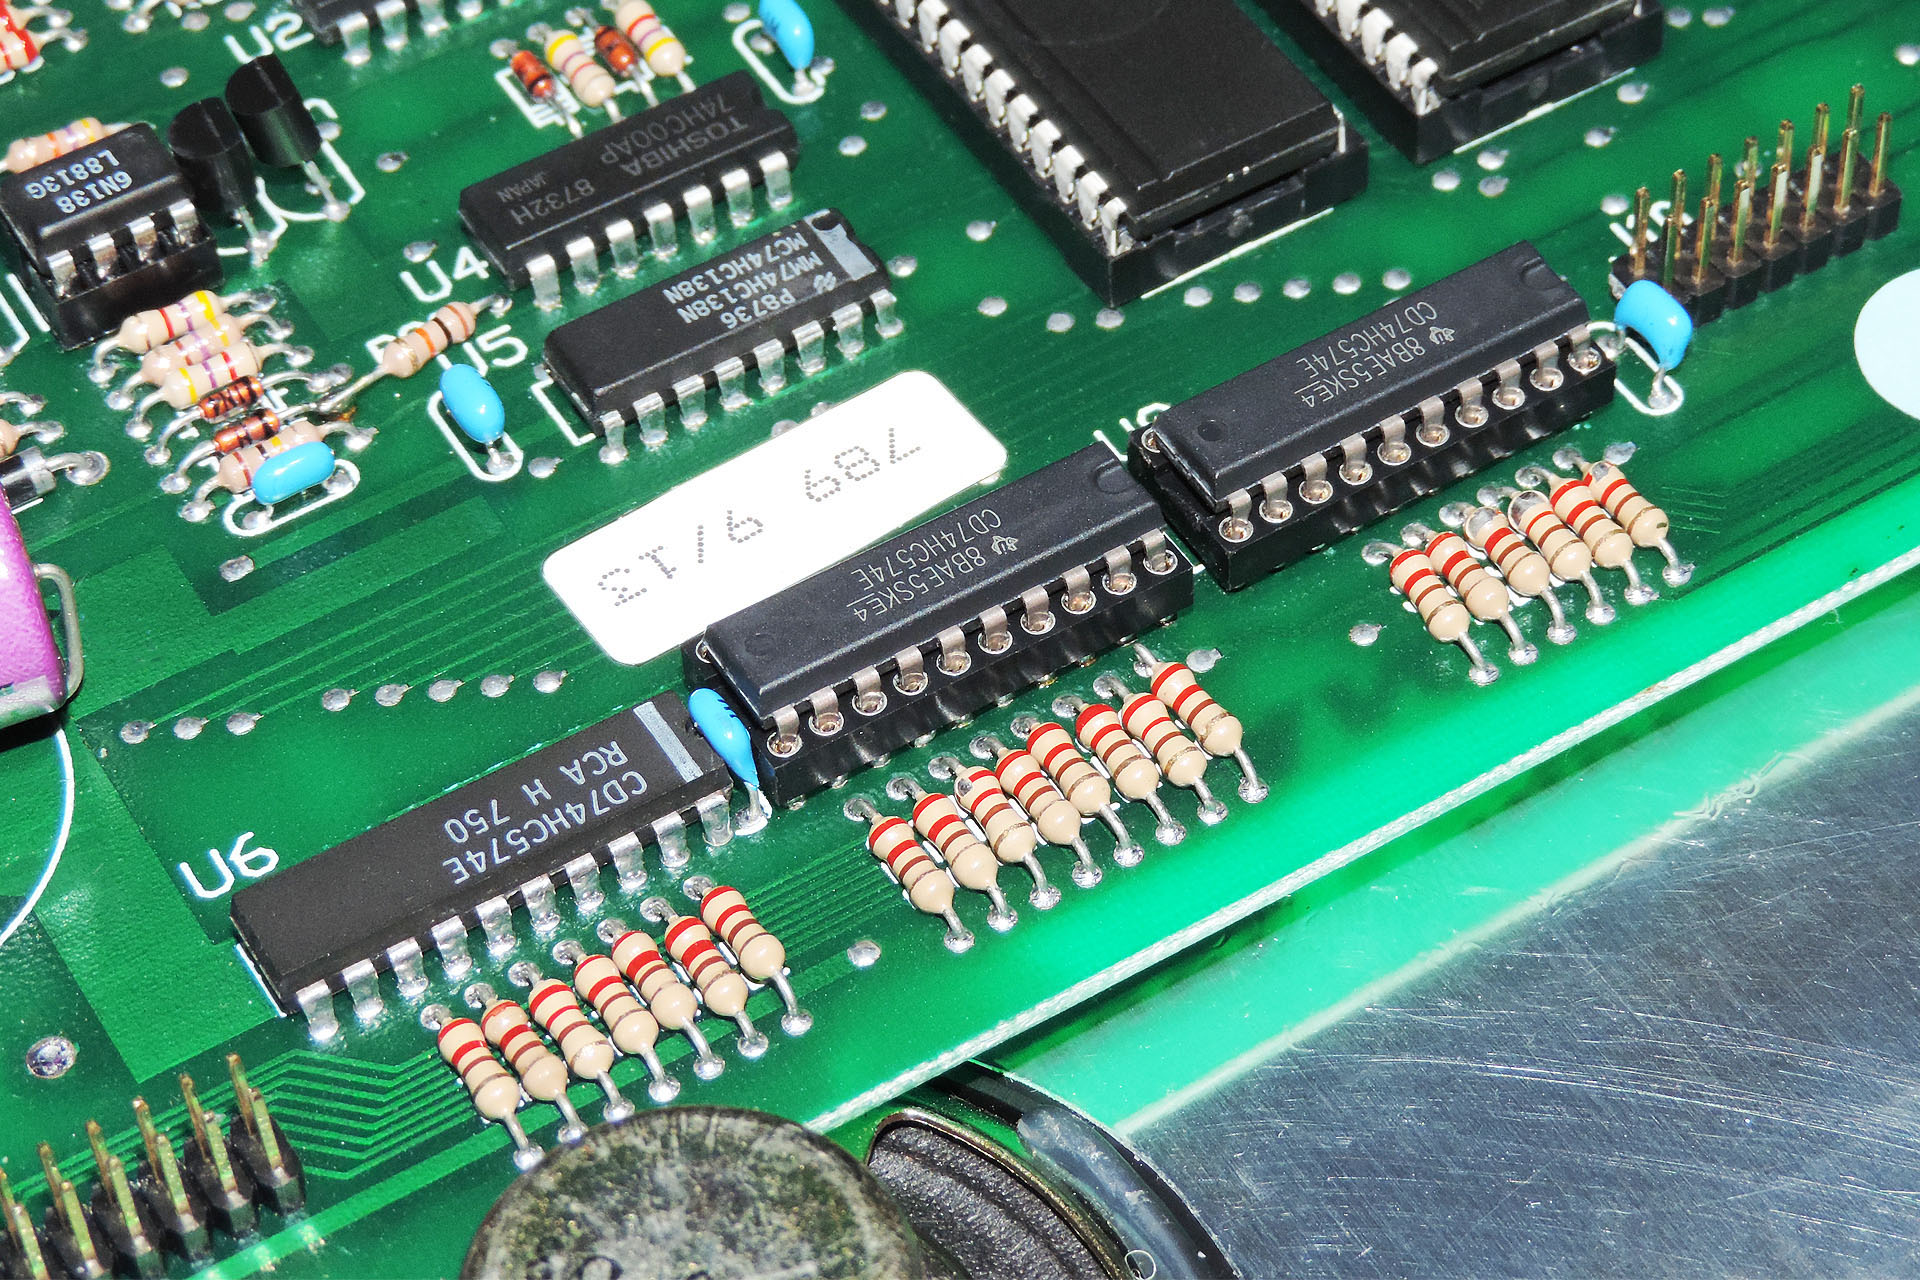
I quickly traced the problems back to U7 and U8; two HC754E 8-way flip-flops. It would appear that five flip-flops were stuck and not flipping or flopping!
So now this MMT-8 looks like new and more importantly, it actually works like new!
Well... not quite.
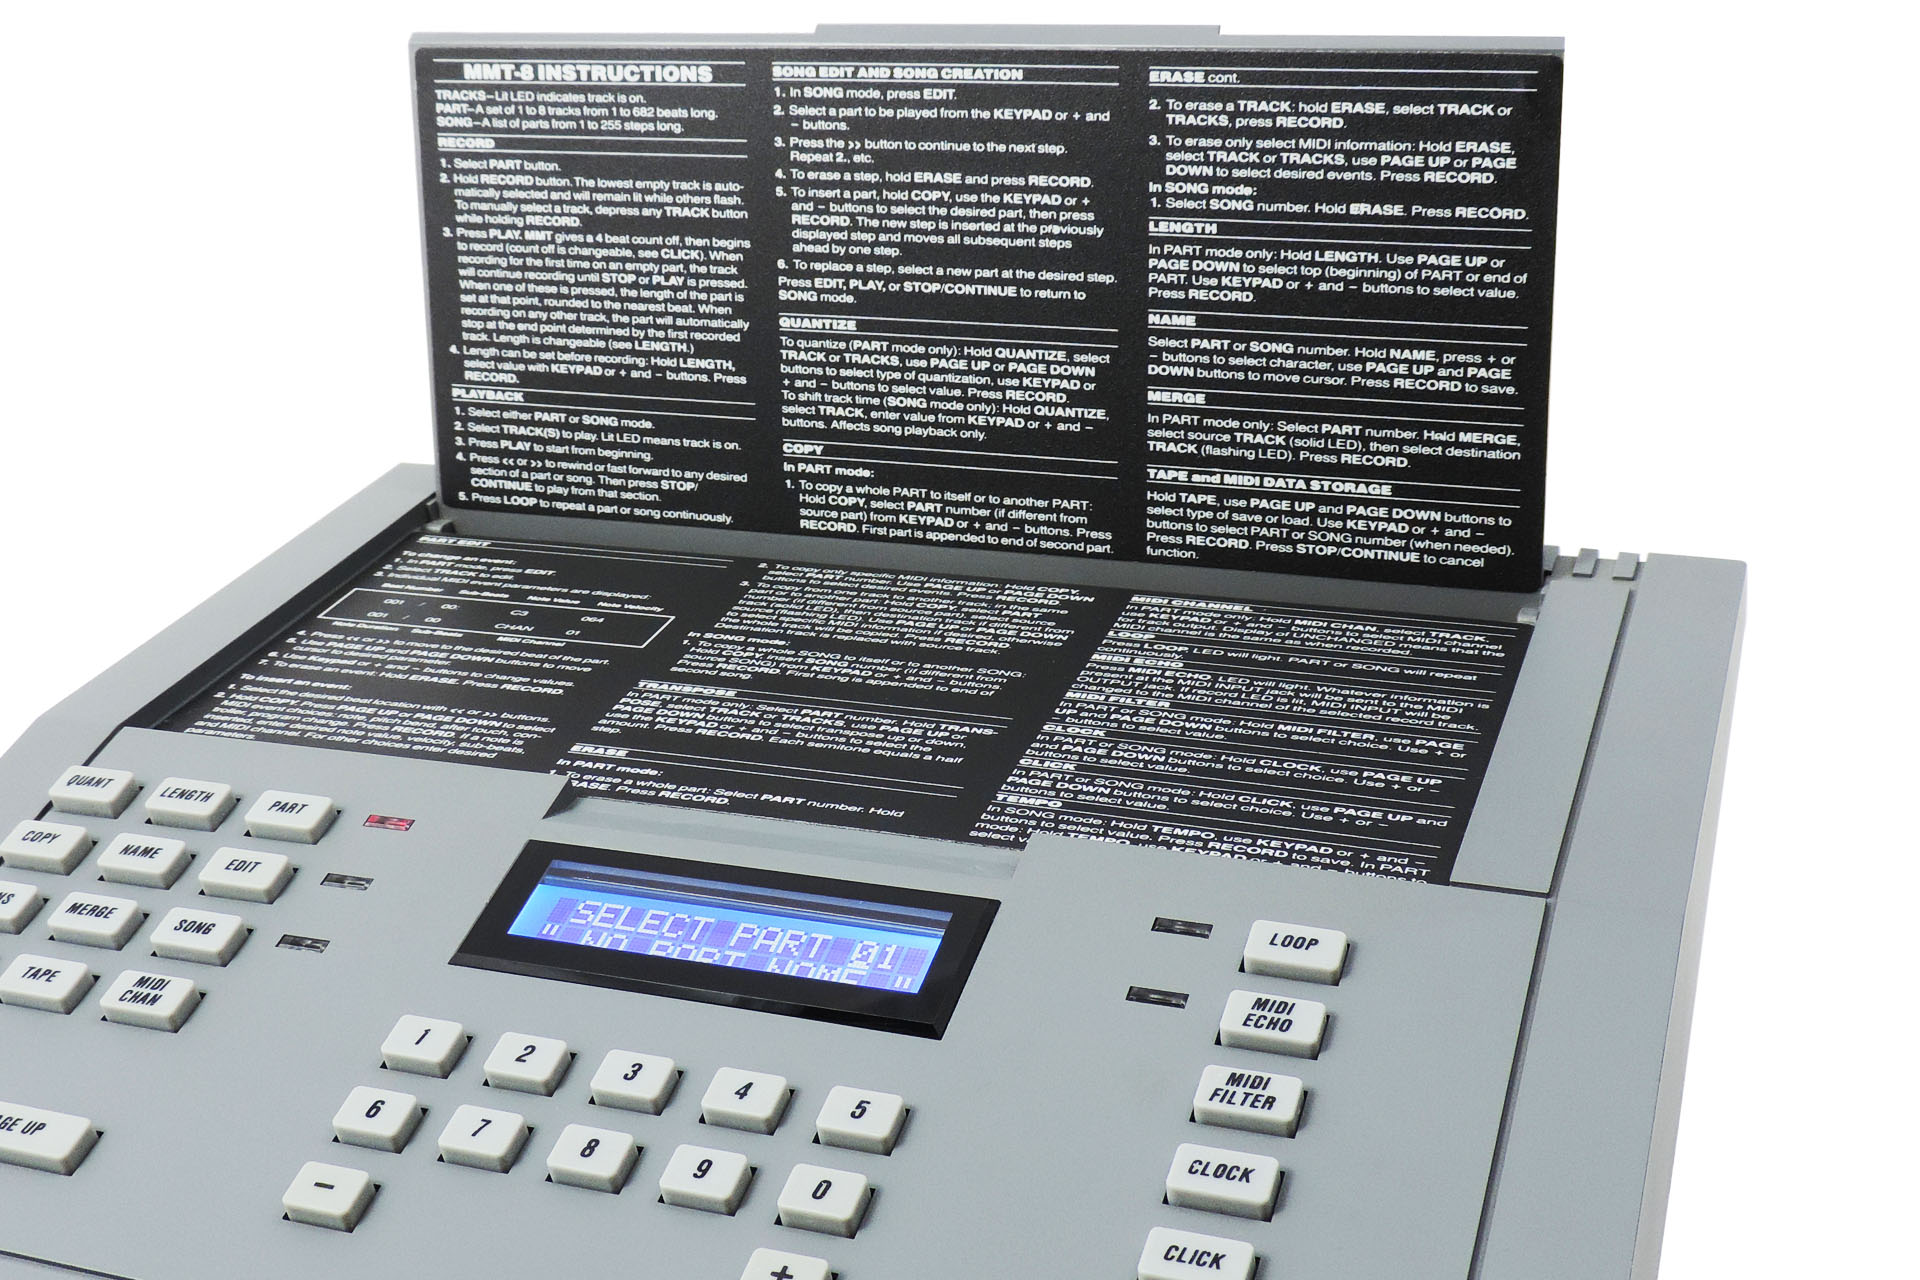
One thing I remember about this machine was the questionable viewing angle of the display. The MMT-8 isn't a square or any other regularly shaped unit. It's all kinda slanted and just says "you need to be sitting down to program me". Well indeed, that's very true and after three decades, even sitting down, the LCD has become pretty unreadable with a low-level backlight and low contrast.
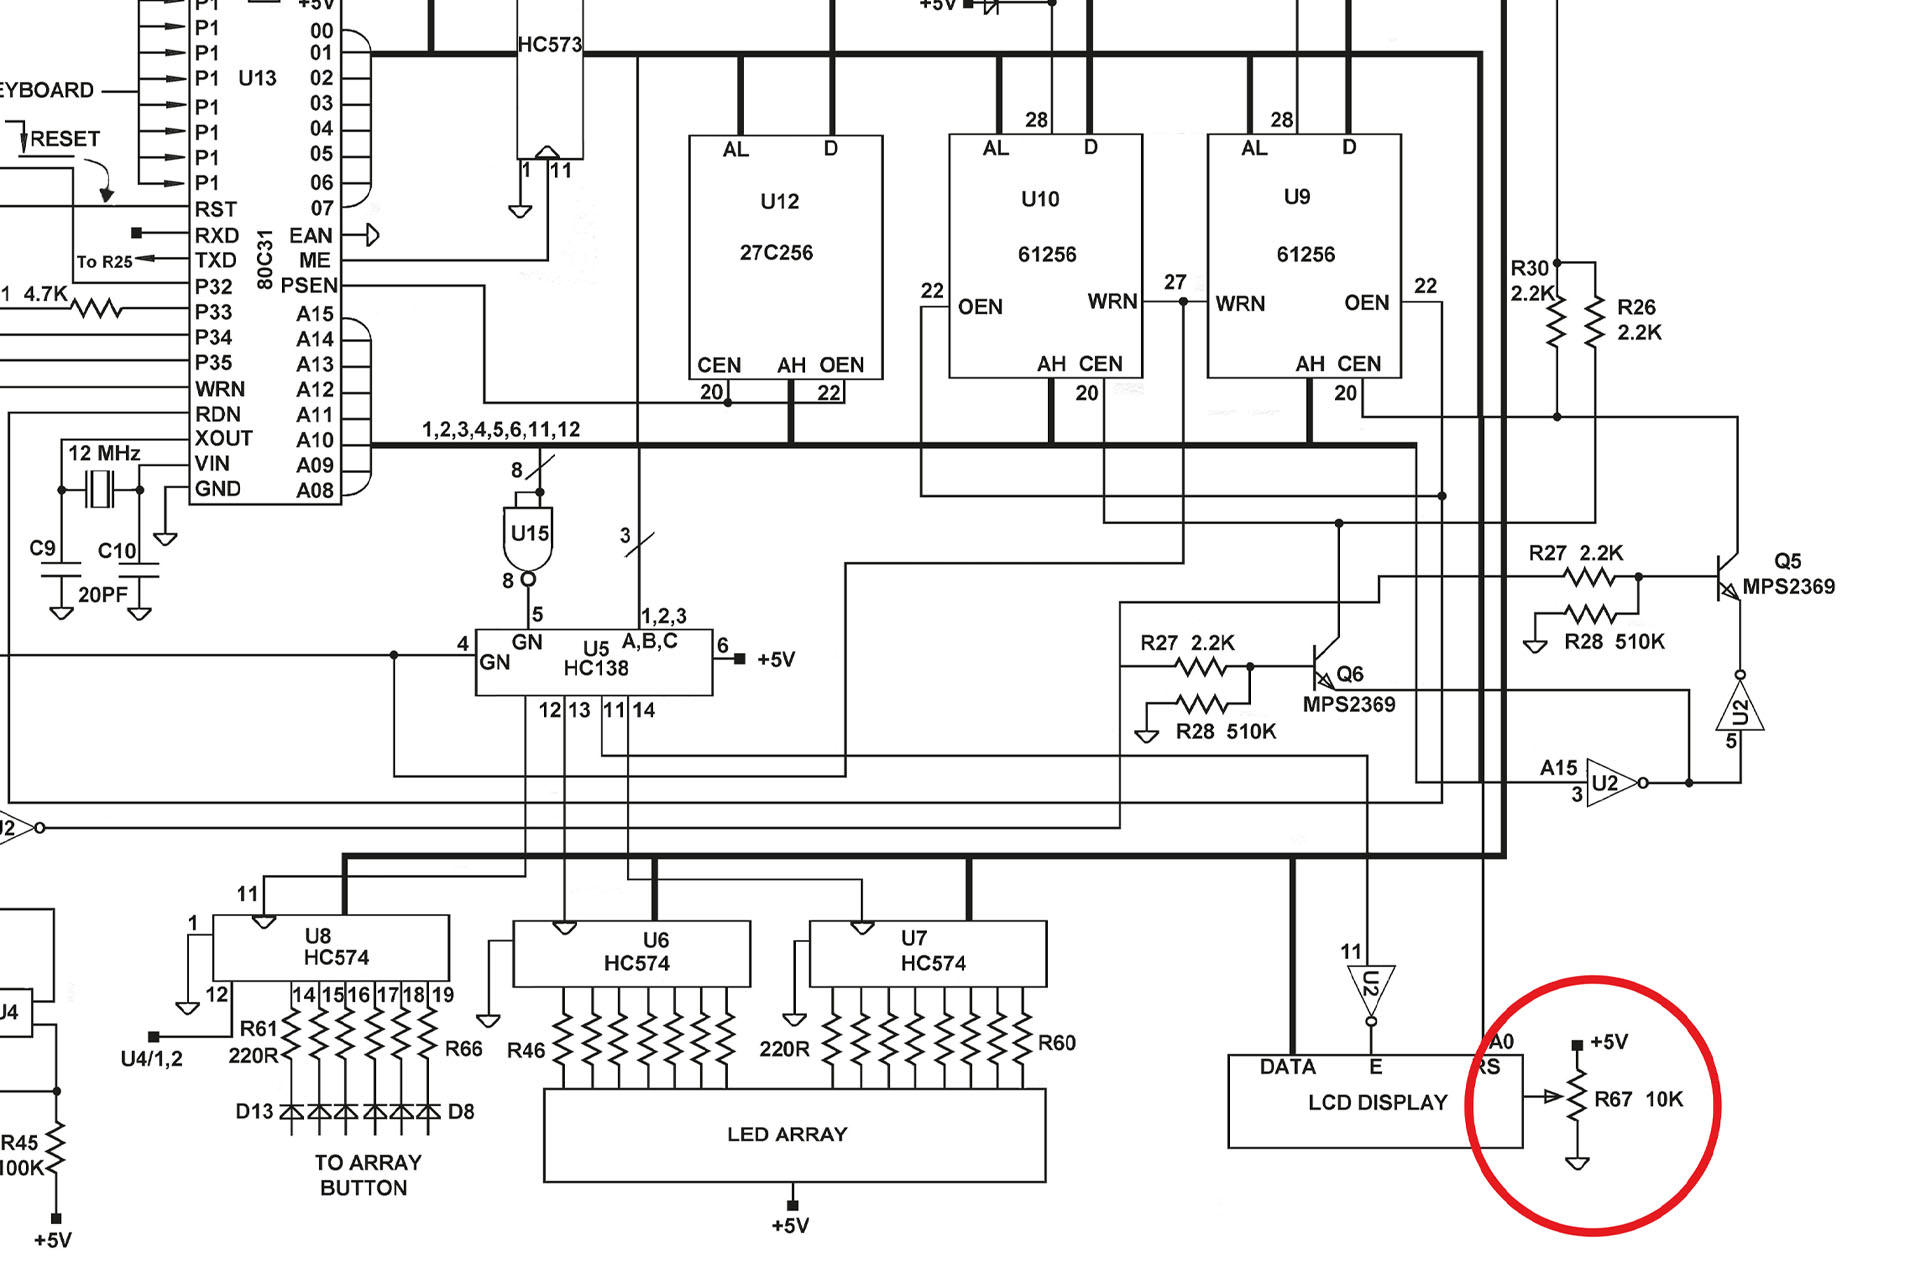
Actually, the contrast and hence the viewing angle is adjustable, via a pre-set pot that's inside the machine (R67). In fact I have a theory as to why the viewing angle is so poor; when these units were inspected and set up at the factory, the technicians were probably err... sitting down! Hence, the contrast was adjusted accordingly.
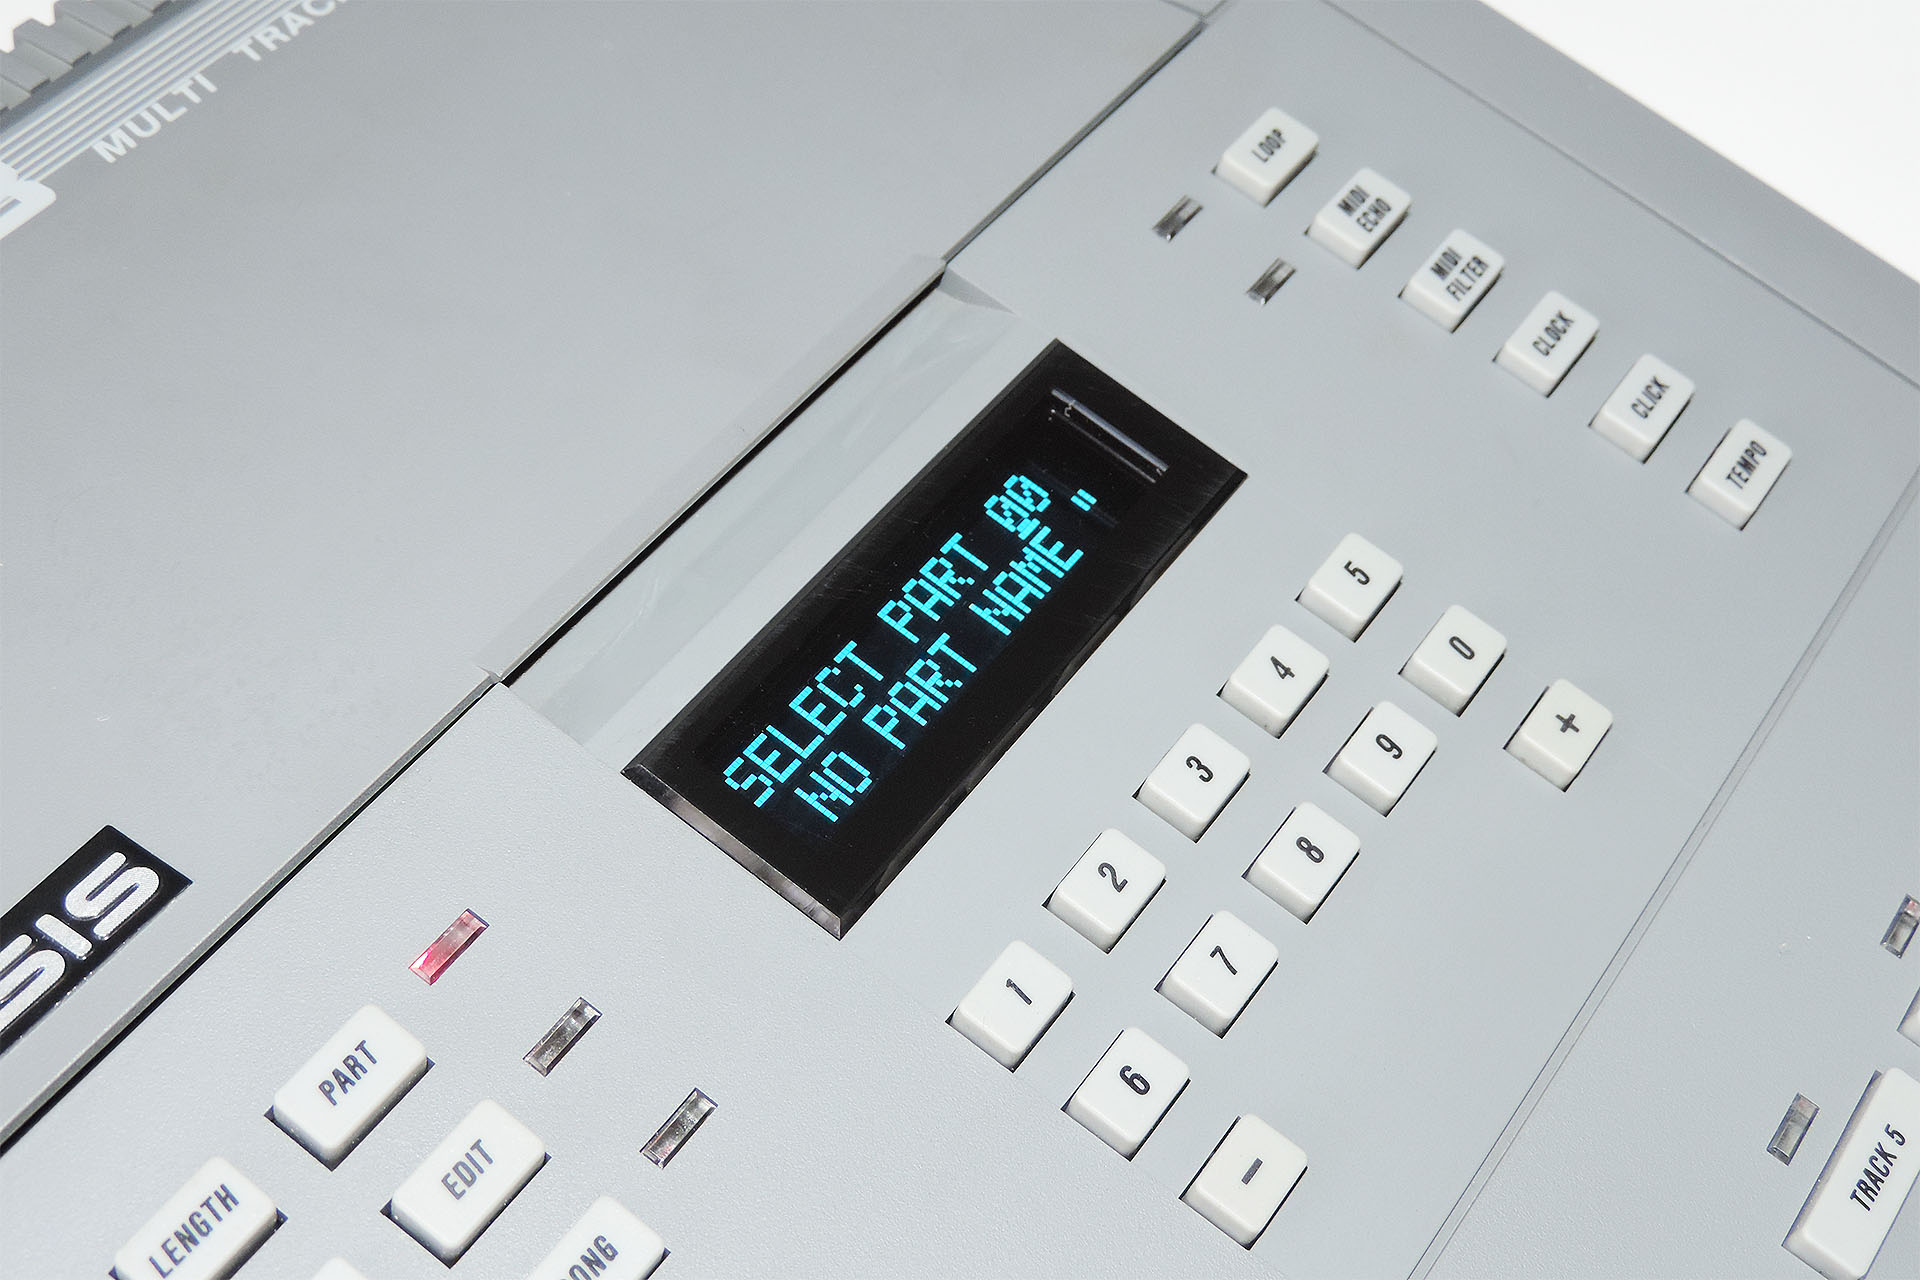
So my Alesis MMT-8 repair and refurbishment continued with hunting down a suitable LCD. I soon came across circuitbenders and bought the perfect module for this machine. The brightness, clarity and viewing angle of modern LCDs is obviously very different to those early devices from the eighties.
Now we're done and will you take a look at that... A blast from the past in stunning, fully working condition.
The Alesis MMT-8 has got to be one of the few machines with a copy of the user-manual built in!
A final few words; I've already mentioned that one limitation of the Alesis MMT-8 is it's memory so it'll come as no surprise that someone out there has developed a simple way to expand the machine's event capacity. You can find details here.
While very cleaver, on this occasion, I advised the customer to consider keeping his machine as original as possible and to avoid drilling holes to fit switches, etc. I'm glad he listened to me.
The operating system on this example is version 1.08. To the best of my knowledge, the last version issued by Alesis was 1.11. Changing the firmware isn't difficult and only involves opening up the case (four screws), pulling out the EPROM and inserting the new one (the right way around, of course). I'd advise checking the revision history before doing that however, as the whole exercise might not be something that's relevant to the way that you use the machine.
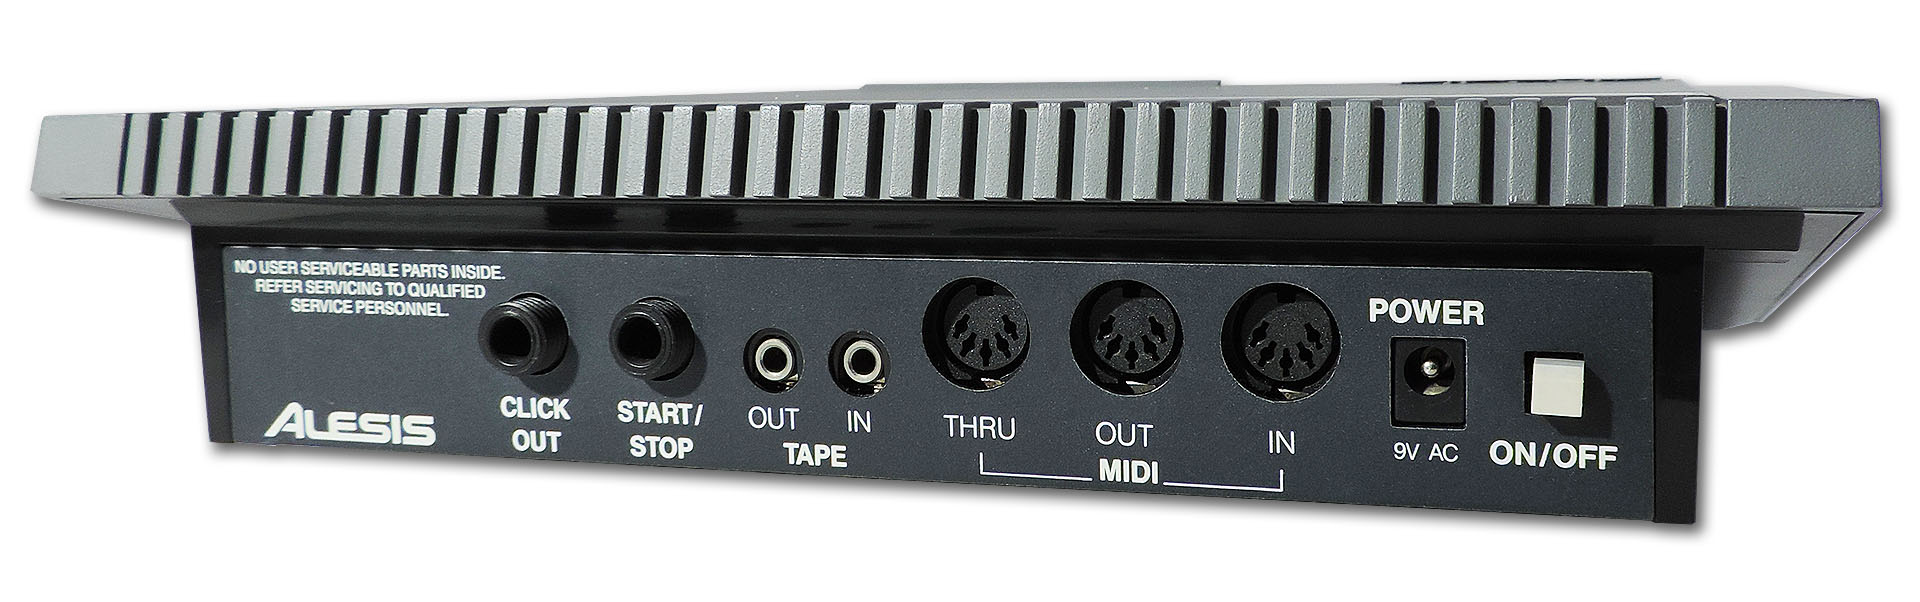
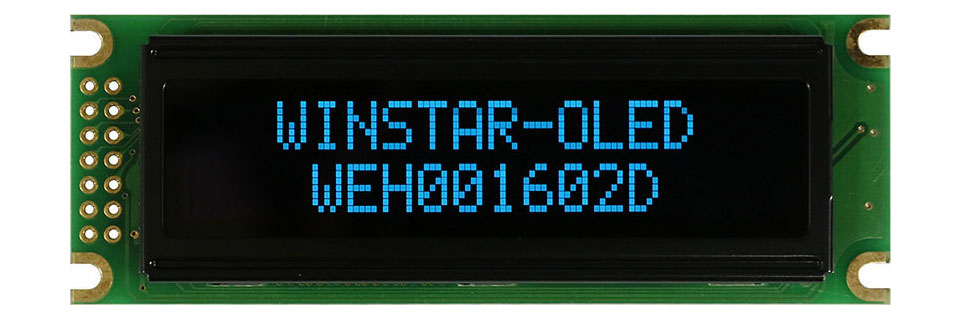
I'm aware that an OLED module suitable for use in other Alesis equipment of the same era, was made by Winstar. I'm uncertain however, as to whether this unit is still available. Another Winstar product code I've seen around, is WEH001602DBPP5N00000 and at the time of writing, this unit is available. If you're interested, then it might be worth checking out. Any display you consider, should have a 14-way connector, be 16 x 2 character and measure 85mm x 30mm.
Alesis released a second version of the MMT-8 but it's really quite difficult to find any info' on it. Some suggest that it was a limited edition version, others believe that it was a Mk II and addressed some of the issues in the well-known grey version. If you know anything about the infamous black Alesis MMT-8, please do let me know.
Technically, this this refurb cost more than the unit is probably worth and quite honestly, I would have dissuaded the customer from proceeding if the machine wasn't in such pristine cosmetic condition. The customer absolutely loves his MMT-8 and like many refurbishments, it's not a case of monitory value. On the other hand, it's something you need to balance up.
So, if you're in a similar situation and considering either an Alesis MMT-8 repair and refurbishment or giving a little TLC to any other bit of gear that you really love, then just message me.
UPDATE - 24th November 2020
Okay so I couldn't help myself and, at my own expense, I bought a Winstar WEH001602DBPP5N00000 from Rapid Electronics, SKU is 60-9686 and it arrived this morning.
After checking the pin assignments, I soldered a 14-way connector on to the module, plugged it into the MMT-8 and hey, it worked!
It looks great! I mean it seriously looks good but being lower than the original (and the replacement I bought from circuitbenders), it doesn't butt up against the inside of the display window. Ironically, the viewing angle is therefore slightly reduced, LOL.
At more than two-and-a-half times the price of the circuitbenders' LCD module, you need to think carefully if considering the Winstar WEH001602DBPP5N00000 as an option.
A couple of things to mention; on the original LCD module, the contrast voltage is delivered to pin 3. This is not connected to anything on the Winstar OLED as OLEDs don't have a contrast control.
Also worth noting is that Winstar makes several different coloured versions of the WEH001602D, so if you don't want blue, you might find a colour that does appeal to you. 🙂