

Being able to convey feel to the sound after the keys are played, can transform a performance into something quite unique and almost magical. Indeed, Roland was definitely on to something when aftertouch began appearing on it’s synthesisers in the mid-eighties. Today, many classic synthesisers have aftertouch strips that either don’t work or are a shadow of what they used to be. Almost forty years later, my modern FSR-based replacement aftertouch sensor for the Roland JX-8P, has considerably more dynamic range and is infinitely more reliable than the first-generation transducers that Roland originally used in the JX-8P and transcends the instrument into another dimension.

I see a lot and I receive a lot of enquiries about failing or failed aftertouch (channel pressure) on the Roland JX-8P. Indeed I’ve been meaning to sort out a long-term solution for this rather well-known problem, for a couple of years. Well, I’m finally pleased to announce that my replacement aftertouch sensor for the Roland JX-8P is a go!
Aftertouch sensors in vintage keyboards have been a bit flaky even before vintage keyboards were, well… vintage! Launched in 1985, the Roland JX-8P soon became quite infamous for aftertouch issues. The problem was so bad that some unlucky customers were experiencing problems, having just bought their brand new instrument.
“So what’s the problem? ”
The aftertouch sensors in early instruments were extremely basic. In the case of the JX-8P, the sensor comprised of a very thin material which had two copper tracks on top of it. In fact a long thin PCB with two wide tracks would be a fair description! On top of the tracks are five conductive rubber strips, then another metal (steel) strip on top of the conductive rubber. Hang on, I’m not finished yet. The whole thing was housed in a kind of rubber extrusion, which in turn, had a strip of keyboard felt running its length. This elaborate assembly sits on top of the keyboard chassis, just under the front of the keys.

When pressing down on the aftertouch sensor, the top metal (steel) strip compresses the conductive rubber strips, thereby reducing the resistance between the bottom copper tracks. Not being hermetically sealed, the copper tracks are susceptible to oxidation and the ingress of contaminants. Over time, a layer of 'crap' develops on top of the bottom copper tracks and it doesn't matter how conductive the rubber strips are, increasing resistance between the tracks will inhibit any conduction of electricity. Don't forget that the stuff that's built up on top of the tracks, also stains the bottom of the conductive rubber strips, also reducing their ability to conduct properly. The sensitivity of the transducer deteriorates, sometimes quite quickly and the system eventually just dies. 🙁
The image below shows sections of the bottom copper tracks of a JX-8P aftertouch assembly strip and three of the conductive rubber strips that sit on top of them. These were removed from an otherwise pristine, like, seriously museum-condition JX-8P.
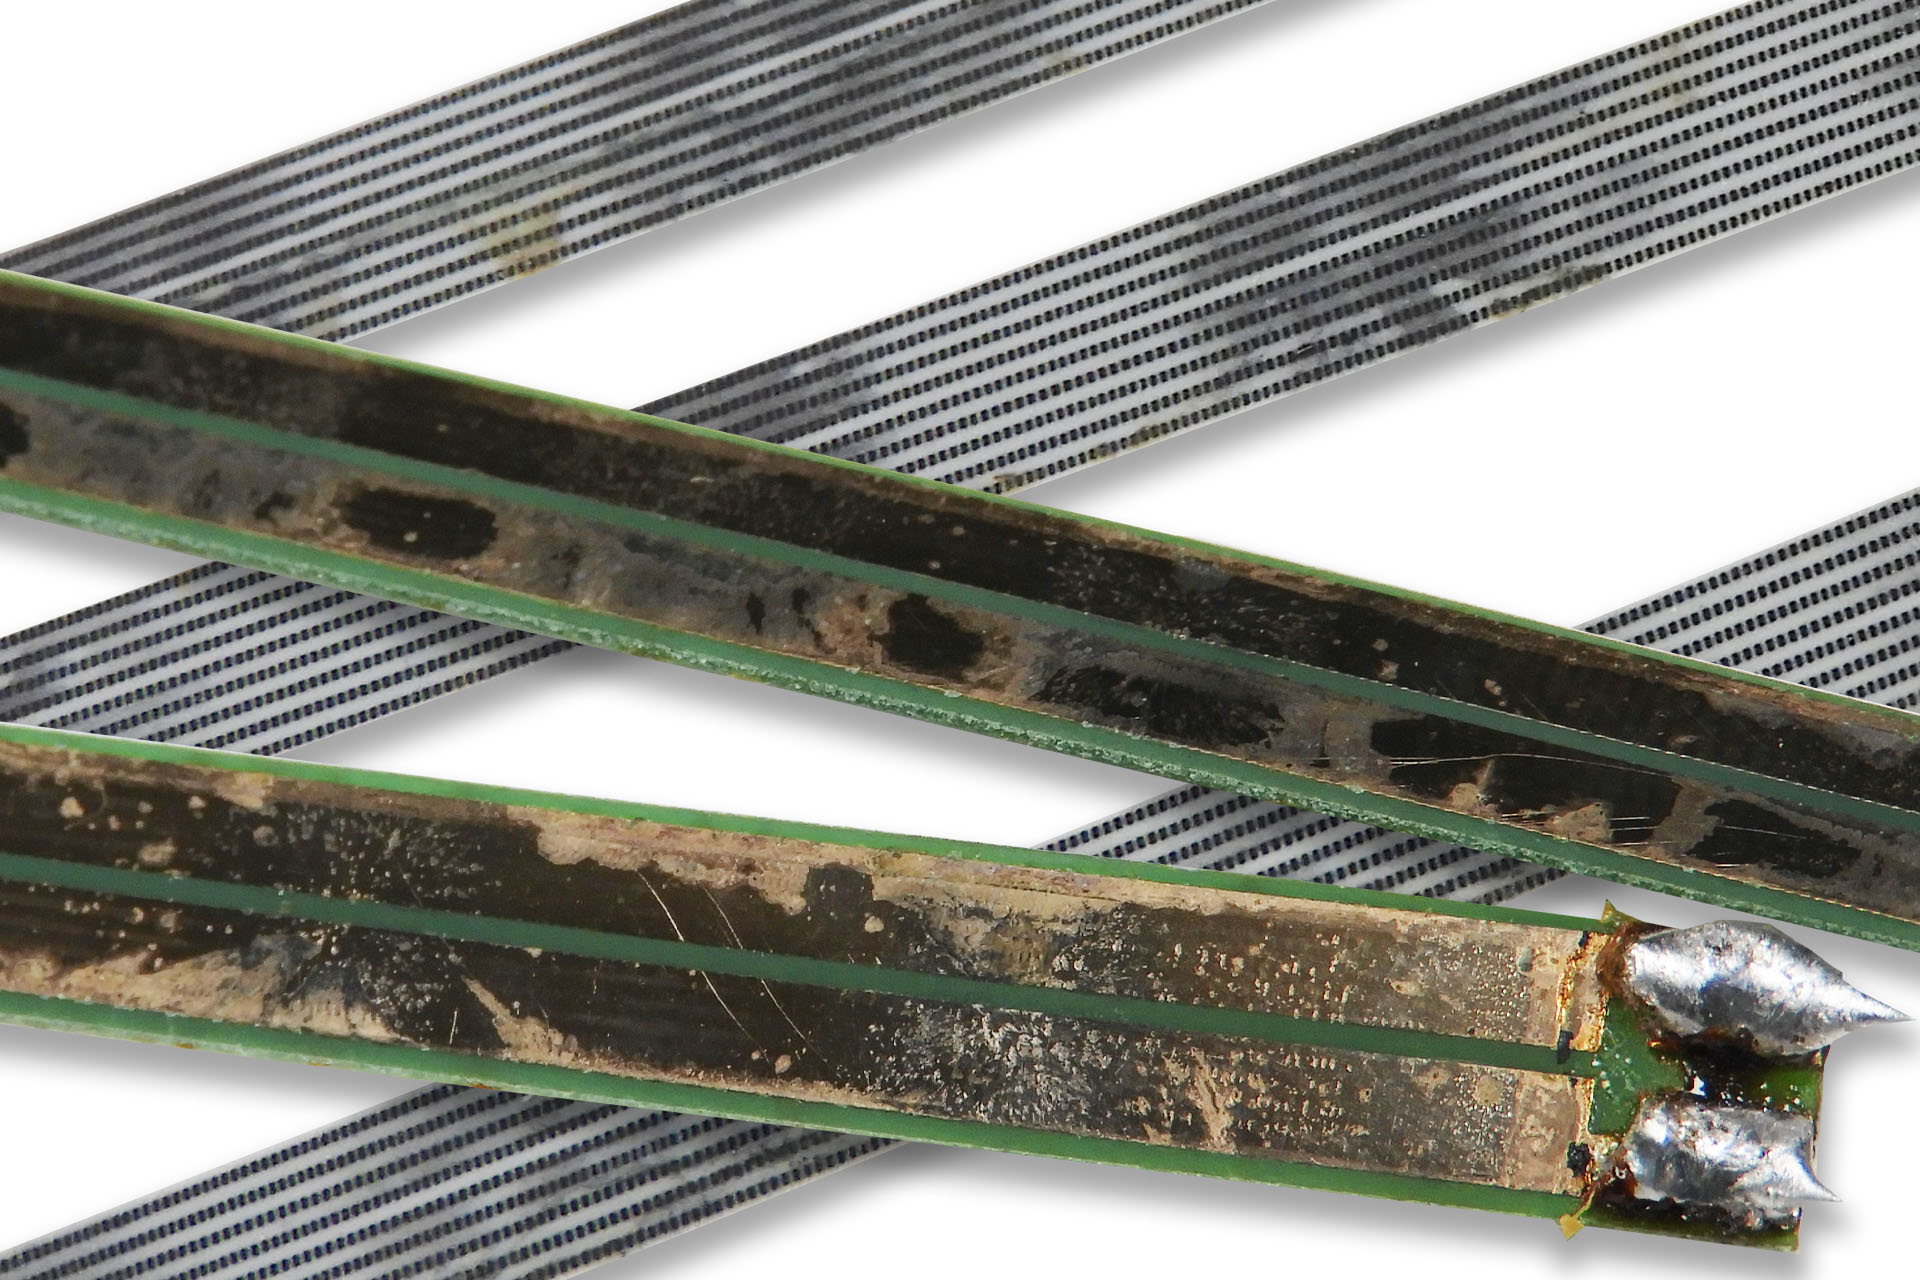
Since the assembly was held together with glue (yes, you read correctly), when attempting to service an original aftertouch strip, disassembly has to be done carefully, glue needs to be (carefully) removed, the top metal strip must not be bent (which is actually quite easy to do) and cleaning the bottom copper tracks, oh and the conductive rubber strips, is all very time consuming and painful… and then you need to put it all back together again, reinstall the keyboard contact strip, the keys and the key retainer and then keep your fingers crossed that it kinda works. Oh boy.
SERIOUSLY?!?!?!? Well it was 1985. What else could they do?
Someone really needs to develop a
replacement aftertouch sensor for the Roland JX-8P!!!!!
When I was at Simmons, we developed two machines that used a new technology; force sensitive resistors (or FSRs). Coincidentally, these were invented in 1985, the same year that the JX-8P was launched. Being the only British electronics manufacturer at the time, to have an office in Tokyo, Simmons was often made aware of new technologies as soon as they broke and clearly saw potential for this new FSR thing.
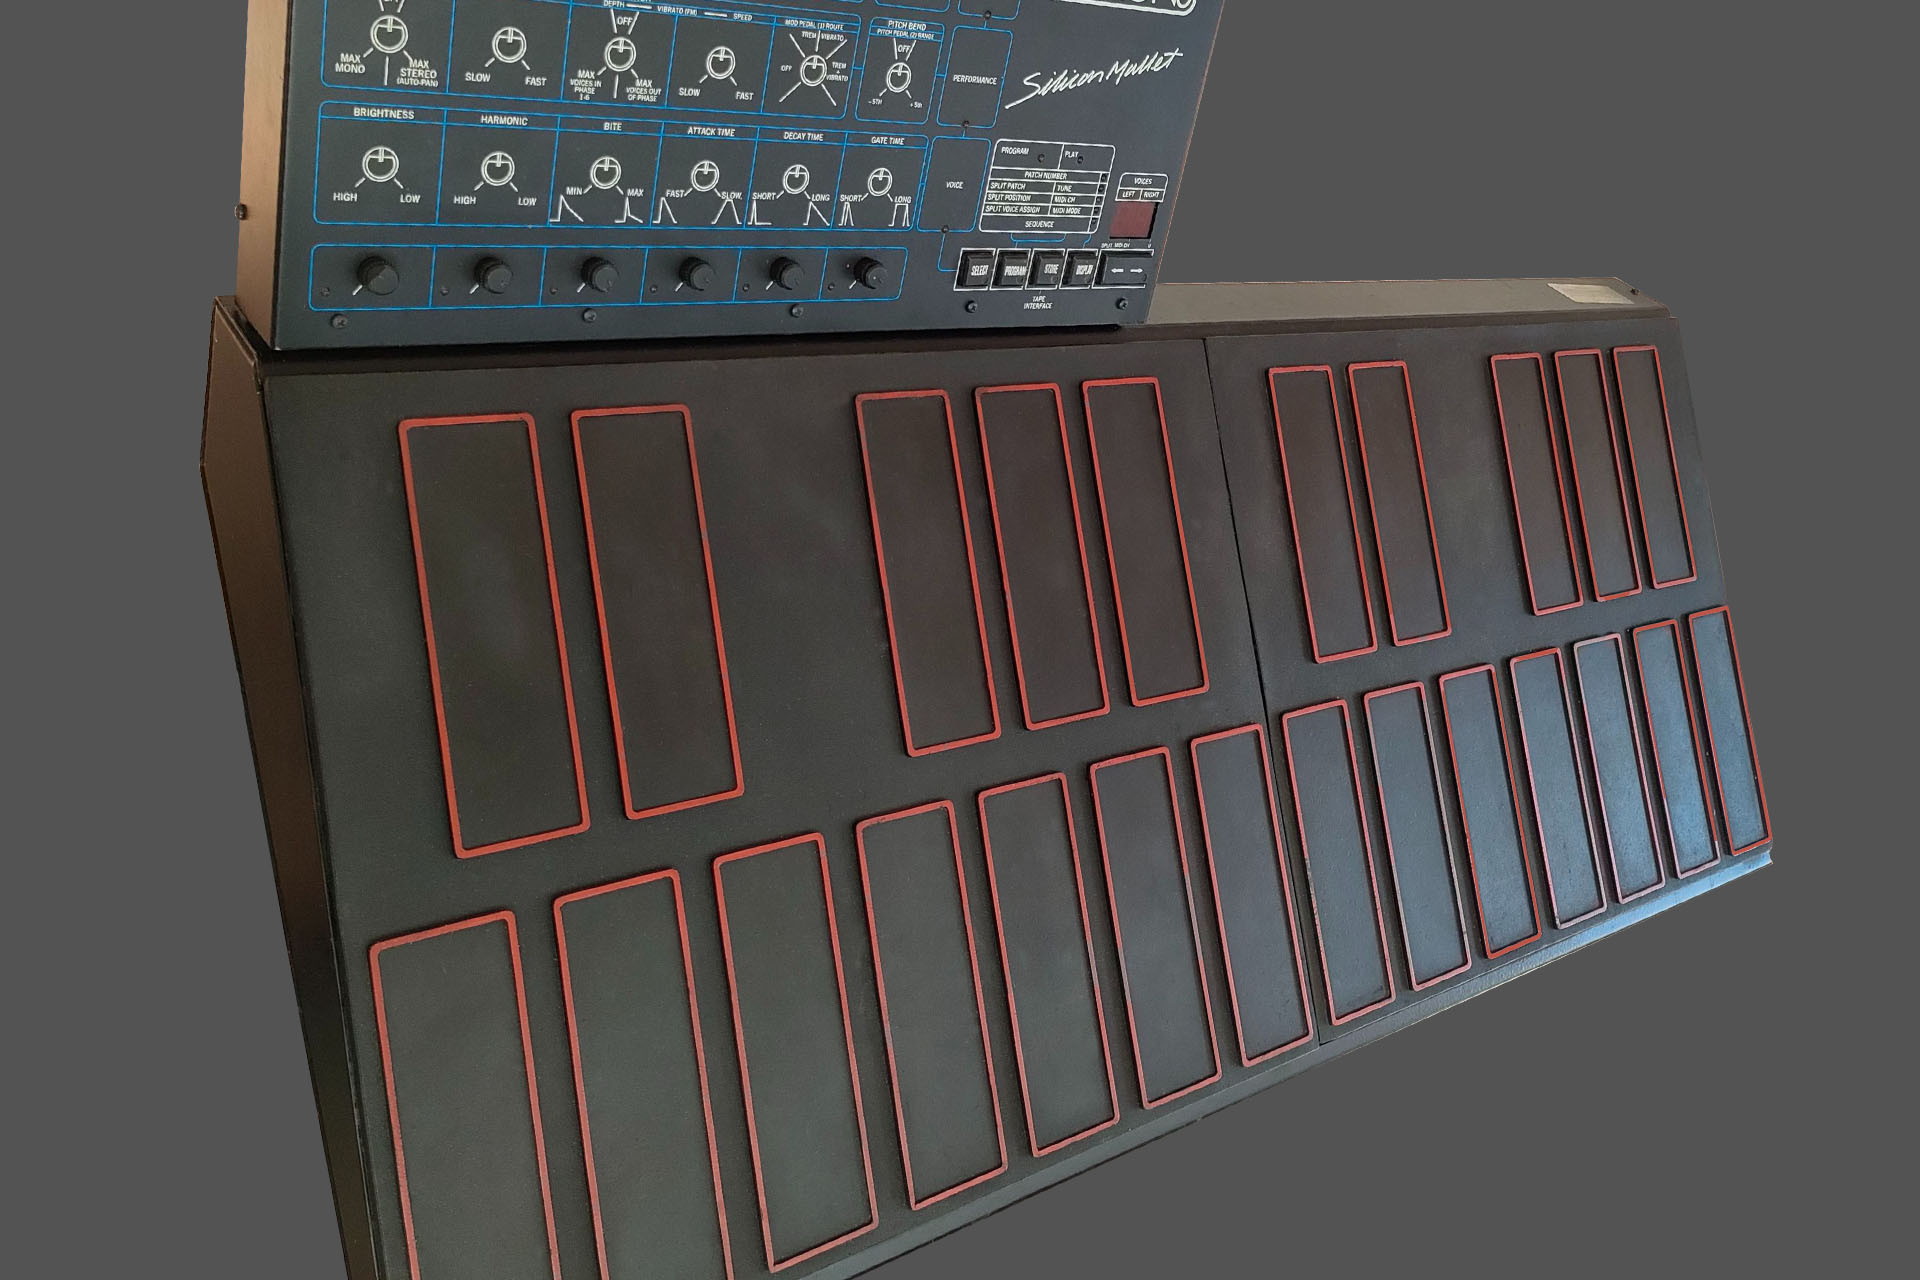
The first FSR based instrument to be developed by the company was the Silicon Mallet, a 2-octave mallet played instrument with FM synthesis-based voicing.
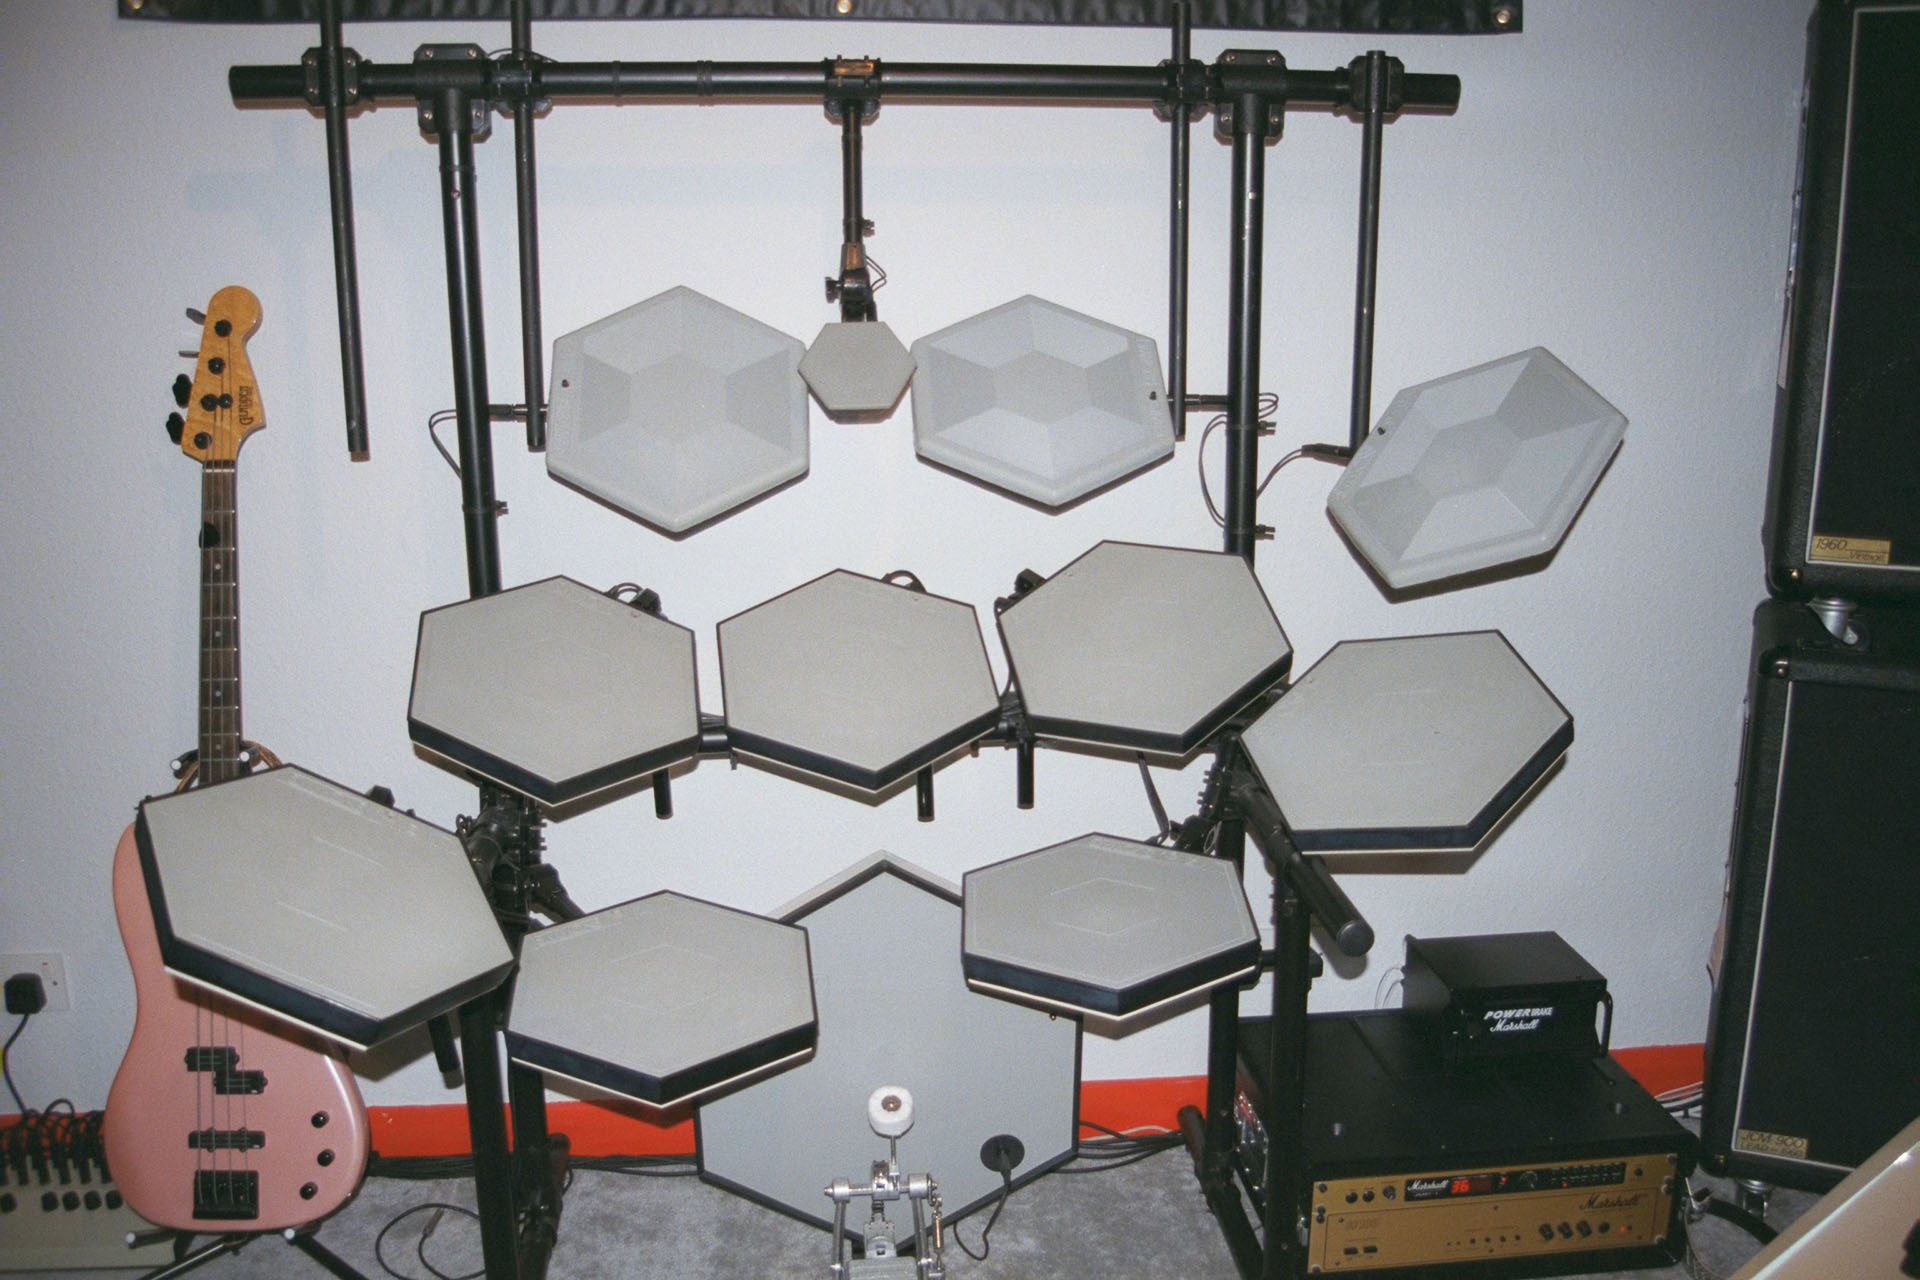
Then, in 1987 came the second instrument from Simmons to feature FSR triggering, the famous and truly impressive SDX which used ‘zone intelligent’ (or ZI) pads. Oh wow, I really enjoyed those days.
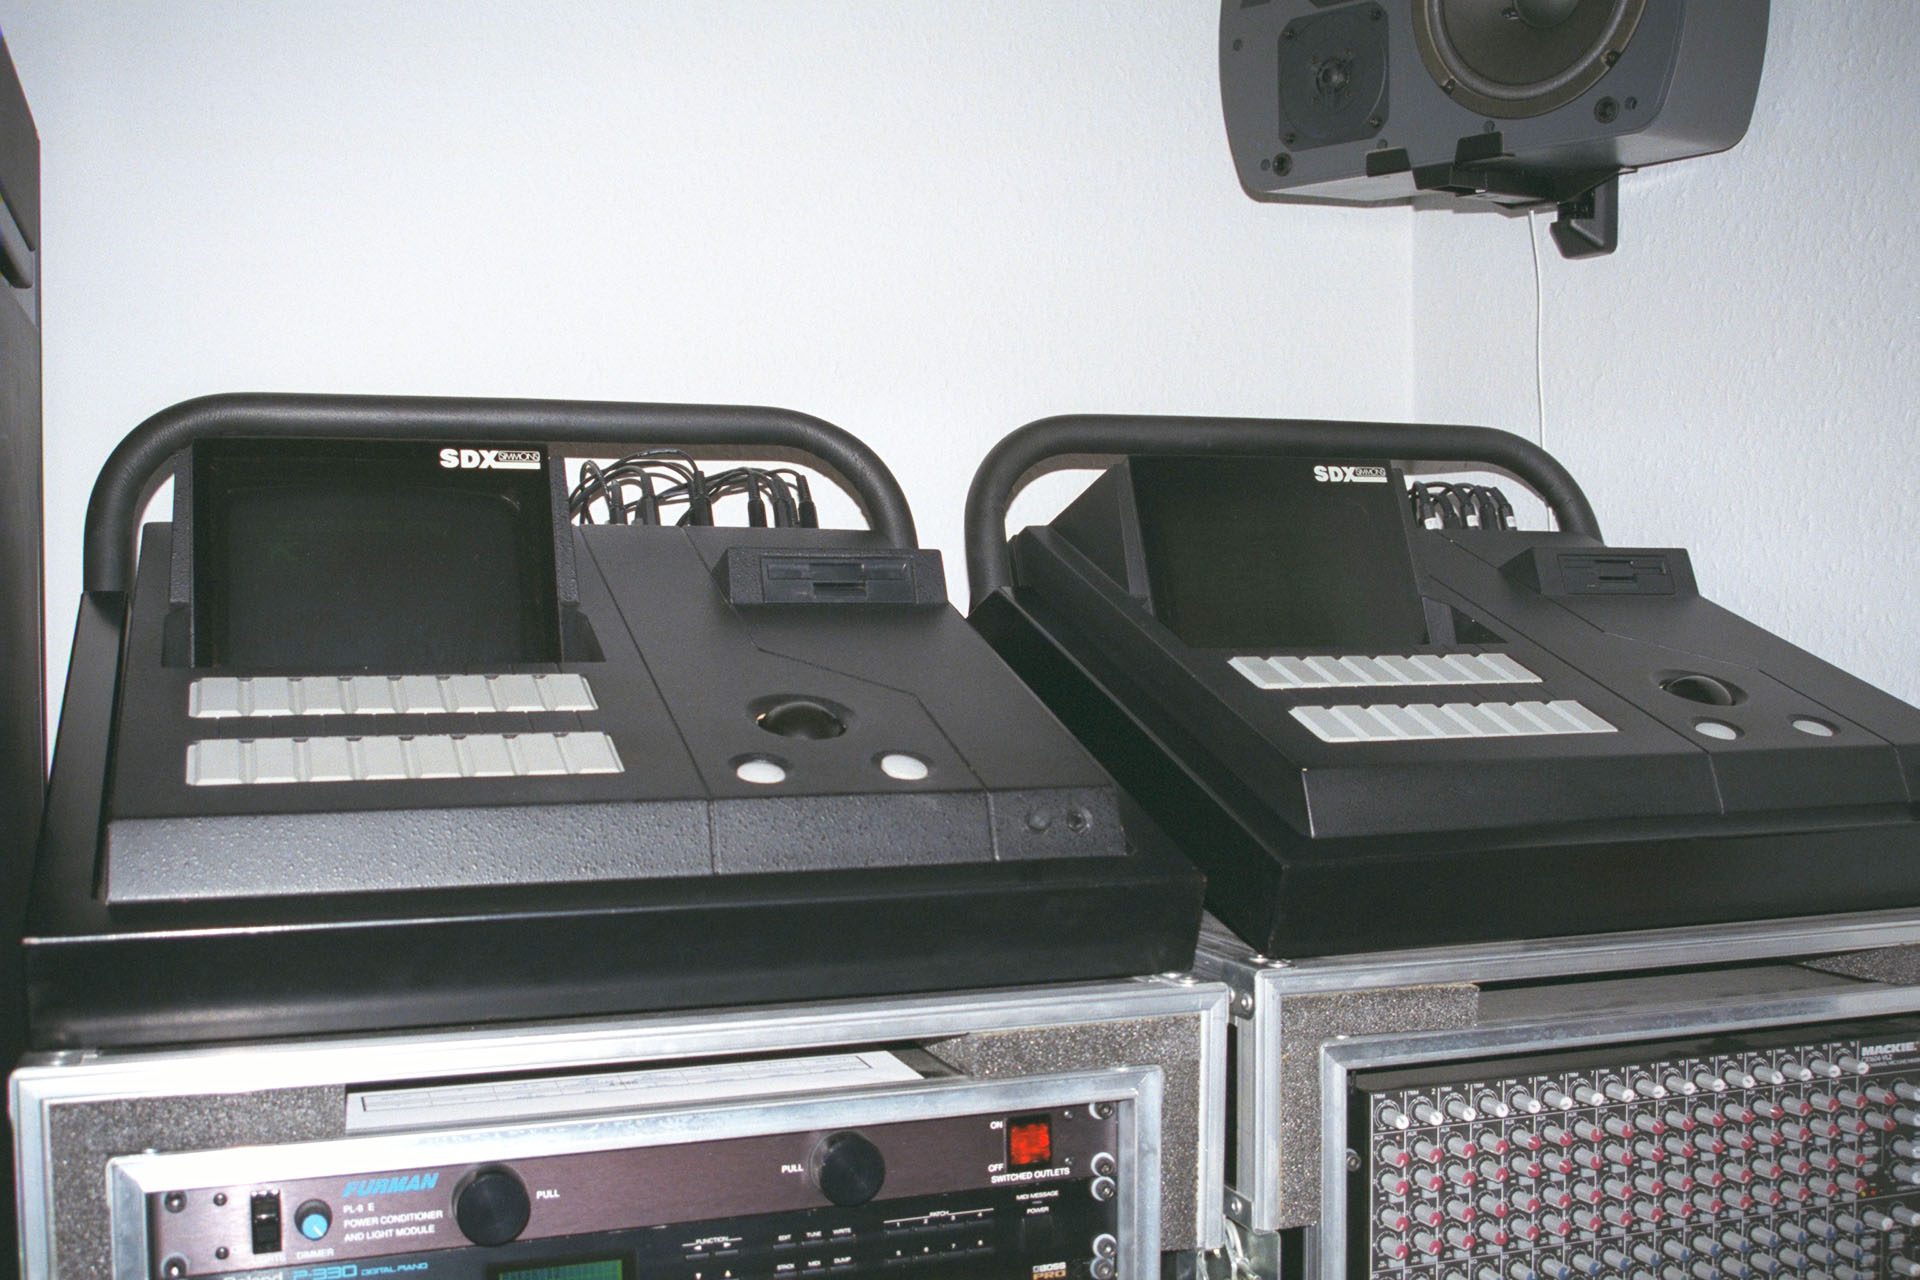
Way too expensive at the time, Simmons simply wasn't able to incorporate FSR technology into it's other range of electronic drum and percussion products. I don't know, perhaps Dave had a long-term plan but well... not today. Although hugely powerful, at over 13,000 GBP (in 1987), the SDX wasn't exactly a big seller. External circumstances like the stock market crash in October '87, the cost of development of the SDX and challenging SDX sales, bust the company so there wasn't exactly much point in thinking to replace piezo sensors with FSRs, anyway! 🙁
Fortunately, FSRs have come a long way since the late eighties. Today, FSR sensors are nicely sealed units and don’t have to be ‘assembled’ by the end user in hermetically sealed environments. Yeah, that bit was a real pain. The smallest bit of dust could render a pad useless.
FSRs have been used as aftertouch sensors in instruments for a while now. As perhaps Dave Simmons had originally intended, FSRs have also replaced the old piezo triggers in some manufacturers' electronic drum pads. Being very aware of this and what with my experience from my days with Simmons, for the past couple of years, I’ve been meaning to test some FSRs to see if they can be used to make a replacement aftertouch sensor for the Roland JX-8P and possibly other older instruments.
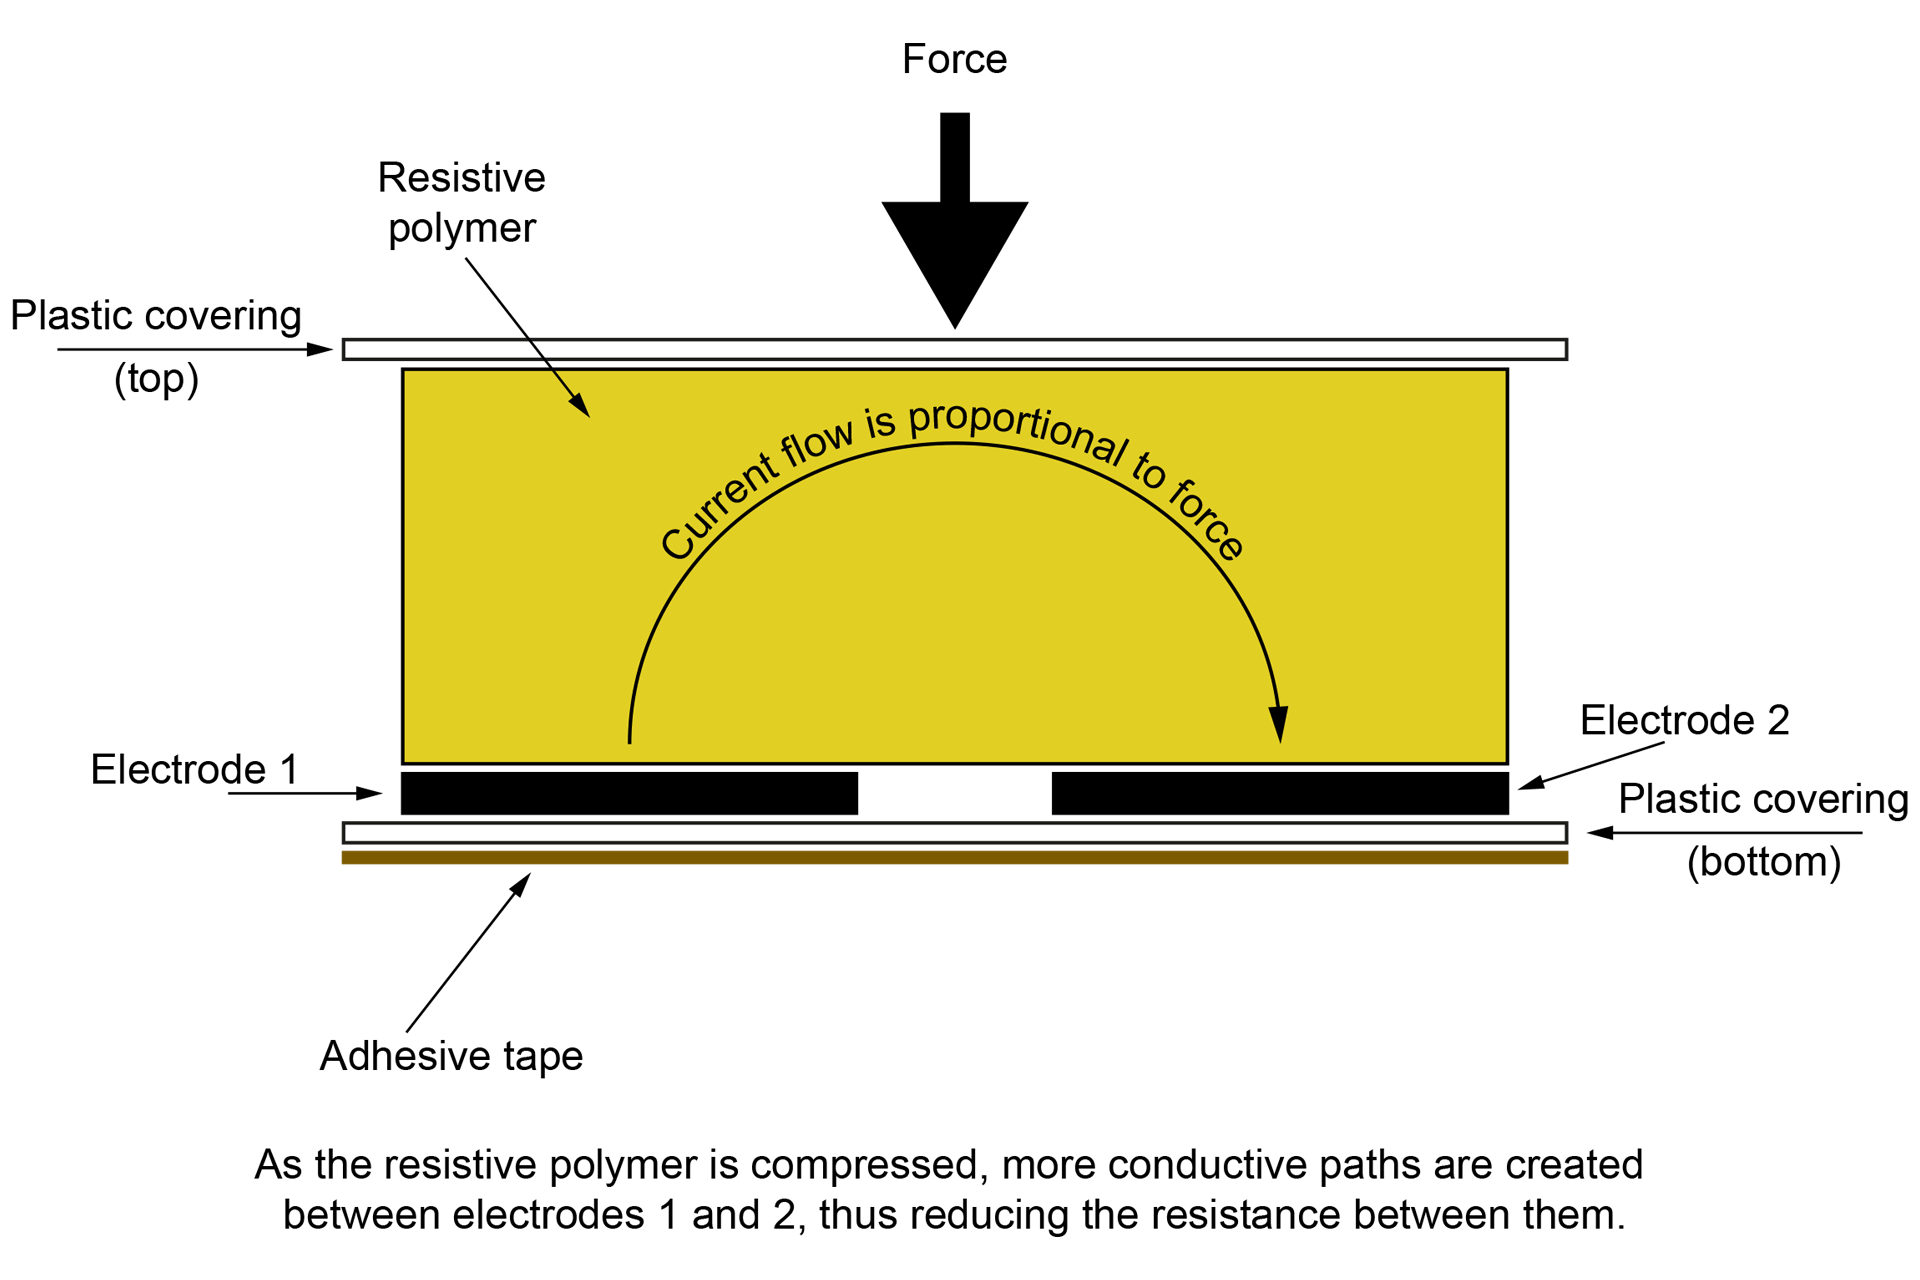
Being basically refined versions of the type of carbon-track sensors that Roland originally used but delivering a lot more dynamic range as well as other benefits, FSRs are perfect for this kind of application. In fact, modern aftertouch sensors and even some drum pads use FSRs. The principle is the same but the resistive polymer material is of a modern composition and the manufacturing process makes FSRs considerably more robust and reliable than previous pressure sensors.
Of course you can’t just use any FSR. The first obvious challenge is finding something that's close if not exactly the same dimensions as your original aftertouch strip. Unlike those old sensor assemblies, modern FSRs are very thin. Also, being incredibly more sensitive, oversensitivity may have to be considered and it may even be necessary to add buffering, attenuation or amplification circuitry. Try to keep it simple, right?
Well, stuff all that! For test purposes, I was able to use off-the-shelf devices which worked just great. I was so pleased. The next challenge was how to attach readily available sensors to the JX-8P keyboard chassis and retain the feel (or better it) of the original keyboard.
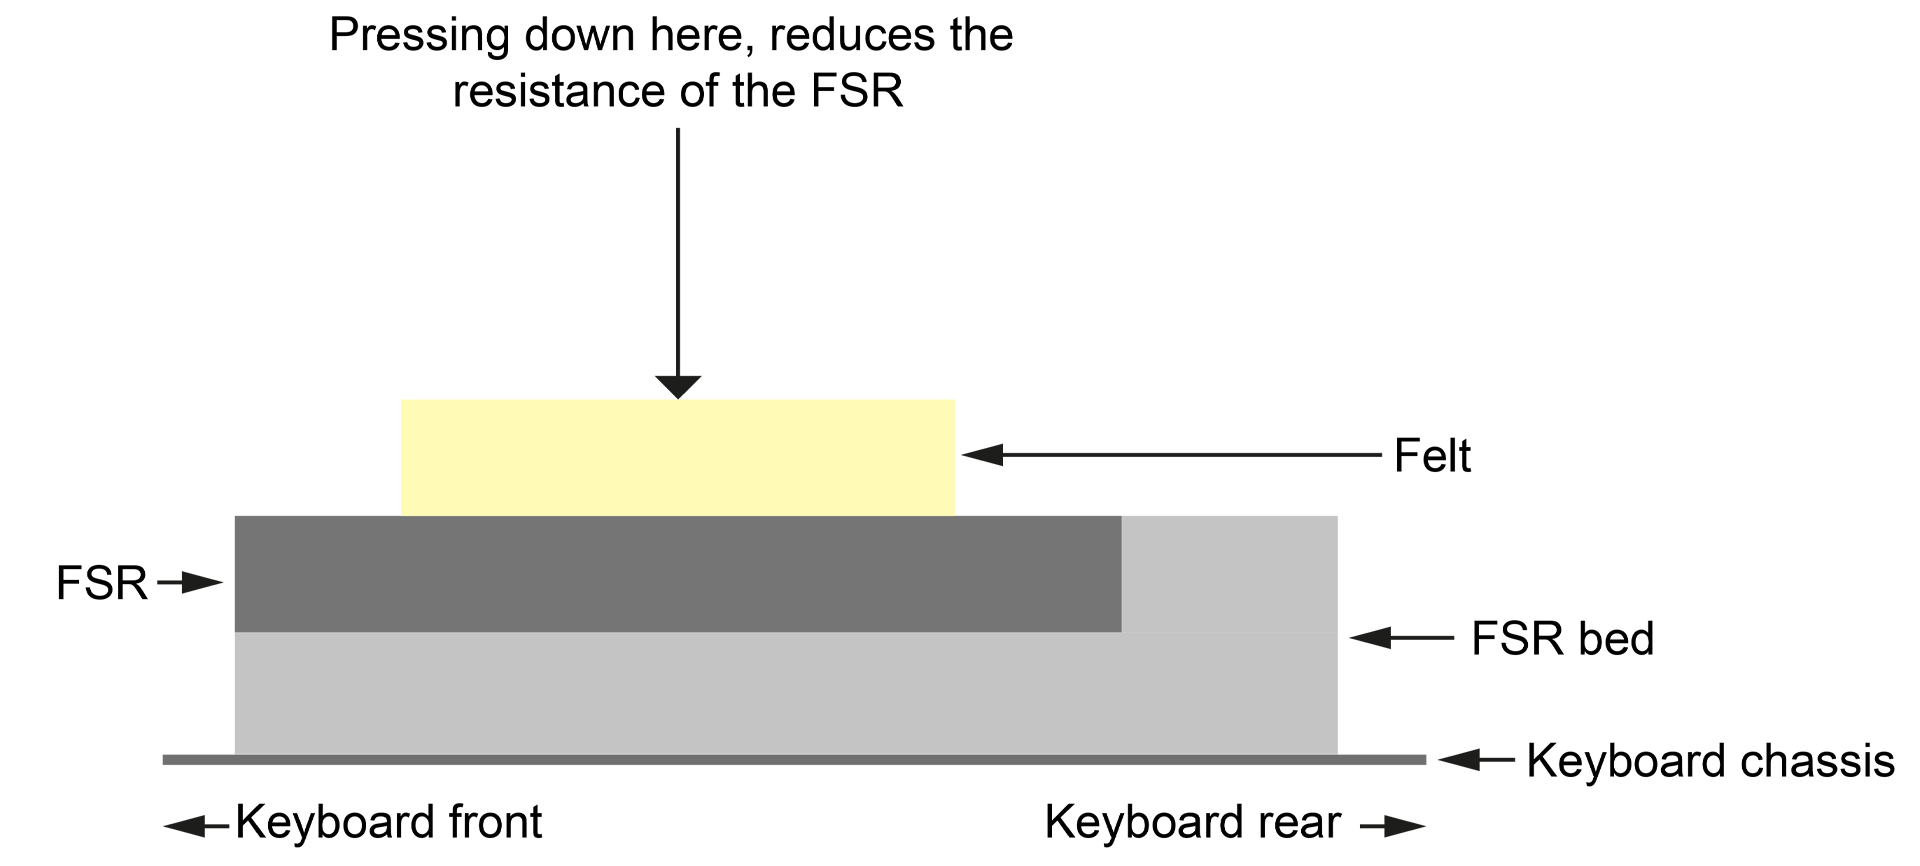
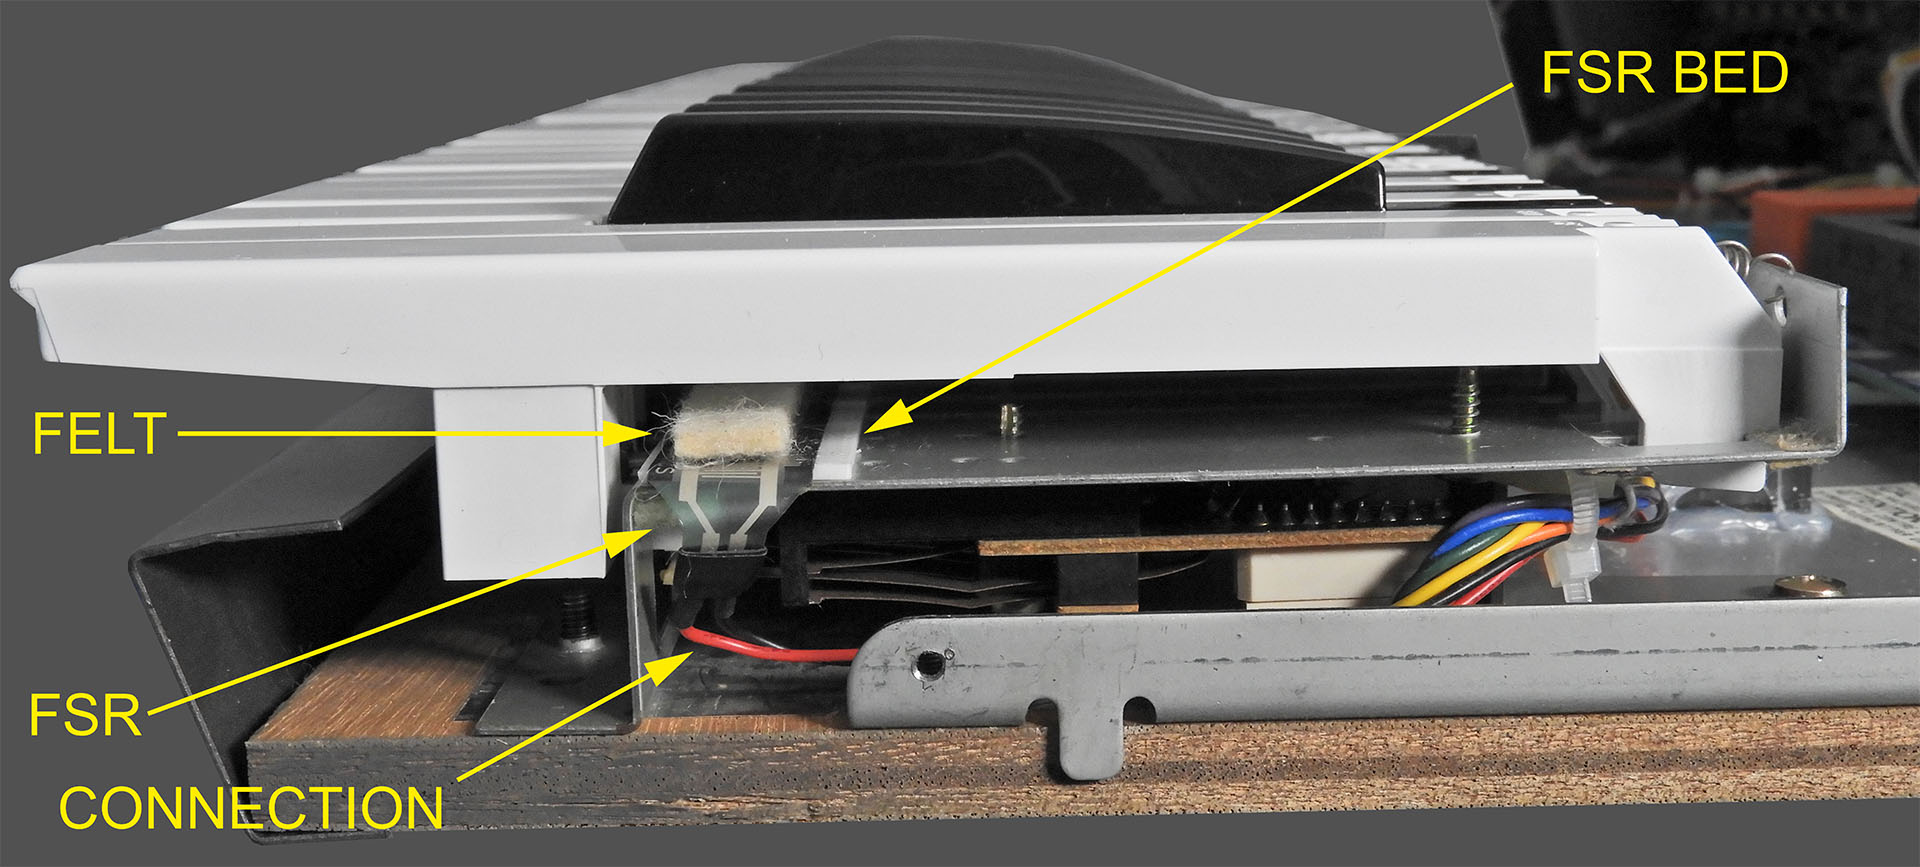
After messing about with a whole bunch of FSRs to get my replacement aftertouch sensor for the Roland JX-8P working properly, I ended up covering the FSRs with a layer of rubber and then a layer of felt. The felt reduces mechanical noise produced when the keys finish their travel. If it wasn't there, hitting the keys would be err... noisy! When fitting the sensor assembly, proper alignment is crucial, so as to ensure a uniform aftertouch response across all keys. After putting things back together, I was delighted that my simple assembly delivered a lovely physical feel to the keys, something I was quite concerned about. The whole exercise would have been a waste of time if the keyboard didn't feel right.
Compared to the old Roland sensor strip, my replacement aftertouch sensor for the Roland JX-8P comprises only three components instead of five, there are no exposed copper strips that'll oxidise and FSRs make the the system considerably more reliable. Theoretically, this should be an install and forget replacement.
The dynamic range of the FSR-based sensor is considerably more than that of Roland's first generation aftertouch transducer. Hence, on the first two prototypes, I deliberately positioned my new sensor so that the effective FSR area sat slightly more forward (towards the front of the keys) than the original device. The increased sensitivity of the new sensor was thereby compensated by the slight increase in pressure required to generate an aftertouch signal.
Hey, if you prefer increased sensitivity, then carry on reading 'cos this design has a little trick up its sleeve.
So I've made reference to FSRs (plural) and not FSR (singular). I think I've hinted that finding a single transducer that would run the length of a 61-note (let alone a 76-note or even 88-note) keyboard is virtually impossible. I did however, find a transducer that would run more than half the length and so I tried using two. Guess what, that idea worked too.
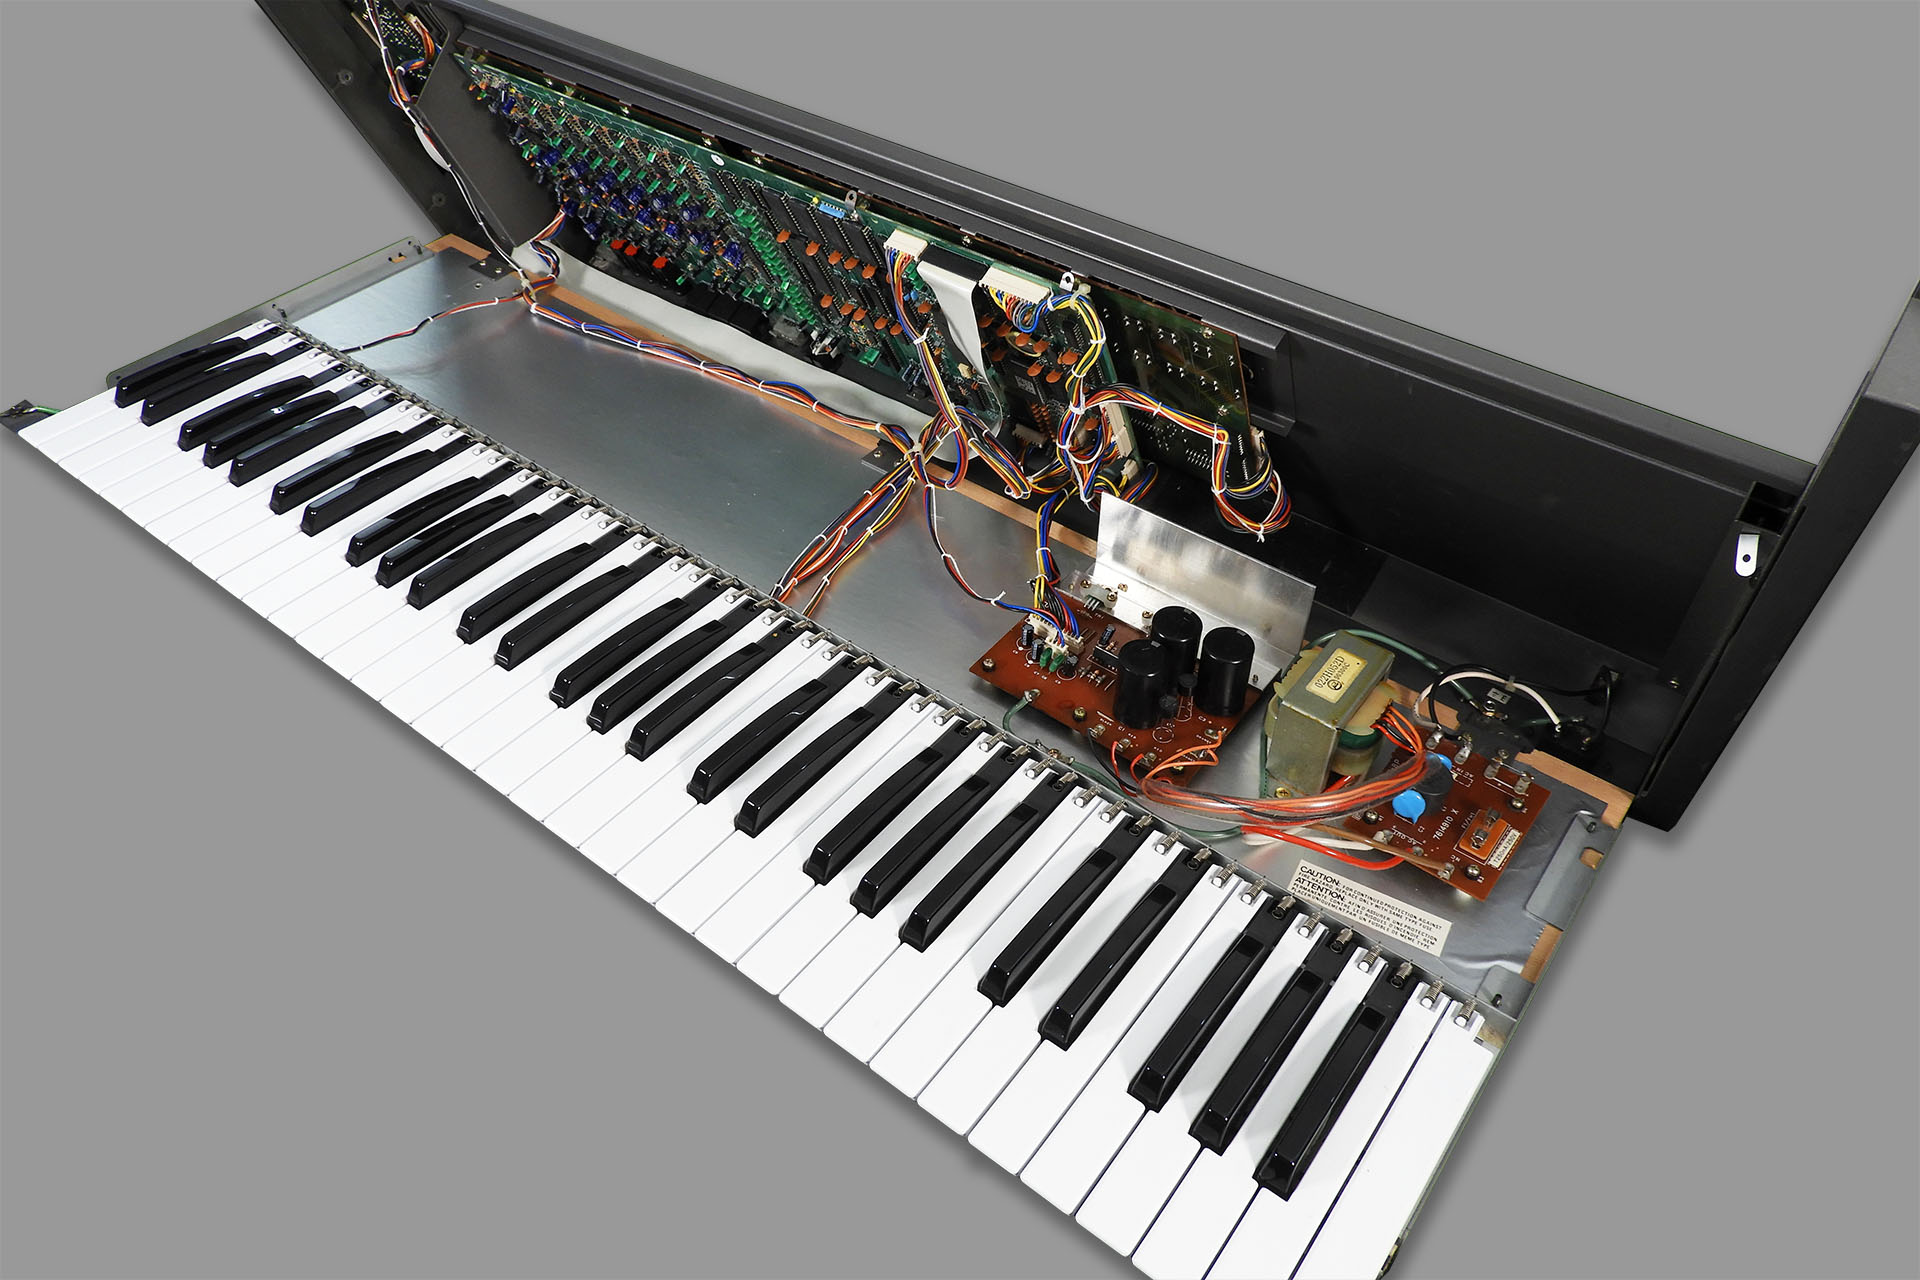
Opening the JX-8P requires the removal of three screws on each end cheek and two screws from underneath the instrument, towards the pitch-bend assembly. In the rather familiar but still elegant manner and indeed similar to many eighties keyboards, the top chassis folds up and back as it's hinged at the rear of the instrument, to the wooden base.
It's unfortunate that the keyboard chassis has to be removed and fully disassembled but considering what the aftertouch sensor does and where it is, it kinda makes sense. More importantly, further on down in this post, I write about removing the glue that was used to attach the Roland aftertouch strip to the keyboard chassis. That's a real task and I wouldn't want to do that with the keyboard chassis inside the JX-8P, to be honest.
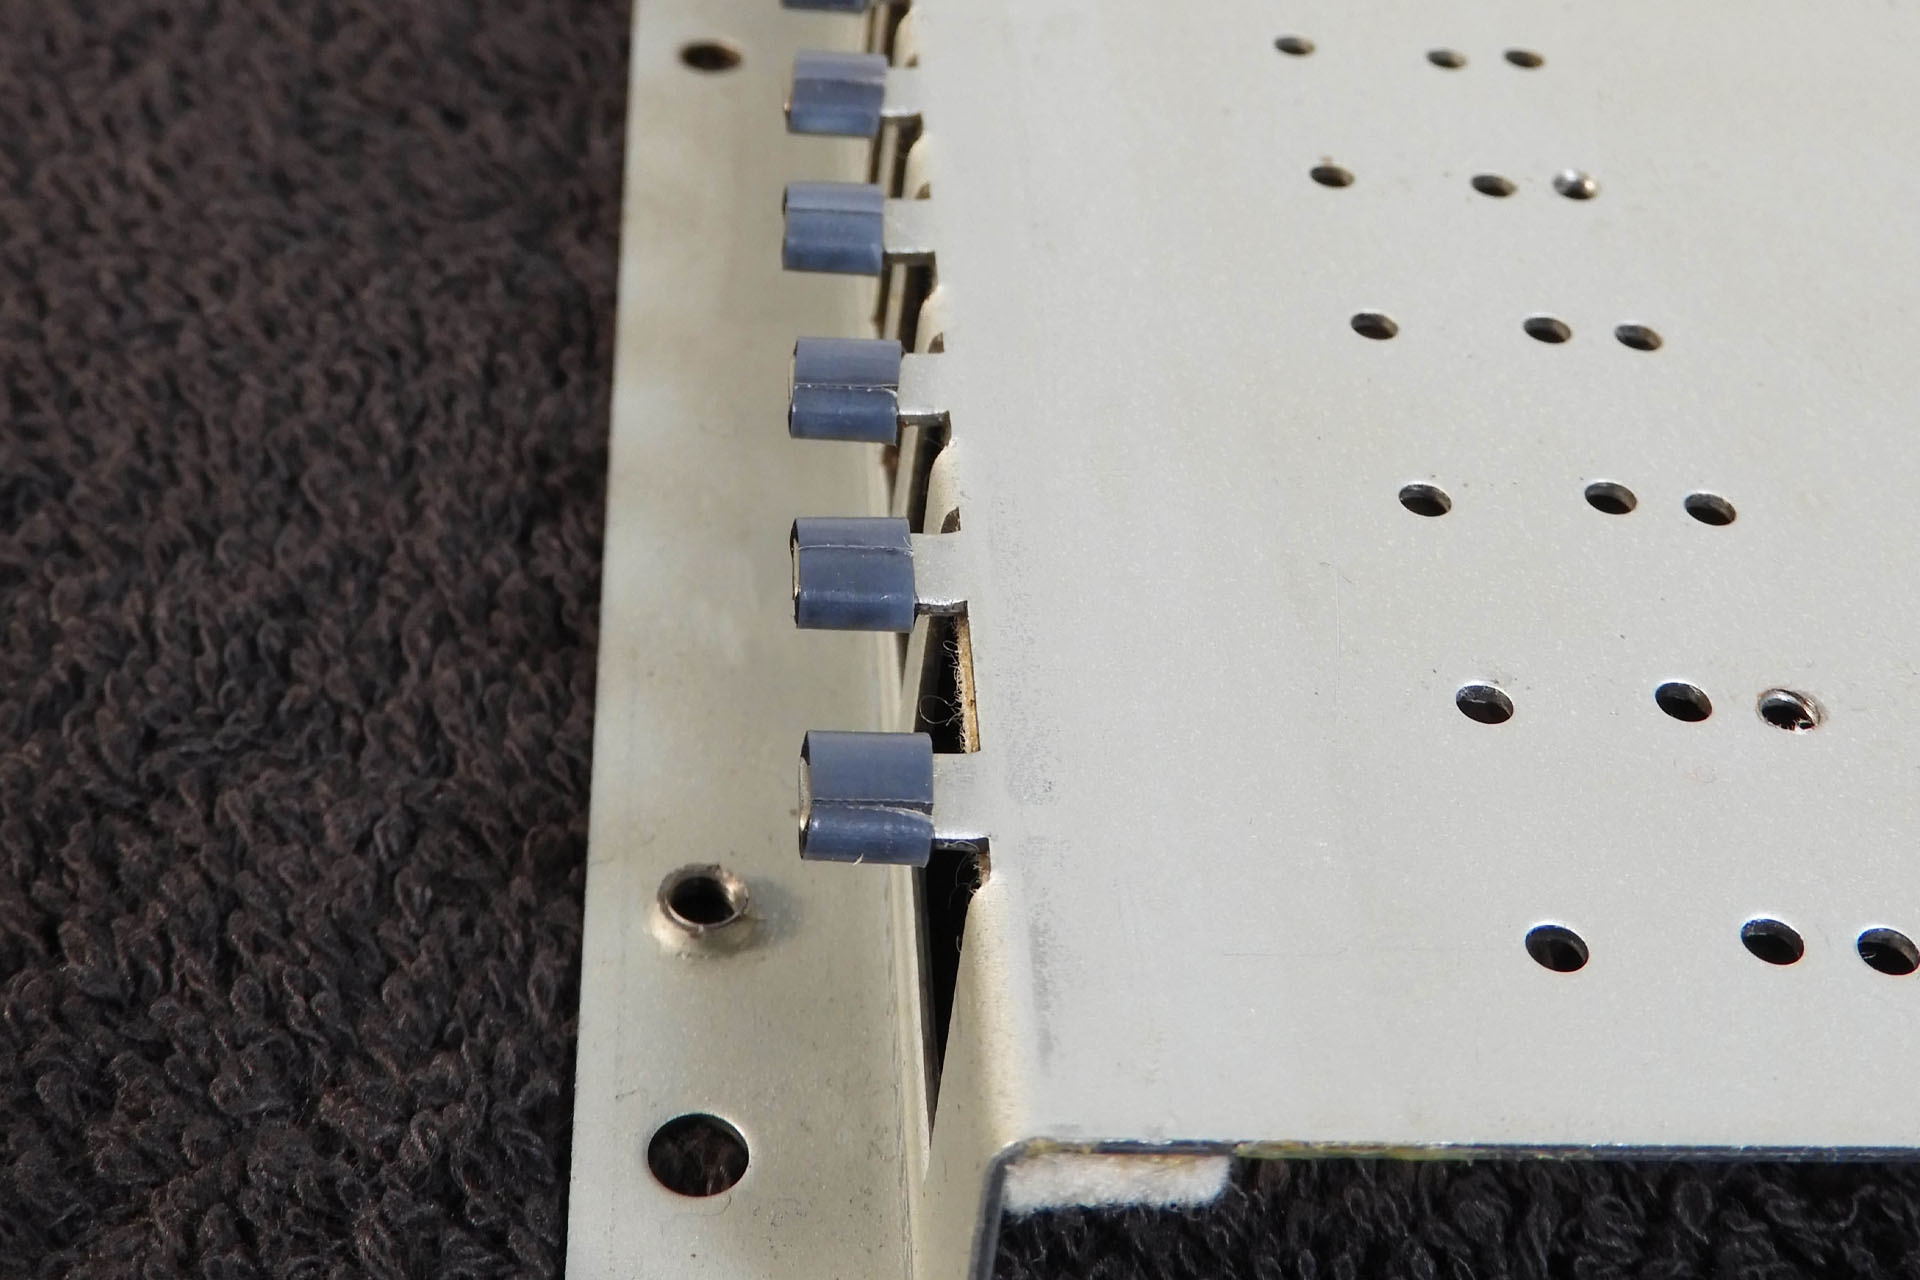
There's a plastic strip running the length of the keyboard, that's underneath and at the back of the keyboard chassis that helps secure the keys. If it wasn't there, the keys would only be held in place by a small spring and could easily be pulled forward.
To remove the whole strip, you have to remove four cable-tie binding points. To remove the cable-tie binding points, you have to remove the contact boards (yes, there are two in the JX-8P). What could have been a quick job, is now going to take a little longer.
Yes, there is a cheat for this but I wanted to work on the bare metal chassis without concern about anything else.
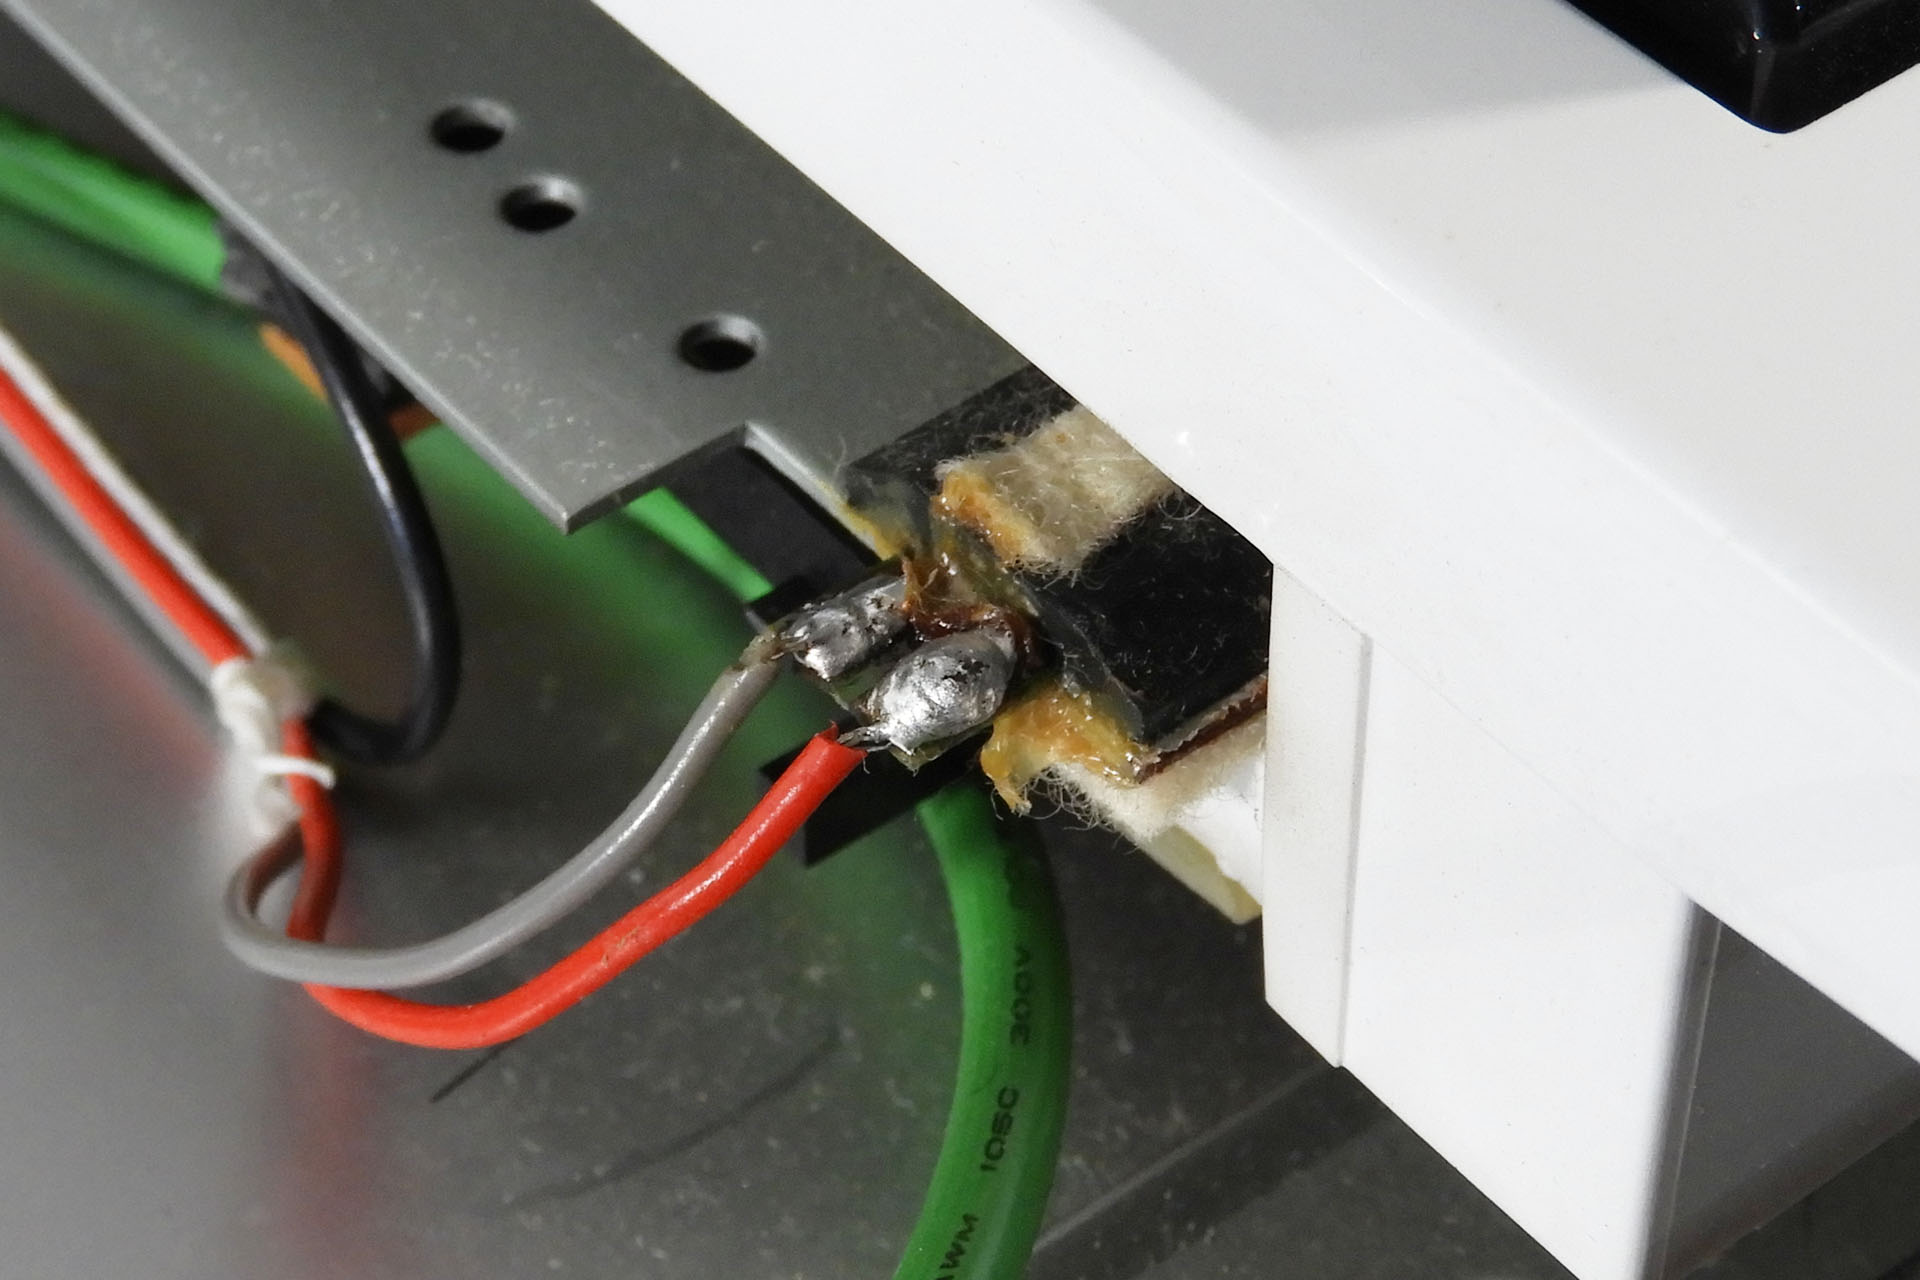
It’s easy enough to desolder the two connections between the original aftertouch strip and the pitch-bend assembly PCB but I would recommend just cutting them. The type of wire Roland used doesn't even need tinning.
My replacement aftertouch strip is secured with double-sided adhesive tape and so after removing the original strip, the top of the chassis MUST be fully and properly cleaned, prior to attaching the replacement sensor. This is a long and tedious job so I had a lot of coffee and biscuits on the side.

Since I was working on the bare metal chassis, I wasn't worried about experimenting with various chemicals and methods to remove the residual double-sided tape, glue and other gunk. I found that DW-40, helped loosen it up a bit. Next it was long and strong finger-nail time, as I scraped off the leftover glue. A dirty and slightly painful job, I'm afraid. Once satisfied that the bulk of the glue had been removed, I used IPA, heavy-duty tissue and an old toothbrush, to get rid of all hints of glue and WD-40. It wasn't just a case of wanting things to look nice. It's really important to do this as the new aftertouch assembly simply won't adhere to the chassis if it's greasy.
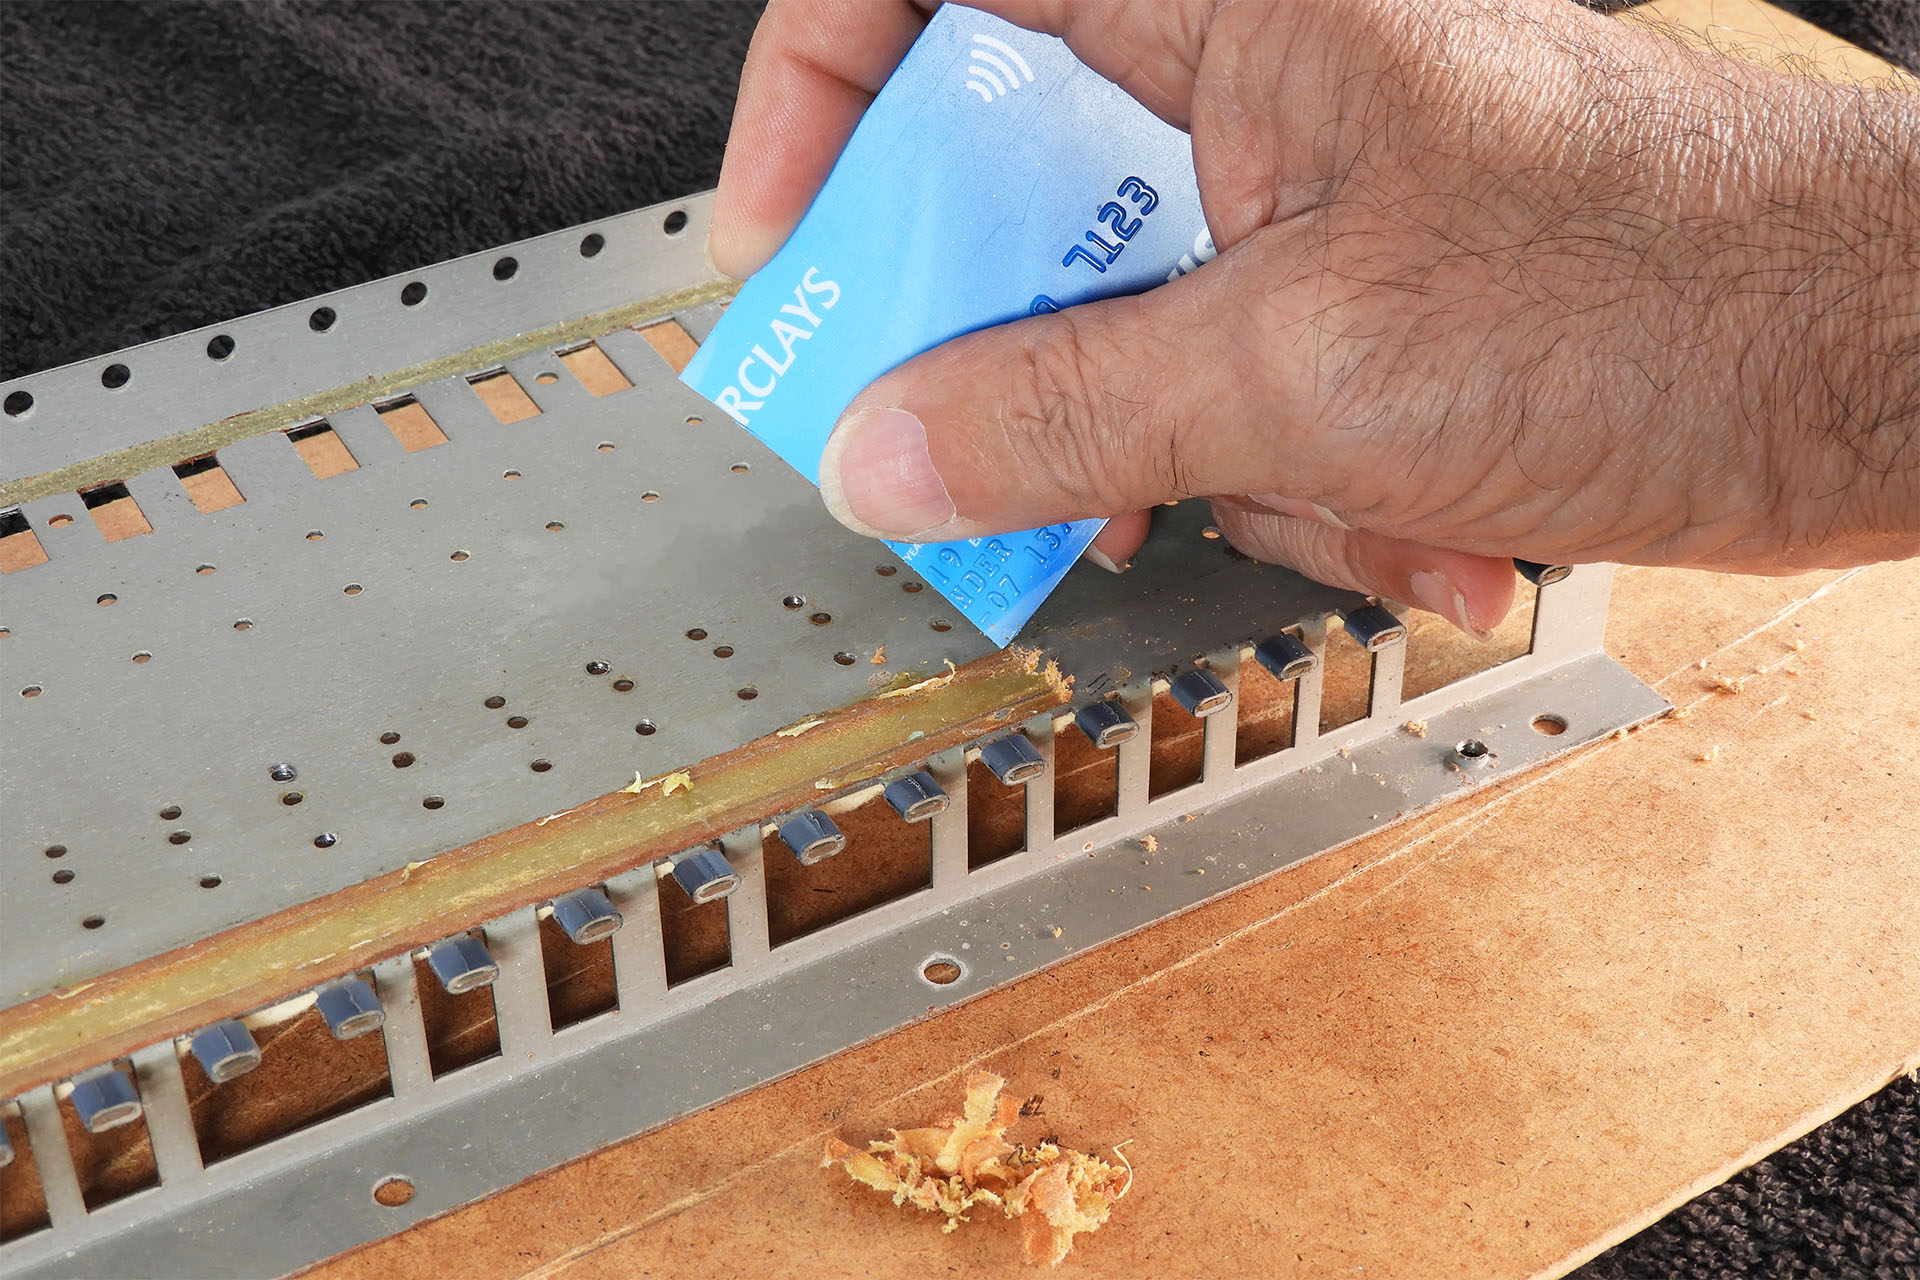
Although I didn't find a shortcut to getting rid of the old Roland glue, when I installed my second replacement JX-8P aftertouch sensor, I decided to use the cut edge of an old credit card. Yeah, I know but they do come in really handy. Clearing a millimetre of glue at a time, the process was just as tedious so you're still going to need the coffee and biscuits but... it was a lot less messy and one could argue that with less clearing up to do afterwards, it was a little quicker.
The theory of replacing the original pressure sensor with a FSR-based system worked first time on my prototype. There were however, some interesting physical challenges and well, life's just boring without challenges, right? 🙂
The original Roland sensor is a single device with terminals on the left-hand side. I used two FSRs and the right-hand FSR terminals would somehow have to be folded and connected. Of course, there’s very little room between the right side of the keyboard chassis and the inside of the right cheek, for example. “Not a problem” I thought. “With so much space underneath the keyboard chassis, I’ll just run my connecting wires there”… I thought.
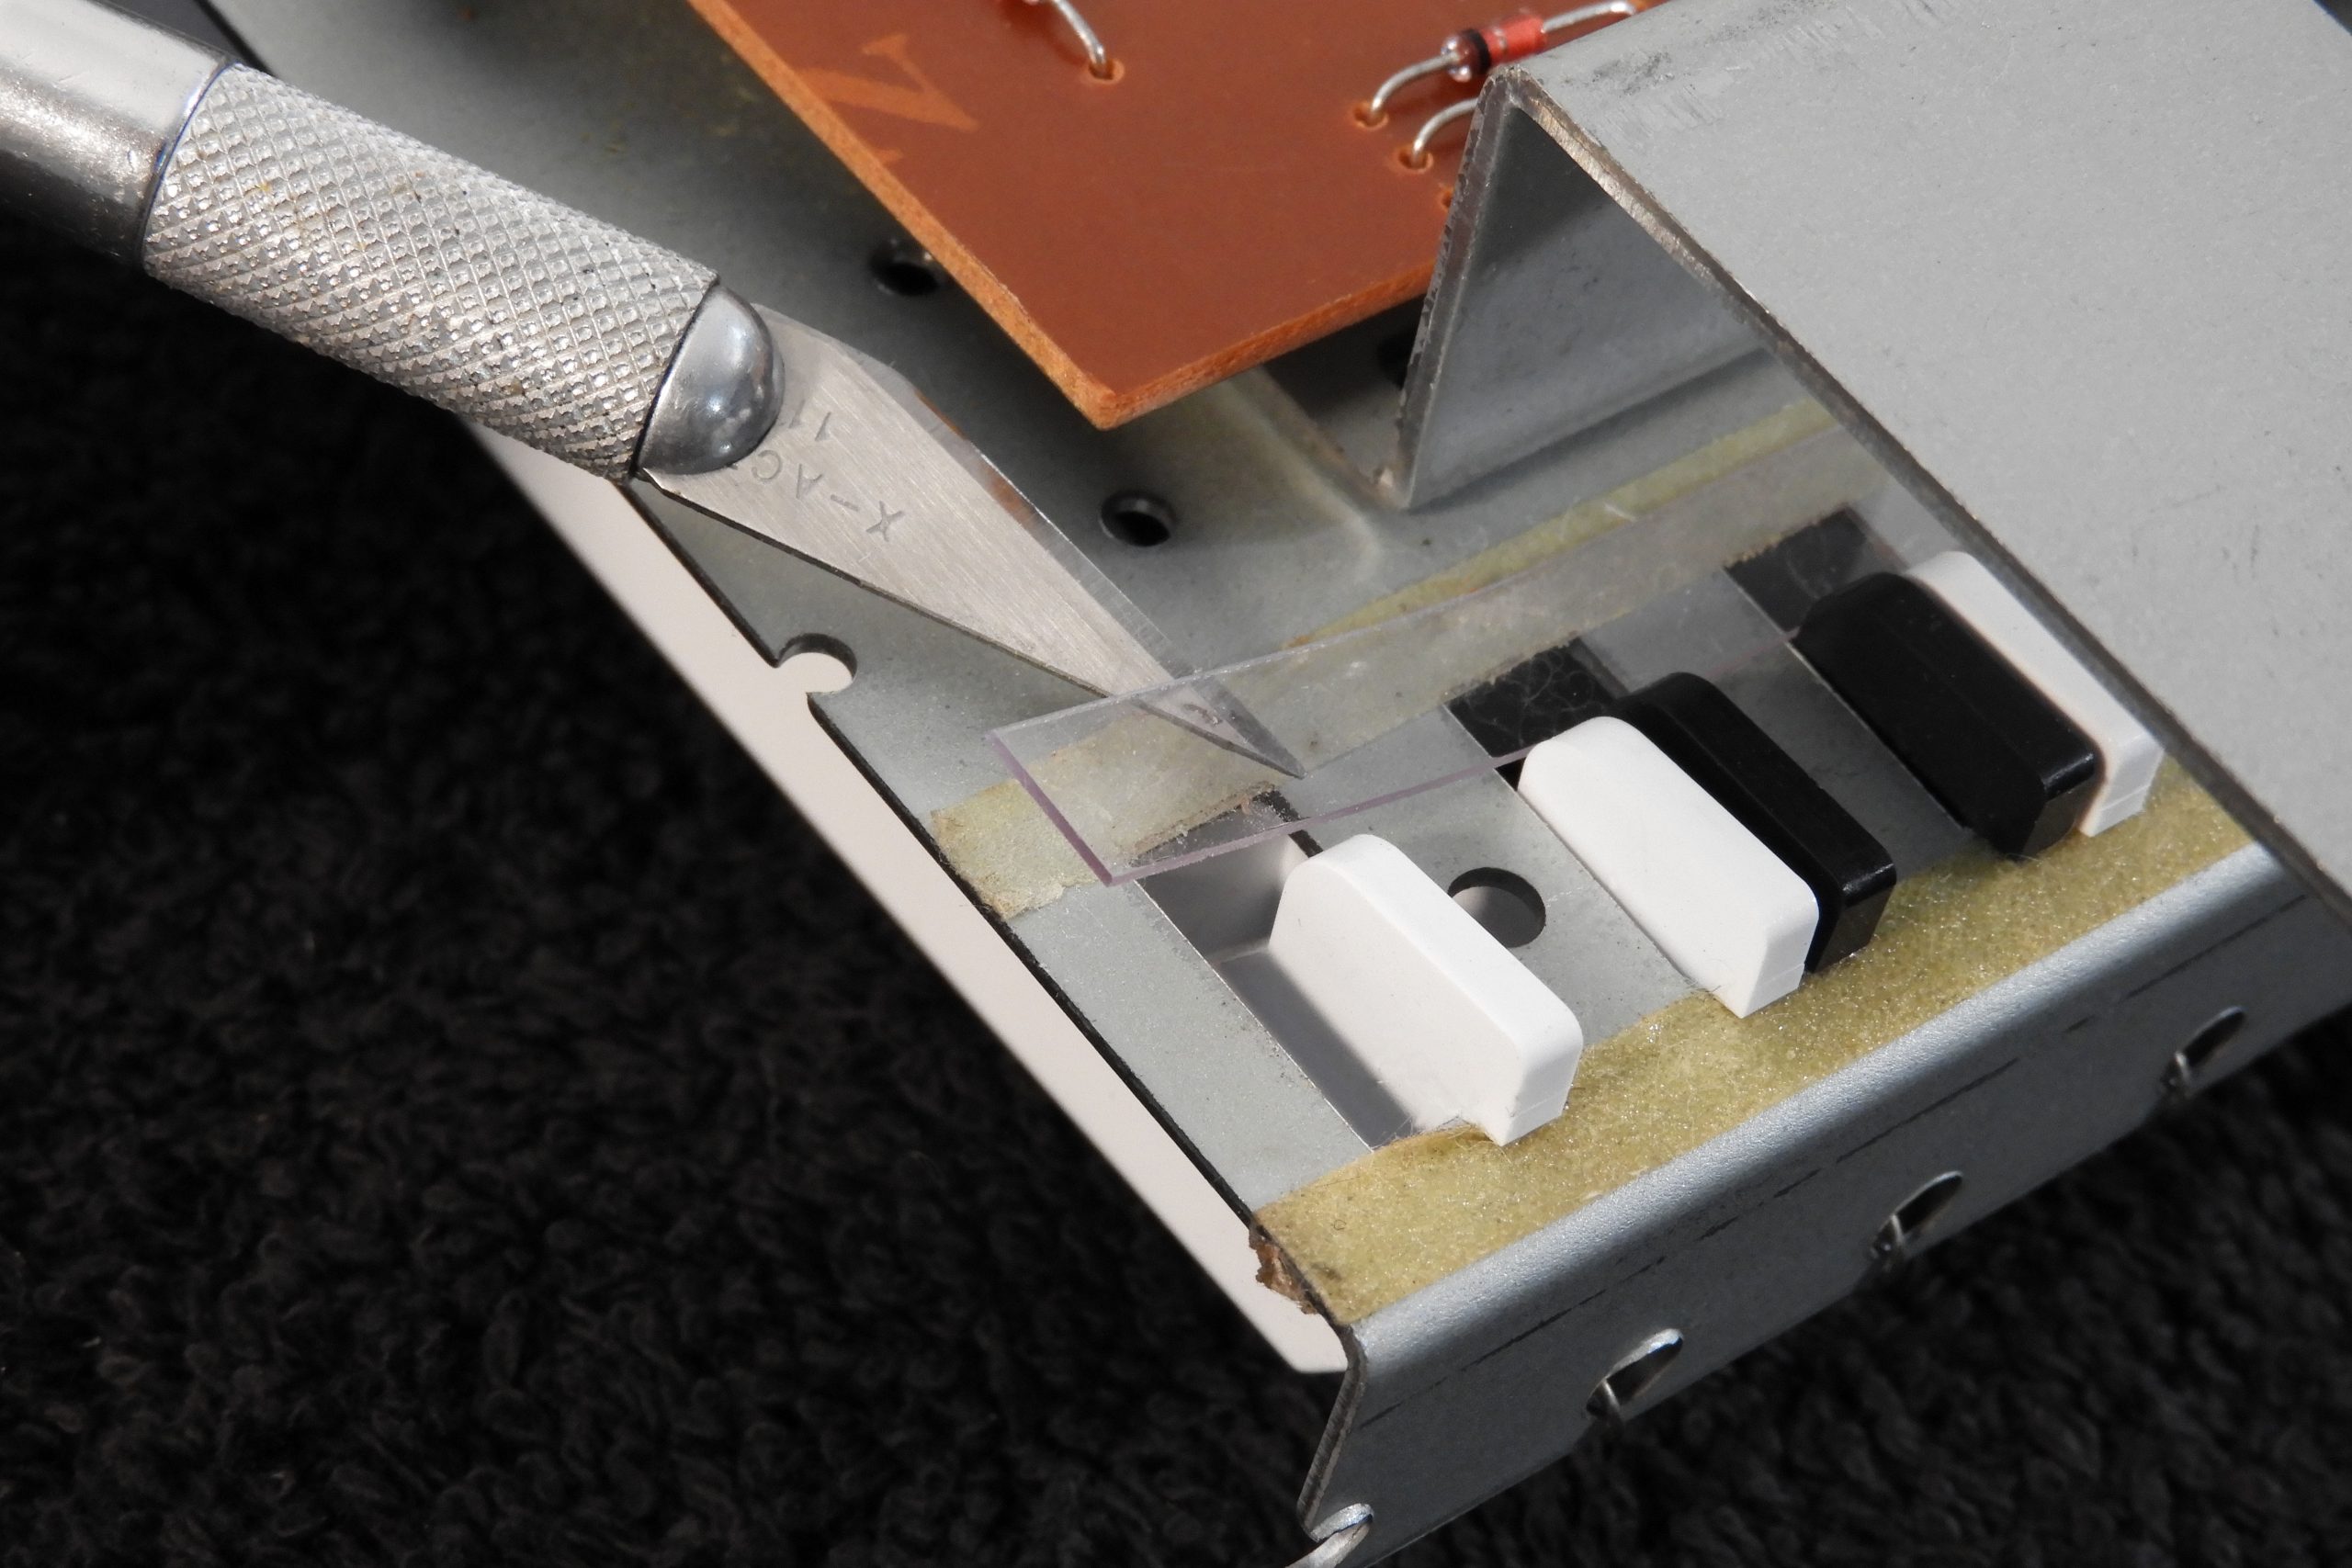
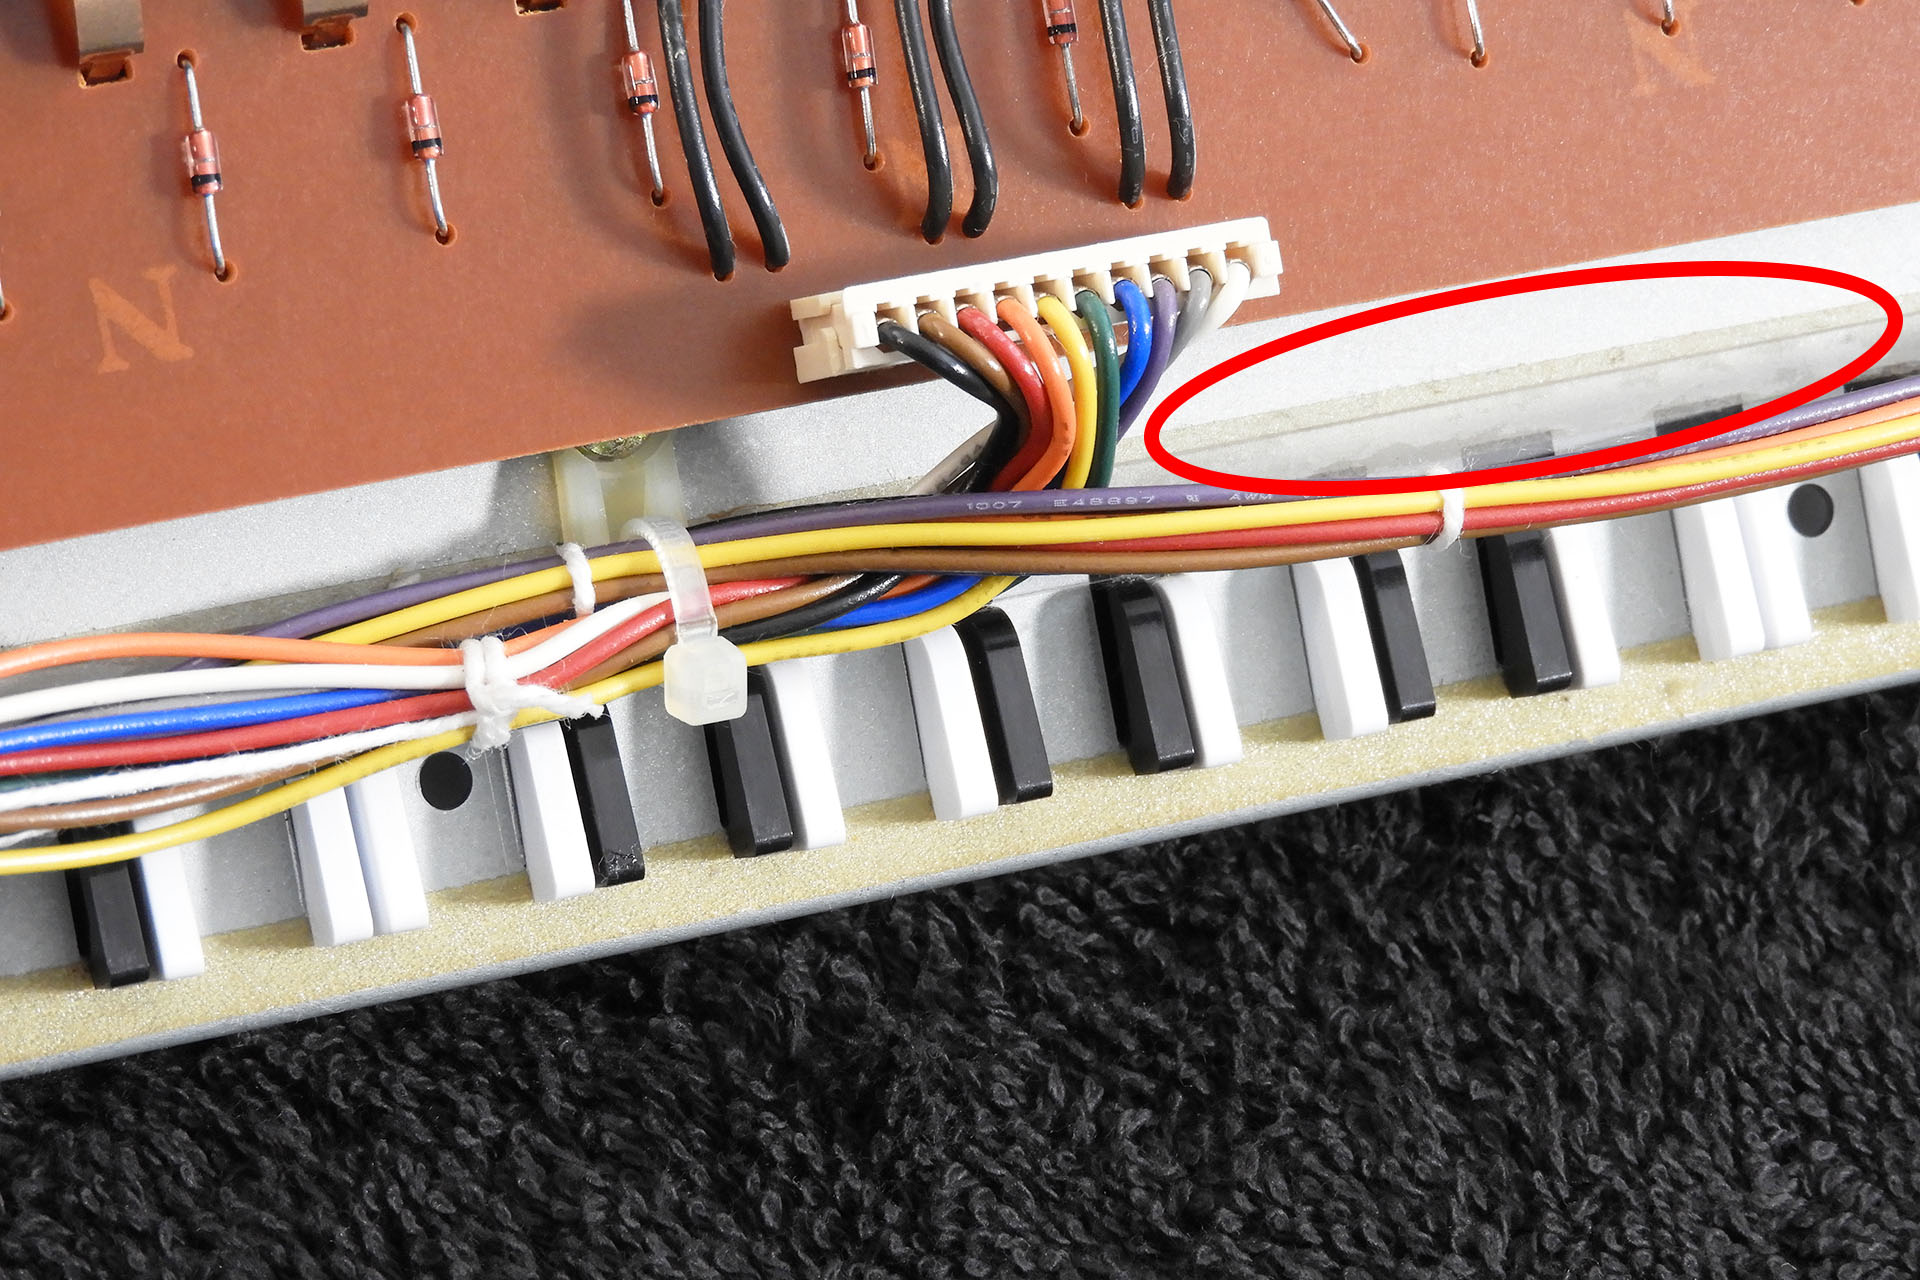
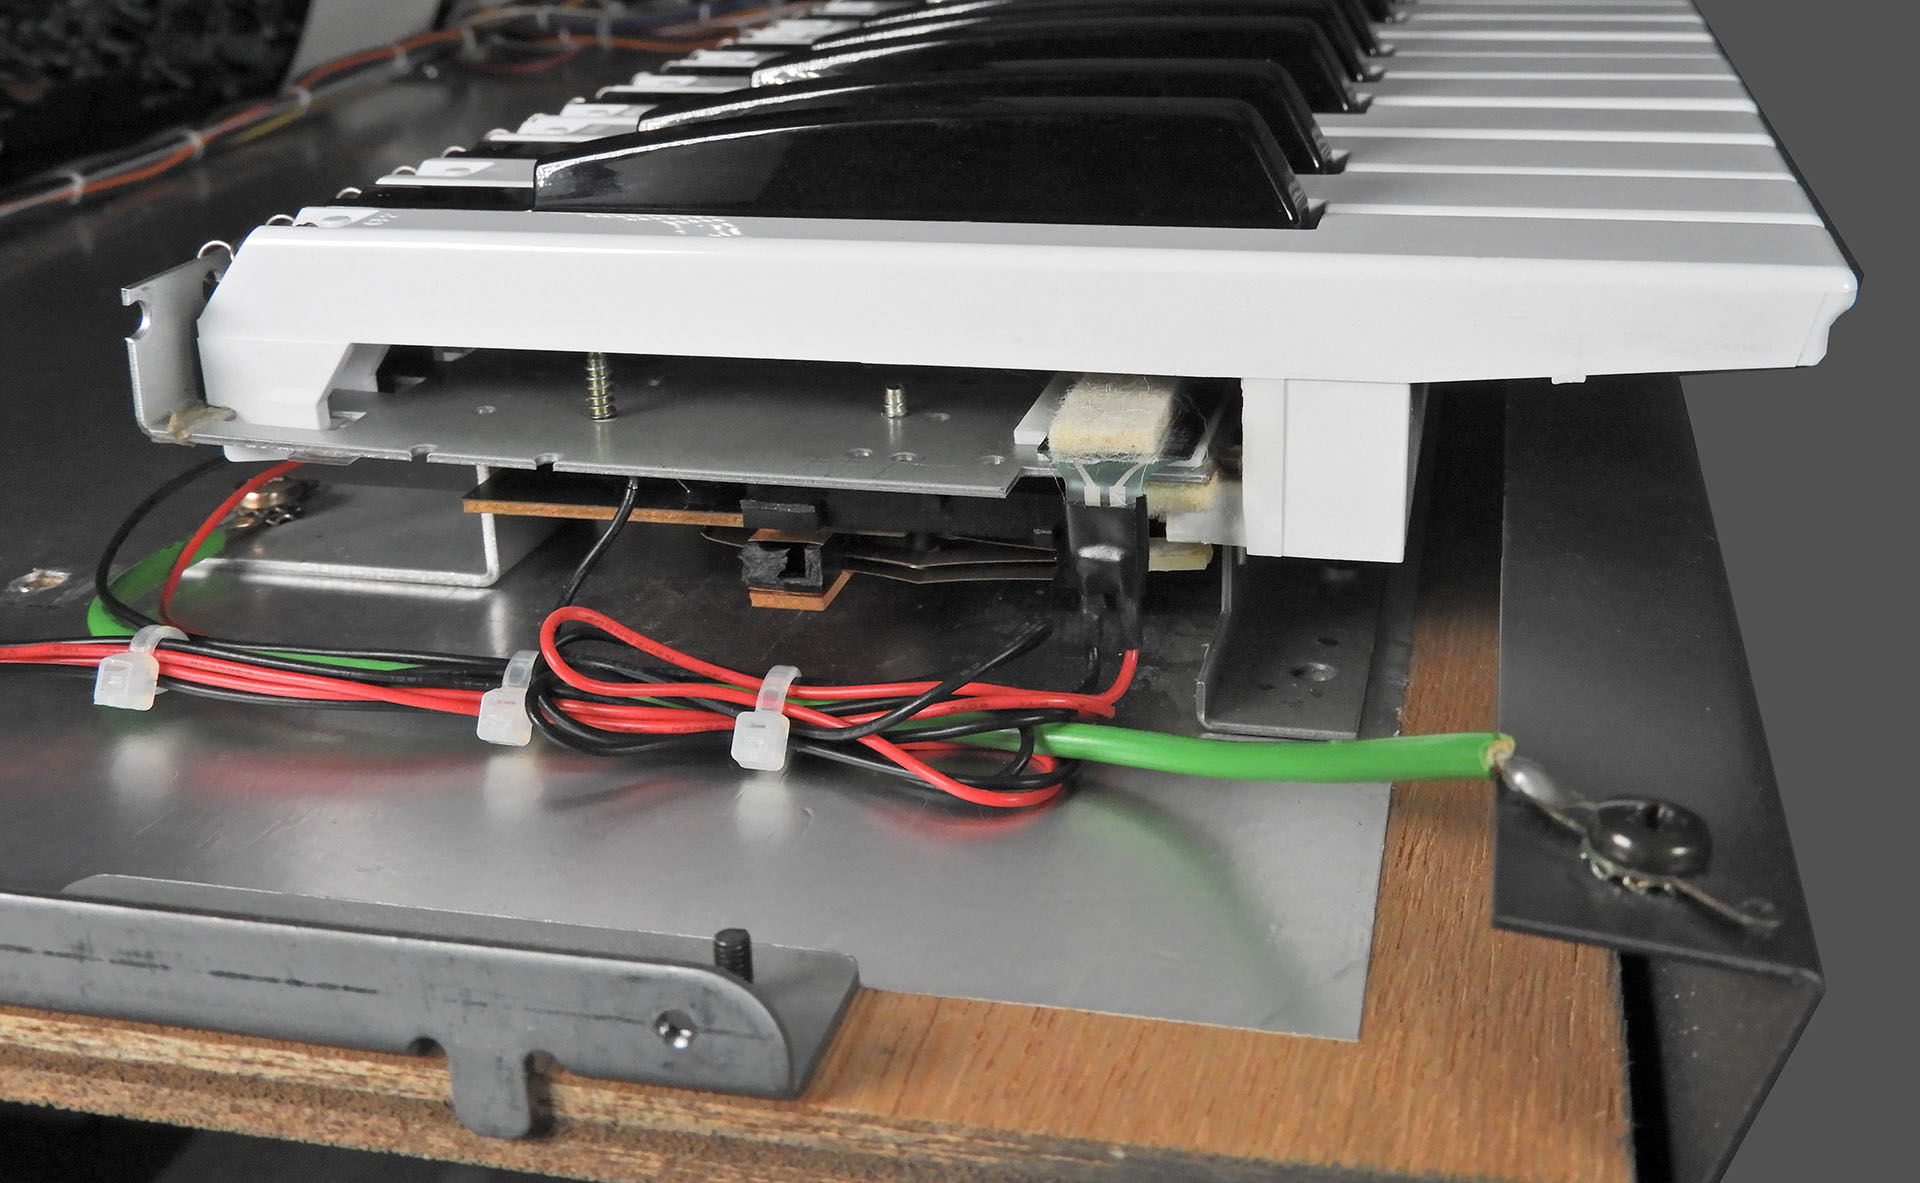
Well, for starters, right underneath the front of the keys and underneath the keyboard chassis is a small felt strip which does the same job as the felt strip on top of the aftertouch sensor; it dampens any mechanical key-noise but when the keys are released and not when they’re depressed. I definitely didn’t want to obstruct that. You can just make out the felt strip at the bottom-centre, in the two pictures above.
The two wires from the right-hand FSR could have run in the small gap between the key-contact assemblies and the bottom of the keyboard chassis. In fact, I tried that and initially this seemed like a groovy route to get the wires from one side of the keyboard to the other. You have to think long-term though, and I was concerned that in time, this arrangement might cause snagging issues as it wasn't easy to properly secure the wires. Hence, I ruled out that approach too.
In the end, my solution was to simply bend the wires coming off the FSR, directing them towards the rear of the keyboard chassis and get them to eventually join Roland's lovely wiring loom that's well out of the way of anything. If you remember, the wiring loom is secured with cable-ties that are attached to small plastic anchors along the rear but underneath the chassis and which cover the plastic key retainer strip. This required me to follow a specific sequence when reassembling the whole keyboard and replacing the keys but it was still the most ideal way to go. Oh PEEEEERFECT!!! 😊
Apart from developing a more reliable and seemingly permanent fix to the JX-8P aftertouch problem, I wanted something that could be installed by almost anyone with a little technical competence and therefore aimed at developing a solderless solution.
CONFESSION TIME
I posted this article on 8th March 2023. Today is 2nd September 2025. Hmm... Okay, so there were aspects of my original design that I wasn't particularly happy with. Despite the popularity and success of the system, I knew I could do better. Here are some of the issues with the original design that I wanted to address:
- My original AT-JX-8P was shipped fully assembled and making such a large item with some precision was challenging.
- Packaging was time consuming and shipping required bespoke cardboard boxes, due to the size.
- Although only weighing a couple of hundred grams, shipping costs were high, again due to the fact that the item was shipped fully assembled and was therefore, quite long.
- The terminals of the FSRs are delicate so careful handling was necessary, both by me and the installer. This was made more difficult because the item had to be kept straight.
- The original AT-JX-8P was expensive to make and also expensive to ship.
My new AT-JX-8P Mk II replacement aftertouch sensor for the Roland JX-8P is NOT technically superior to my original design. It just ticks all the issues highlighted above.
After investing in a 3D printer last year for another project, I realised the potential and contemplated converting my AT-JX-8P into a modular kit, which I felt would be cheaper and much easier for customers to install. Instead of using a single rubber strip as the mounting platform for the FSRs, I experimented with a plastic bed . Of course, it wouldn’t be easy printing a strip of plastic about 840mm long so I considered a modular approach.

Despite my best efforts, I haven’t been able to get a manufacturer to supply me with single-piece FSRs in the lengths that I need for my replacement aftertouch sensors. Hence, all my aftertouch systems use two readily available FSRs. Previously mounted on to a rubber strip, they’re now mounted on to a set of four (in the case of the JX-8P) plastic FSR bed strips. All of the strips except for the far right one, are identical and can actually be used in all of my designs. The right FSR bed strip is specific to the instrument that the respective system is destined for. This allows me to keep things pretty universal but also cater for varying keyboard sizes.
Designed to make alignment of the system a lot easier than my previous system, installation is much more straight-forward and less prone to ‘human error’, ideal for those will little experience at doing this kind of stuff.

Wow, this was amazing! My new AT-JX-8P Mk II worked just like my original design but assembly time was greatly reduced, I could pack this kit into a box half the size of that I was using before and installation time was also a fraction of that needed to install my AT-JX-8P Mk I. In fact, my AT-JX-8P Mk II is the easiest of all my FSR based replacement aftertouch systems to install. The hardest part is stripping all the glue off the keyboard chassis after removing the old Roland AT sensor.
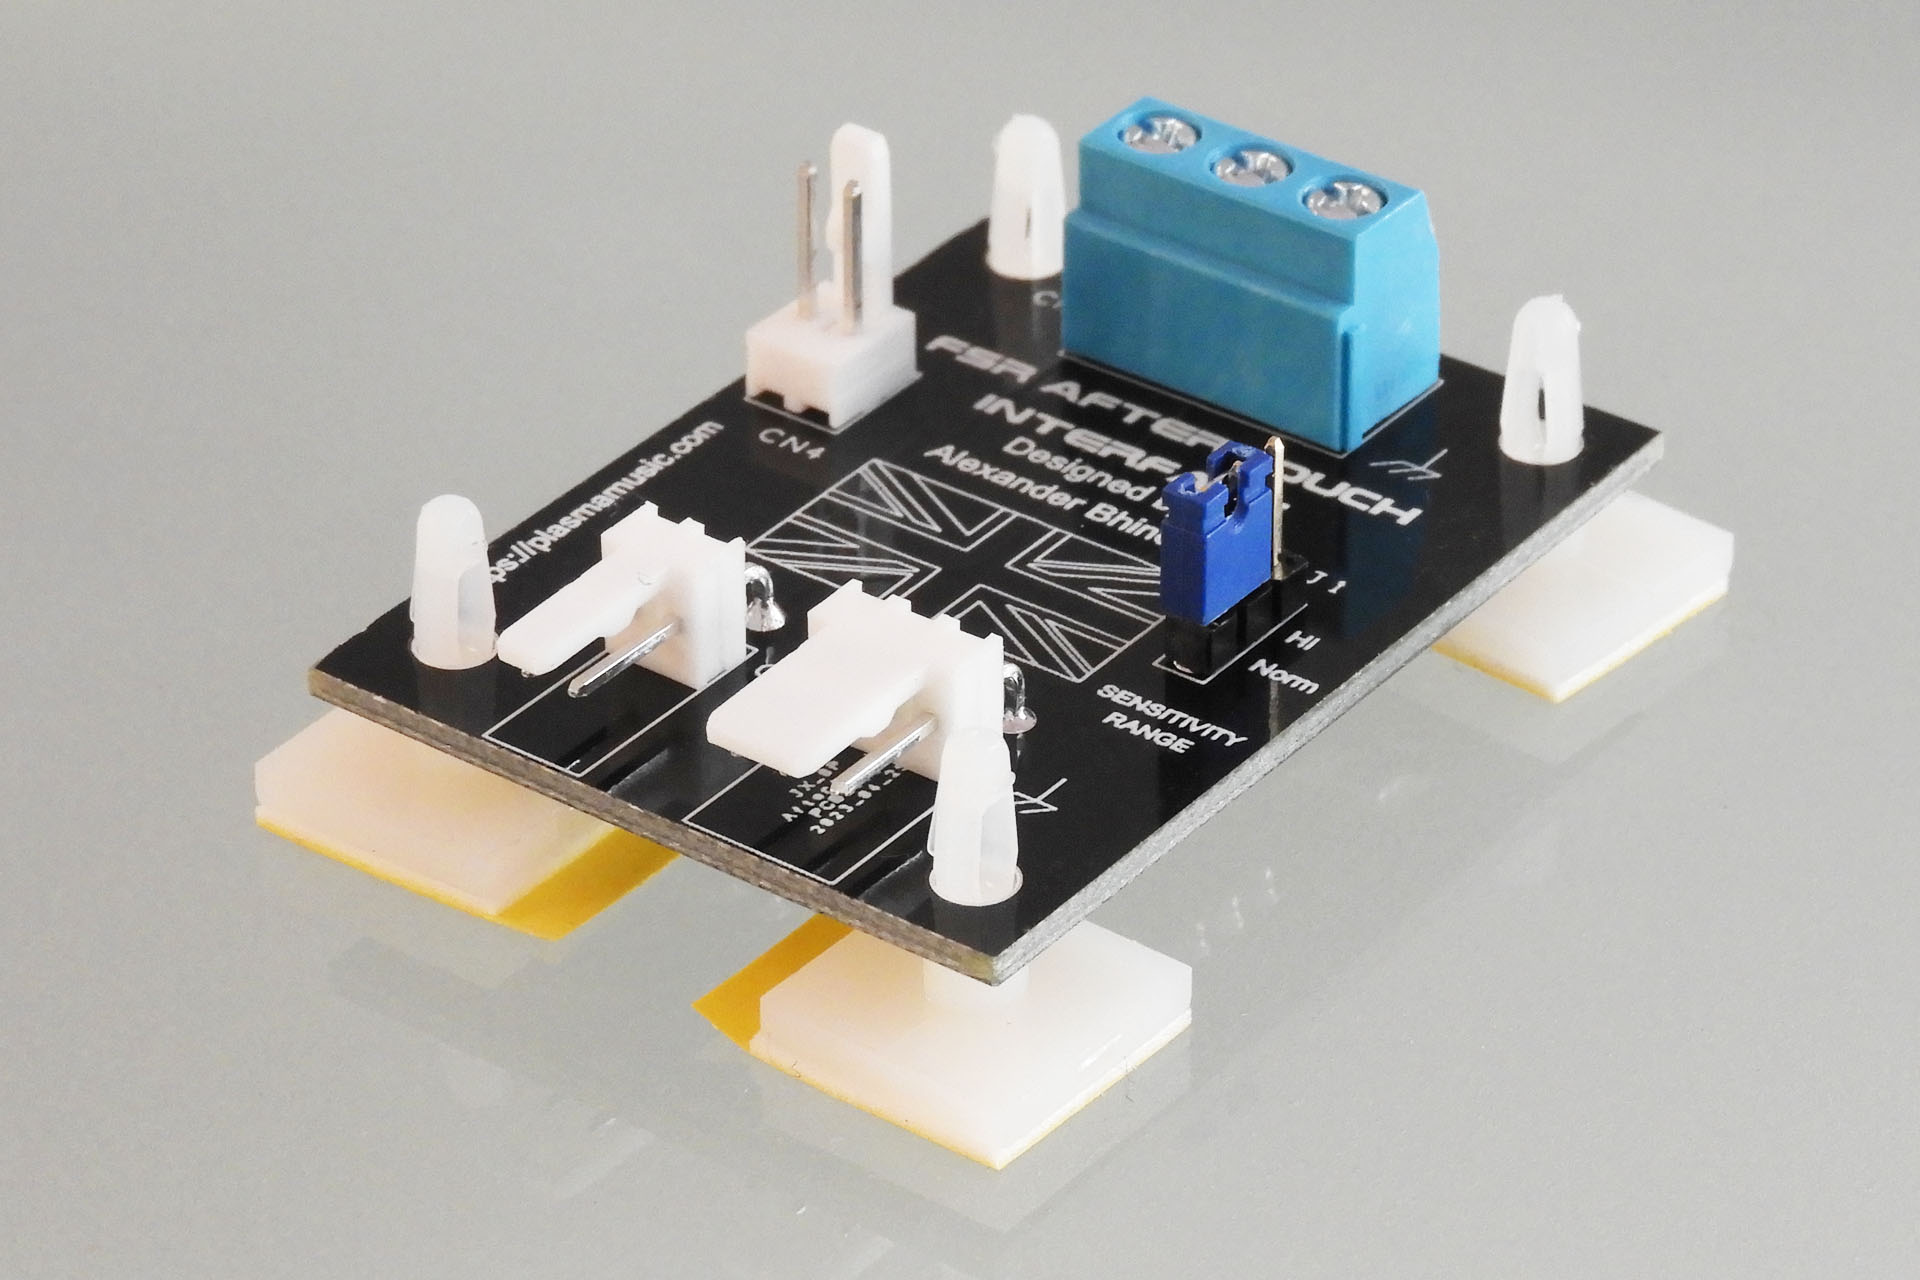
I’ve tried to keep things simple (haven't I said that before) and so to that end, the connection of the replacement aftertouch sensor to the wires that go to the pitch-bend assembly, is done via a simple (passive) PCB that I knocked up. The wires from the FSRs are terminated with female Molex connectors that snap into male connectors on the PCB. Thinking ahead, I put a 3-way connector on the wires coming from the left-hand FSR. This allows for easy (and tidy) connection of the original earth wire that ran from the pitch-bend assembly to the keyboard chassis. The wires from the volume-board are attached to the PCB via a terminal block. All you need is a small screwdriver.
My FSR Aftertouch Interface PCB is secured to the JX-8P's wooden base, with supplied self-adhesive standoffs which I found to be more than adequate. I guess you could use small nylon spacers and then screw the PCB to the base, if you wish. If you're JX-8p is NOT going on a deep-space mission however, I would stick to plan A!
Now then... so I've said that I wanted to keep things simple and that one of the objectives of the project was that my replacement aftertouch sensor for the Roland JX-8P should be a solderless upgrade. Well, it is but there's a but...
Things will work okay when connecting the system to the JX-8P's aftertouch circuitry but (told ya'), some may find the response and feel a little too sensitive. That's because the output from the new FSRs is considerably higher than that generated by the old sensor. So if you do have knowledge and experience of working on electronics, you might want to consider unlocking the FSR Aftertouch Interface PCB's cool little secret... which is even more cool when you think it's just a passive build comprising a couple of connectors and resistors!
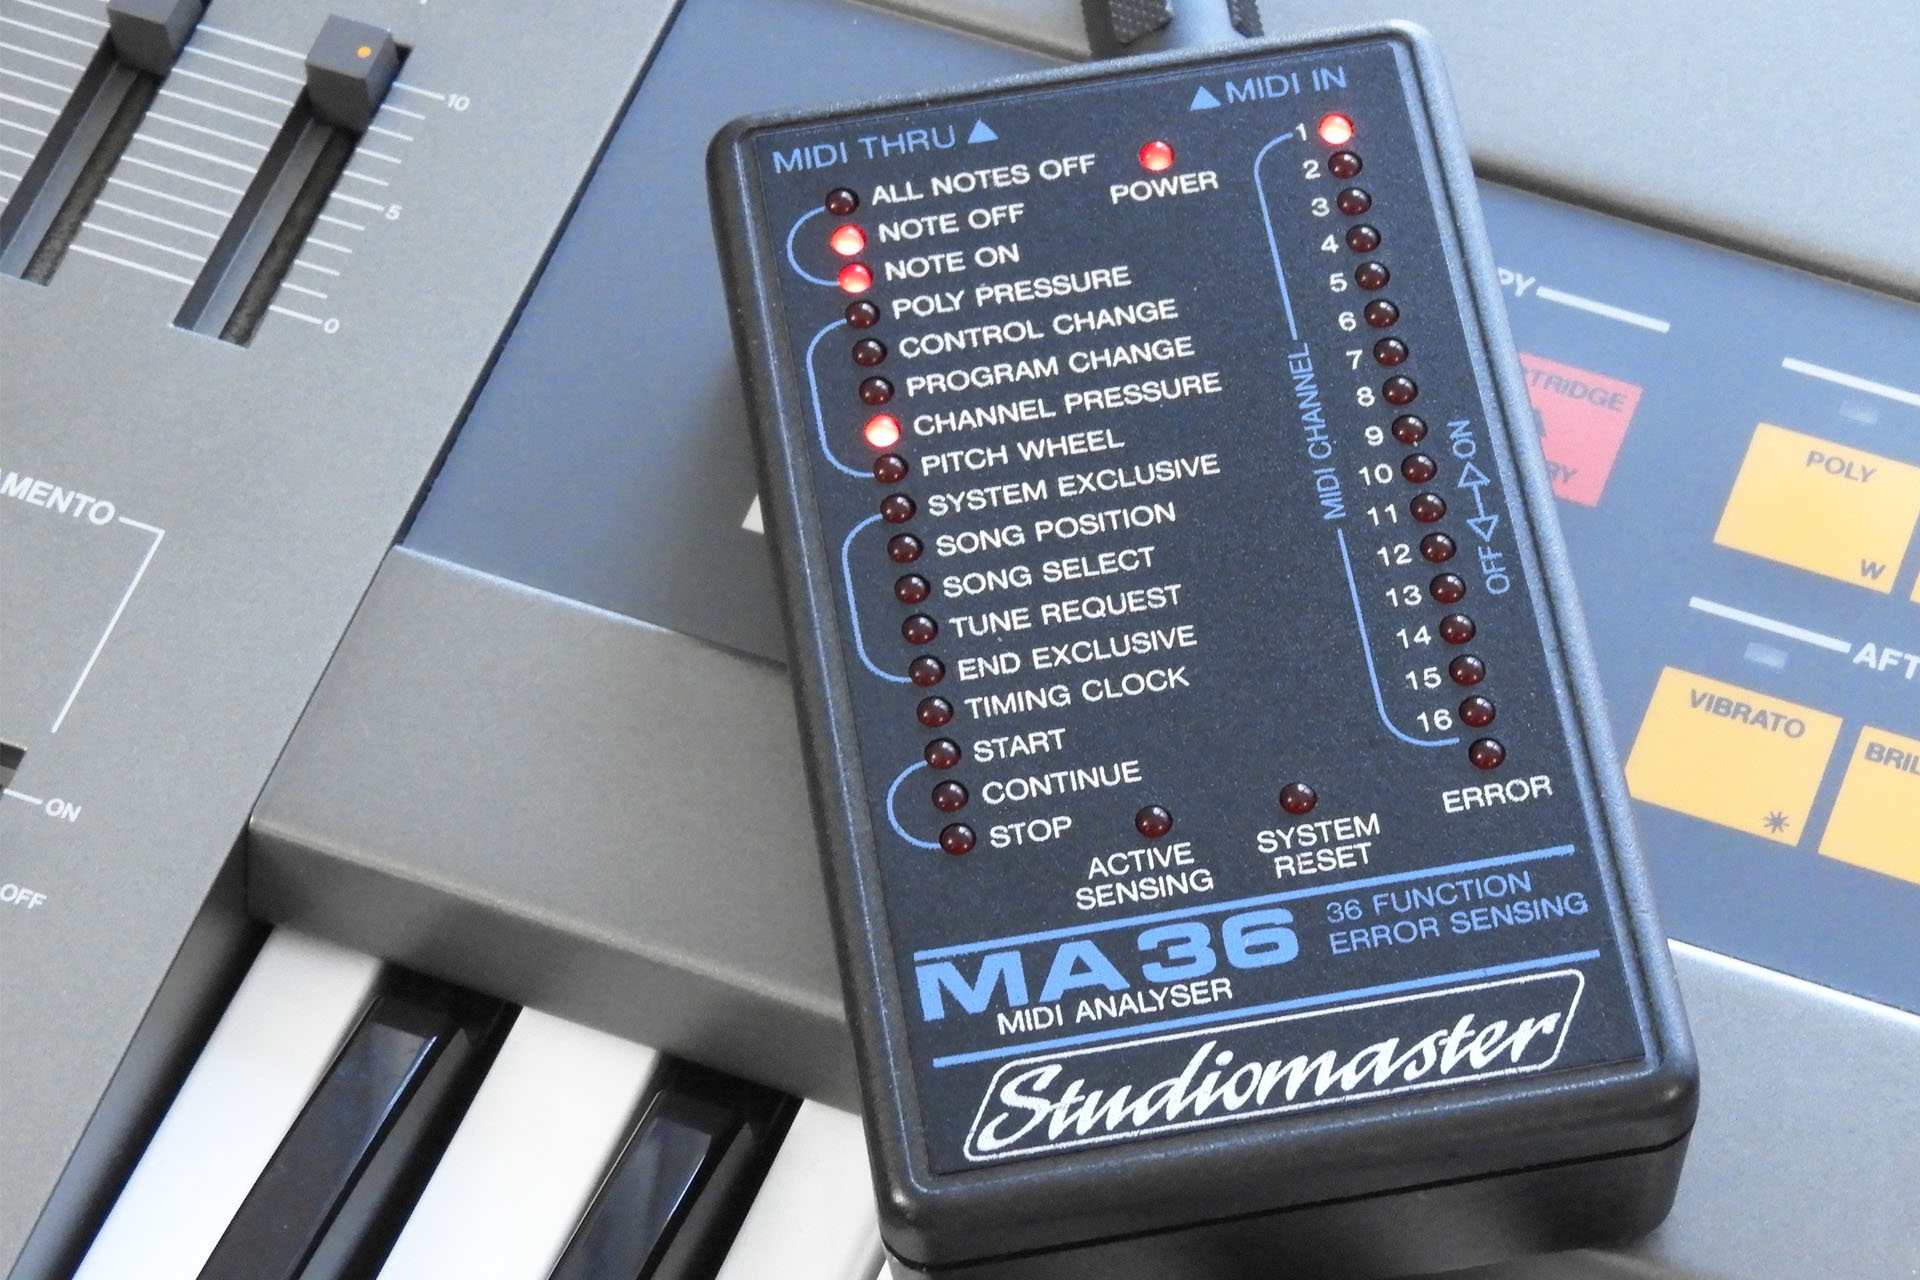
Impossible to compare the response of the new FSR-based sensor with that of the original sensor as it was in 1985, I could only really use a modern MIDI controller keyboard connected to a JX-8P as some kind of reference. Having friends over allowed me to experiment with different 'hands' (if you know what I mean) and the experience gave me valuable data pertaining to the gain of the aftertouch buffer / amp stage of the JX-8P and how to potentially adjust this for the new type of sensor.
Having an opportunity, I ended up designing my FSR Aftertouch Interface PCB with the facility to provide switchable aftertouch sensitivity ranges. Removing one resistor on the JX-8P's volume-board and substituting two wires (supplied with the kit) in its place, by simply moving a jumper on FAI, you'll be able to switch between two sensitivity ranges. The 'Norm' setting is nice and smooth and I'm guessing close to what the original aftertouch might have felt like. The 'Hi' setting on the other hand, is a little more spontaneous, requiring less force to produce an aftertouch signal.
How fringin' cool is that?!?!? 🙂
Testing the two settings with the aftertouch slider on the front panel of the JX-8P at about 80% and a nominal finger pressure (nothing heavy), I recorded a couple of hits into Cubase.
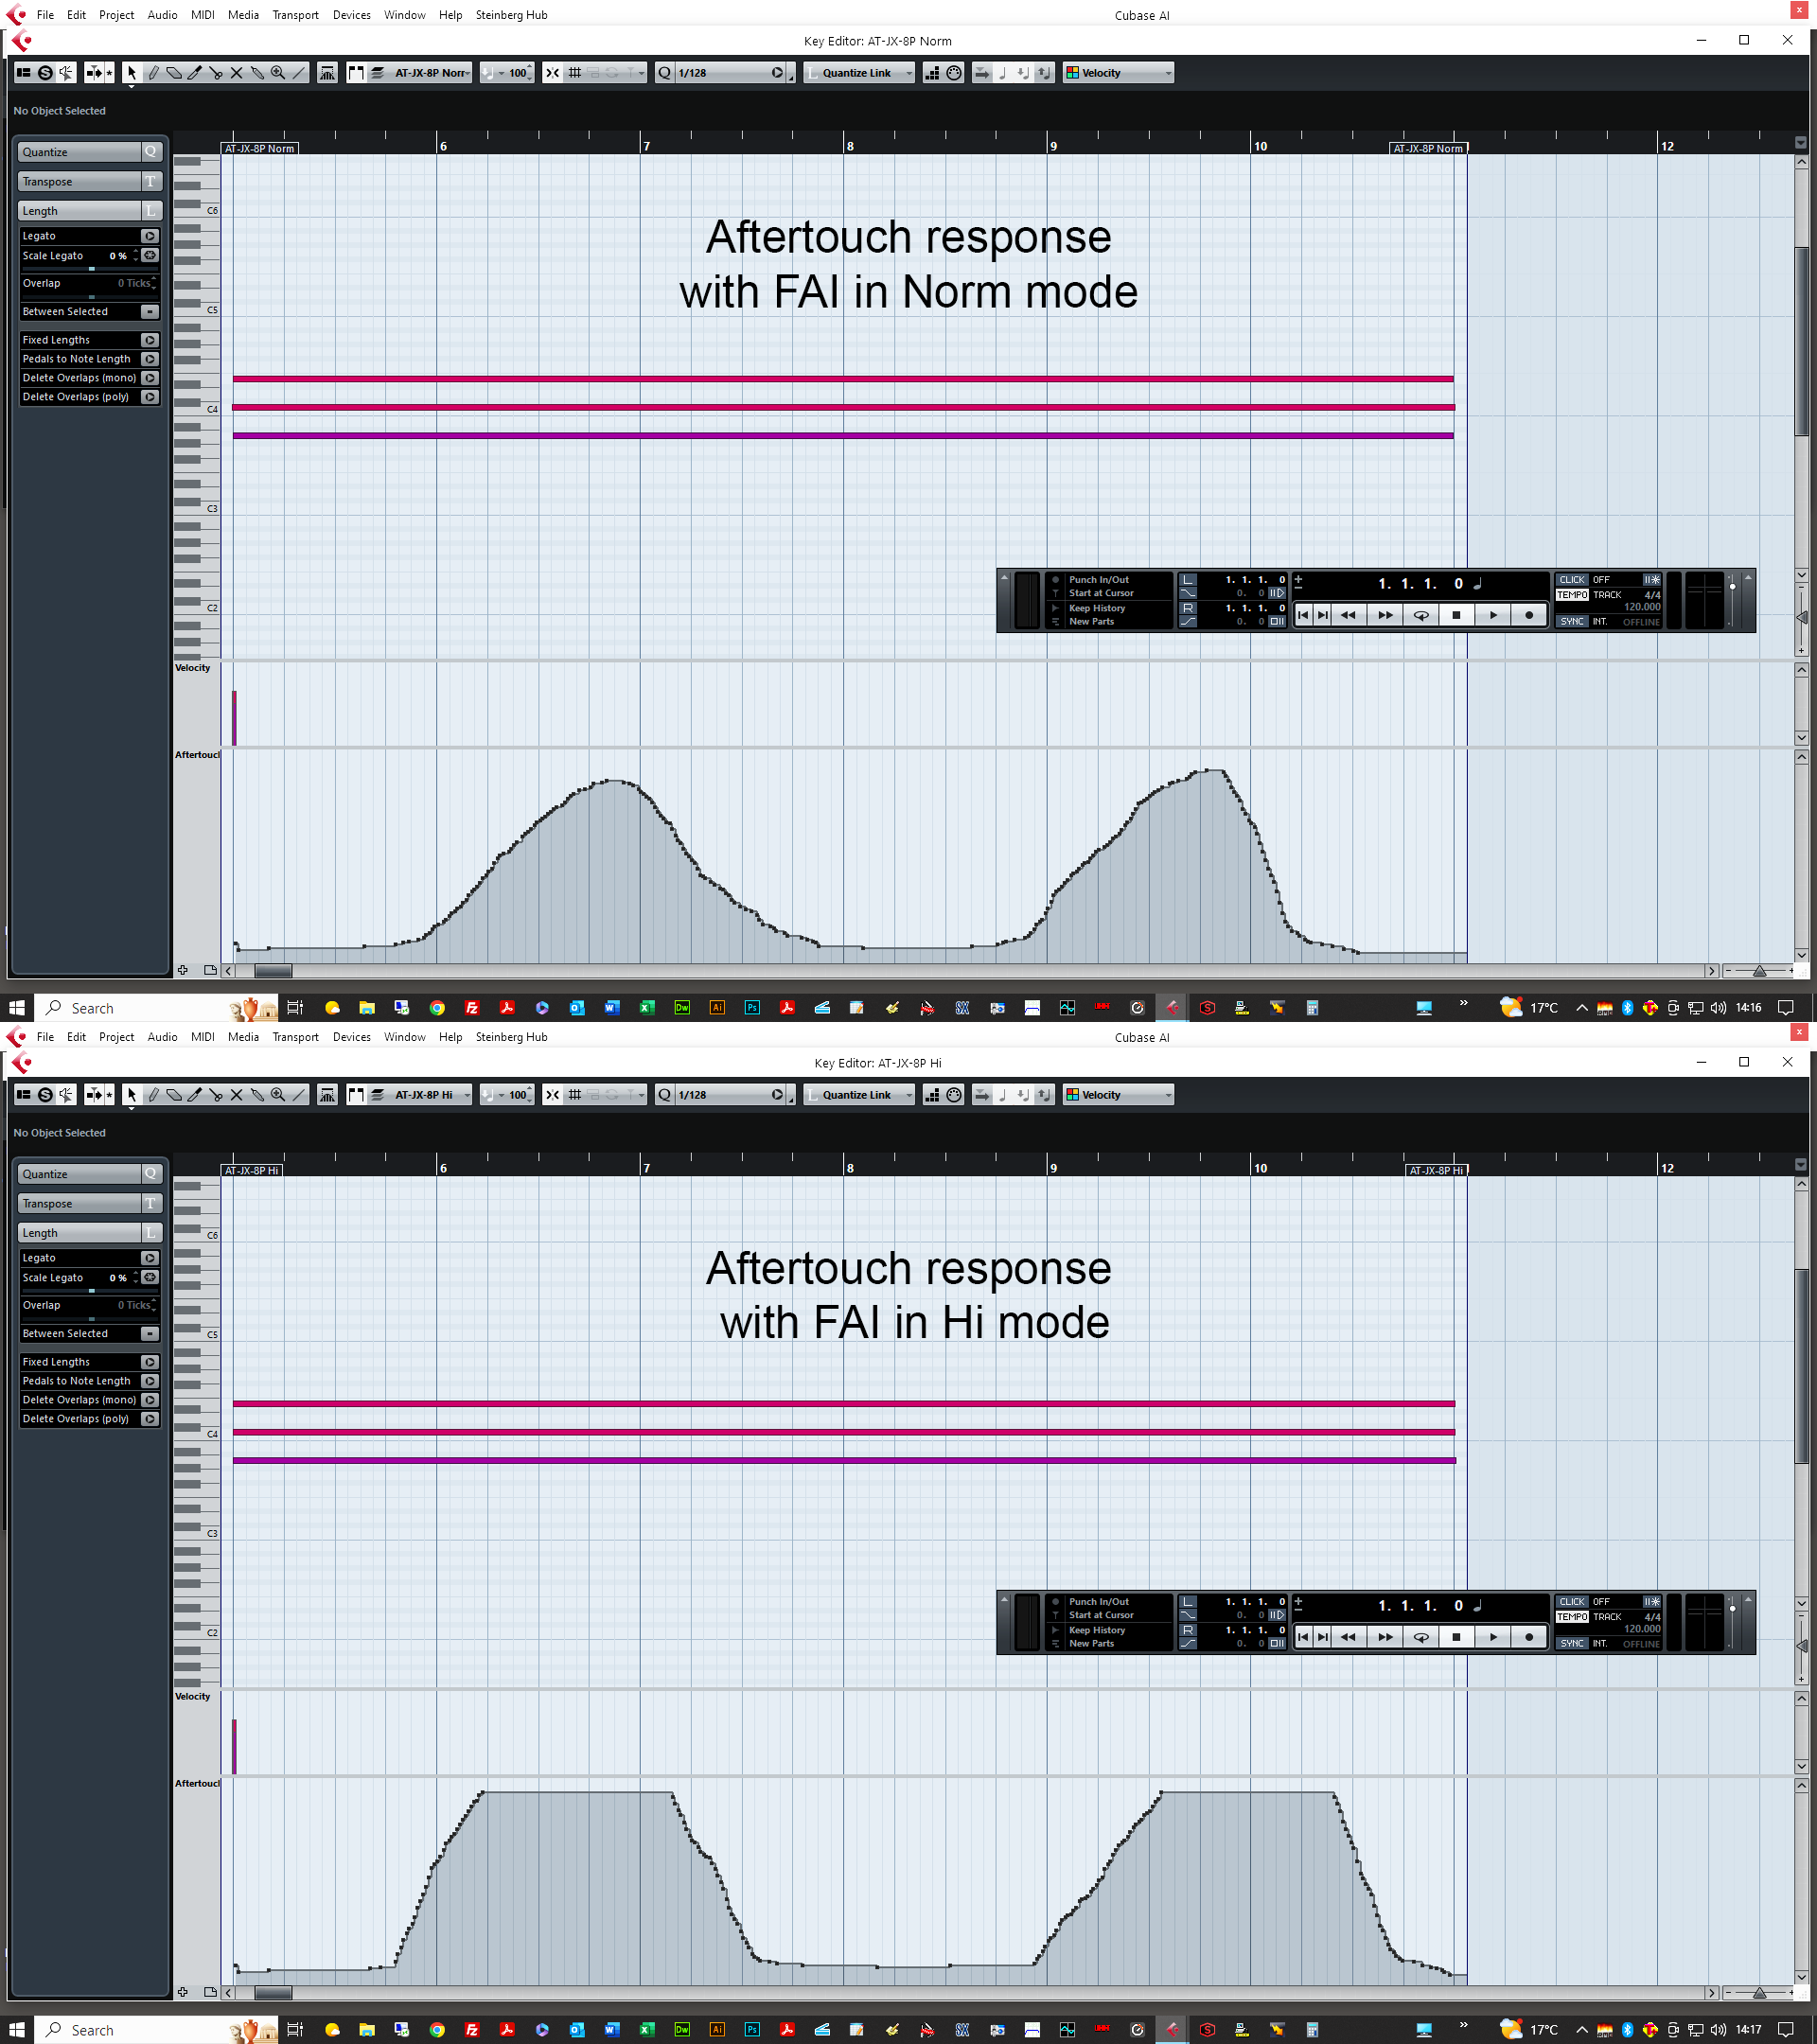
As you can see, in Hi mode, the attack curve of the aftertouch response is steeper and a full 127 aftertouch reading happens quicker. Of course, the aftertouch slider on the top panel of the JX-8P, can still be used to trim the feel of the aftertouch in either mode.
The only downside is that you'll need to desolder a resistor and to do that, you'll need to remove the volume-board to do that but like I said, only for experienced tech dudes!
Once everything was working, I just couldn't stop playing. Wow, this is something else! Testing gear shouldn't be this much fun! 😀 The JX-8P was like a new instrument. What a transformation.
This has been a fun little project. My replacement aftertouch sensor for the Roland JX-8P is now installed and working in a couple of customers' instruments. The second challenge however, was converting the project into a package which could be sent out to JX-8P owners / users and installed with minimal hassle. Well, I managed to do that too and and I've also just finished compiling the accompanying detailed and fully illustrated installation instructions, which means that you can now order my AT-JX-8P kit here.
Allowing me to experiment on their machines, two of my customers (Clive and James) are stunned (in a good way) with their Roland JX-8Ps, both having been brought back to life, with fully working aftertouch. In fact, I soon developed a similar transducer assembly for the 76-note Roland JX-10. Unlike the JX-8P, the JX-10's aftertouch strip used a pair of carbon tracks instead of the two copper tracks. There's also a noticeable absence of the steel top strip, conductive rubber strips and the rubber housing. Anyway, enough Super-JX nonsense. As soon as I've got a little time, I'll post full details of my replacement aftertouch sensor for the Roland JX-10.
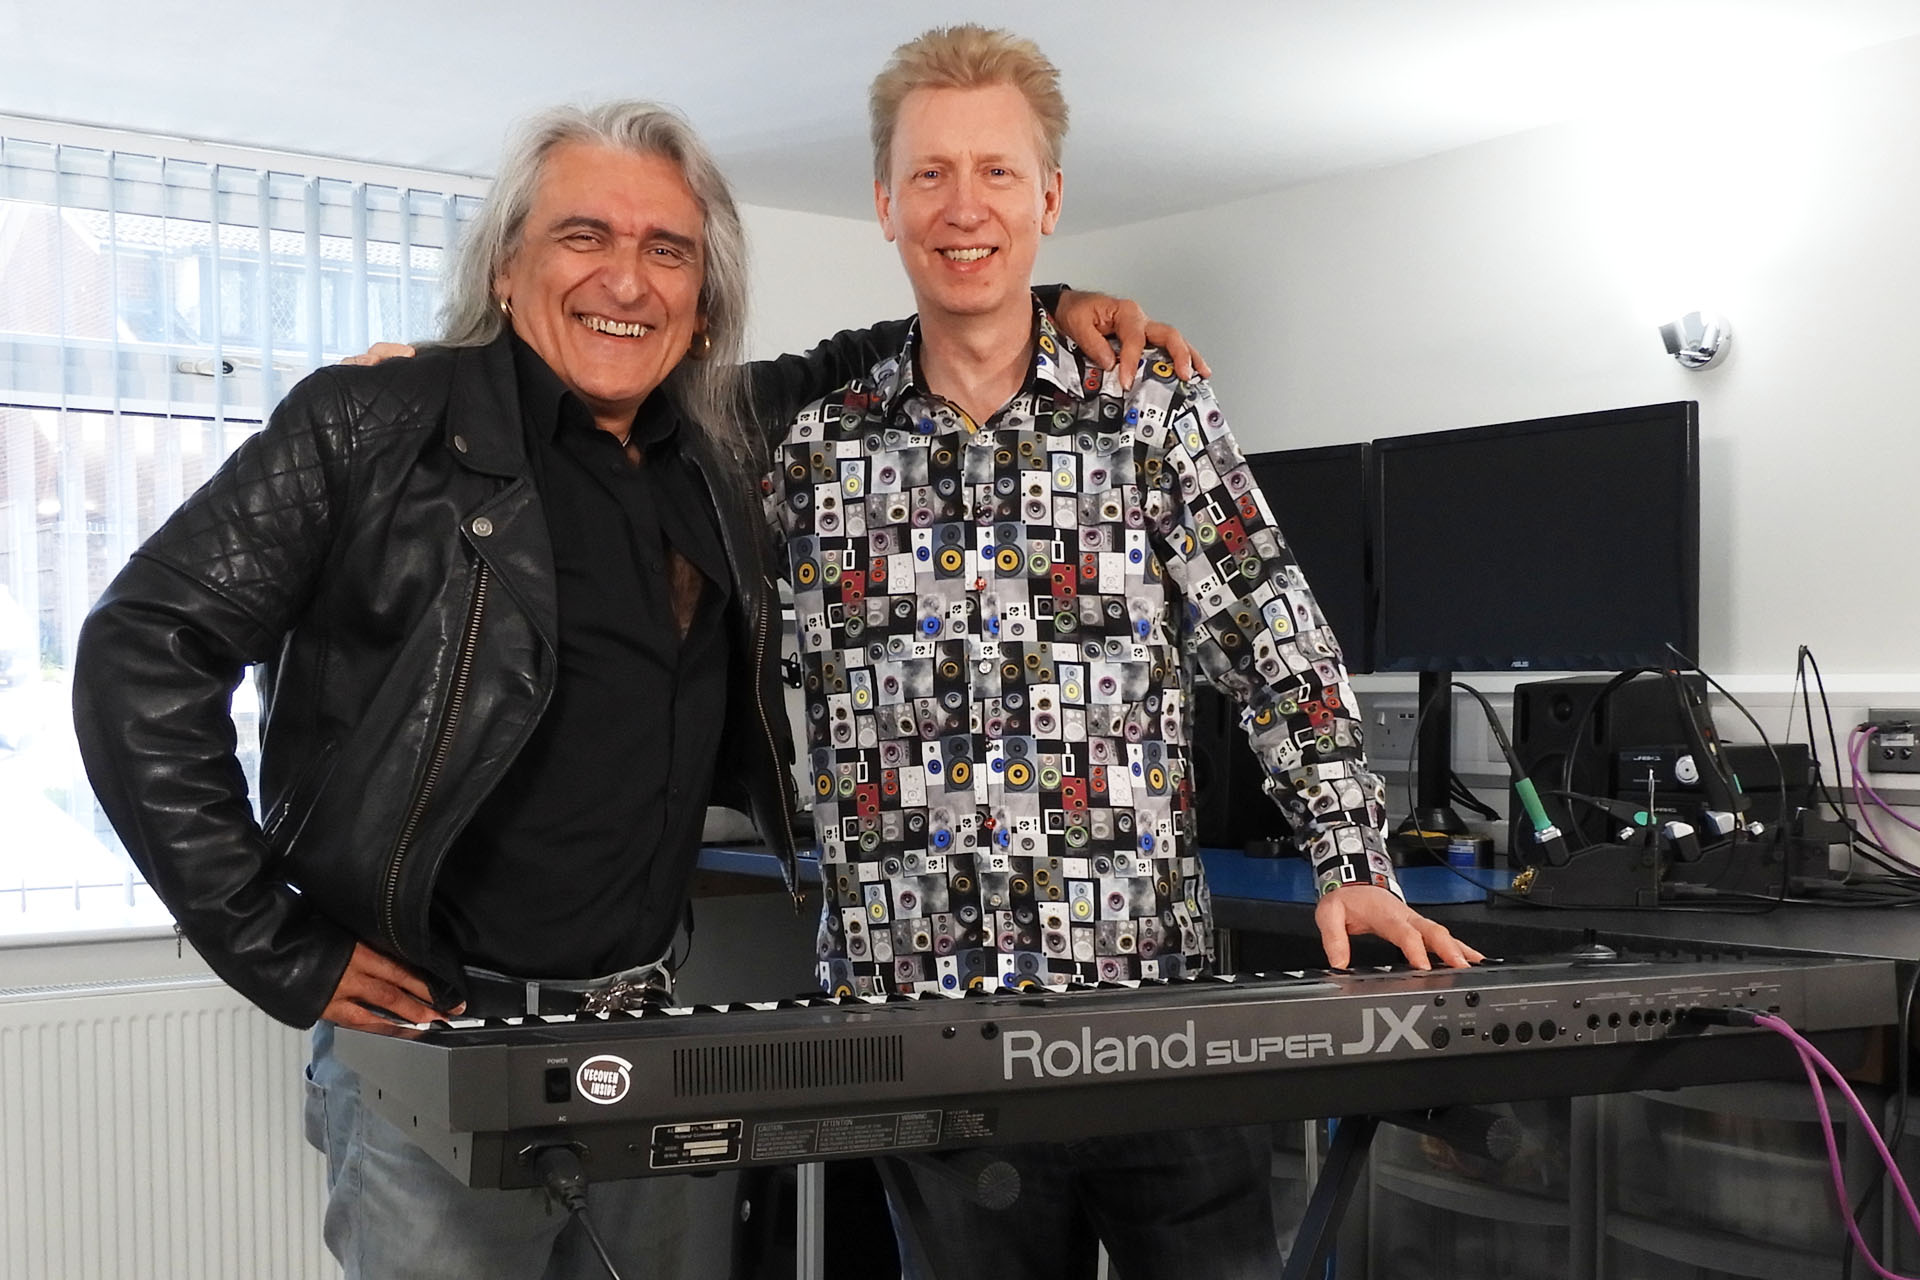
My dear friend Guy Wilkinson (you all know Guy, right) leant me his JX-10 as a test bed. Thanks, Guy! 🙂 It was a perfect subject because guess what... the aftertouch was shot. The construction of the JX-10 is a little more evolved than that of the JX-8P but functionally, it's very similar. Under the bonnet, it's quite apparent how Roland implemented what it had learnt from previous synthesisers like the JX-8P but still retained all the good stuff.
If you want to buy my AT-JX-8P replacement aftertouch sensor for the Roland JX-8P, you can do so here...

As with everything I make, I've tried hard to keep costs down. Not being a massive corporation, I'm limited by things like the quantities of components that I can buy at any one time. For something like this replacement aftertouch sensor for the Roland JX-8P, I had to make a special assembly jig so that I could keep things straight, precise and consistent. It's not just a case of knocking stuff up and shipping. Each assembly is tested and even just to collect the reference data was a task in itself.
I'm therefore hoping that the price is favourable to most and that the majority of JX-8P owners / users will appreciate the efforts that go into designing and building these kind of upgrades.
I design and make stuff because I enjoy the challenges and I want to help keep as much vintage gear going as long as possible.
The Roland JX-8P - A Lot of History
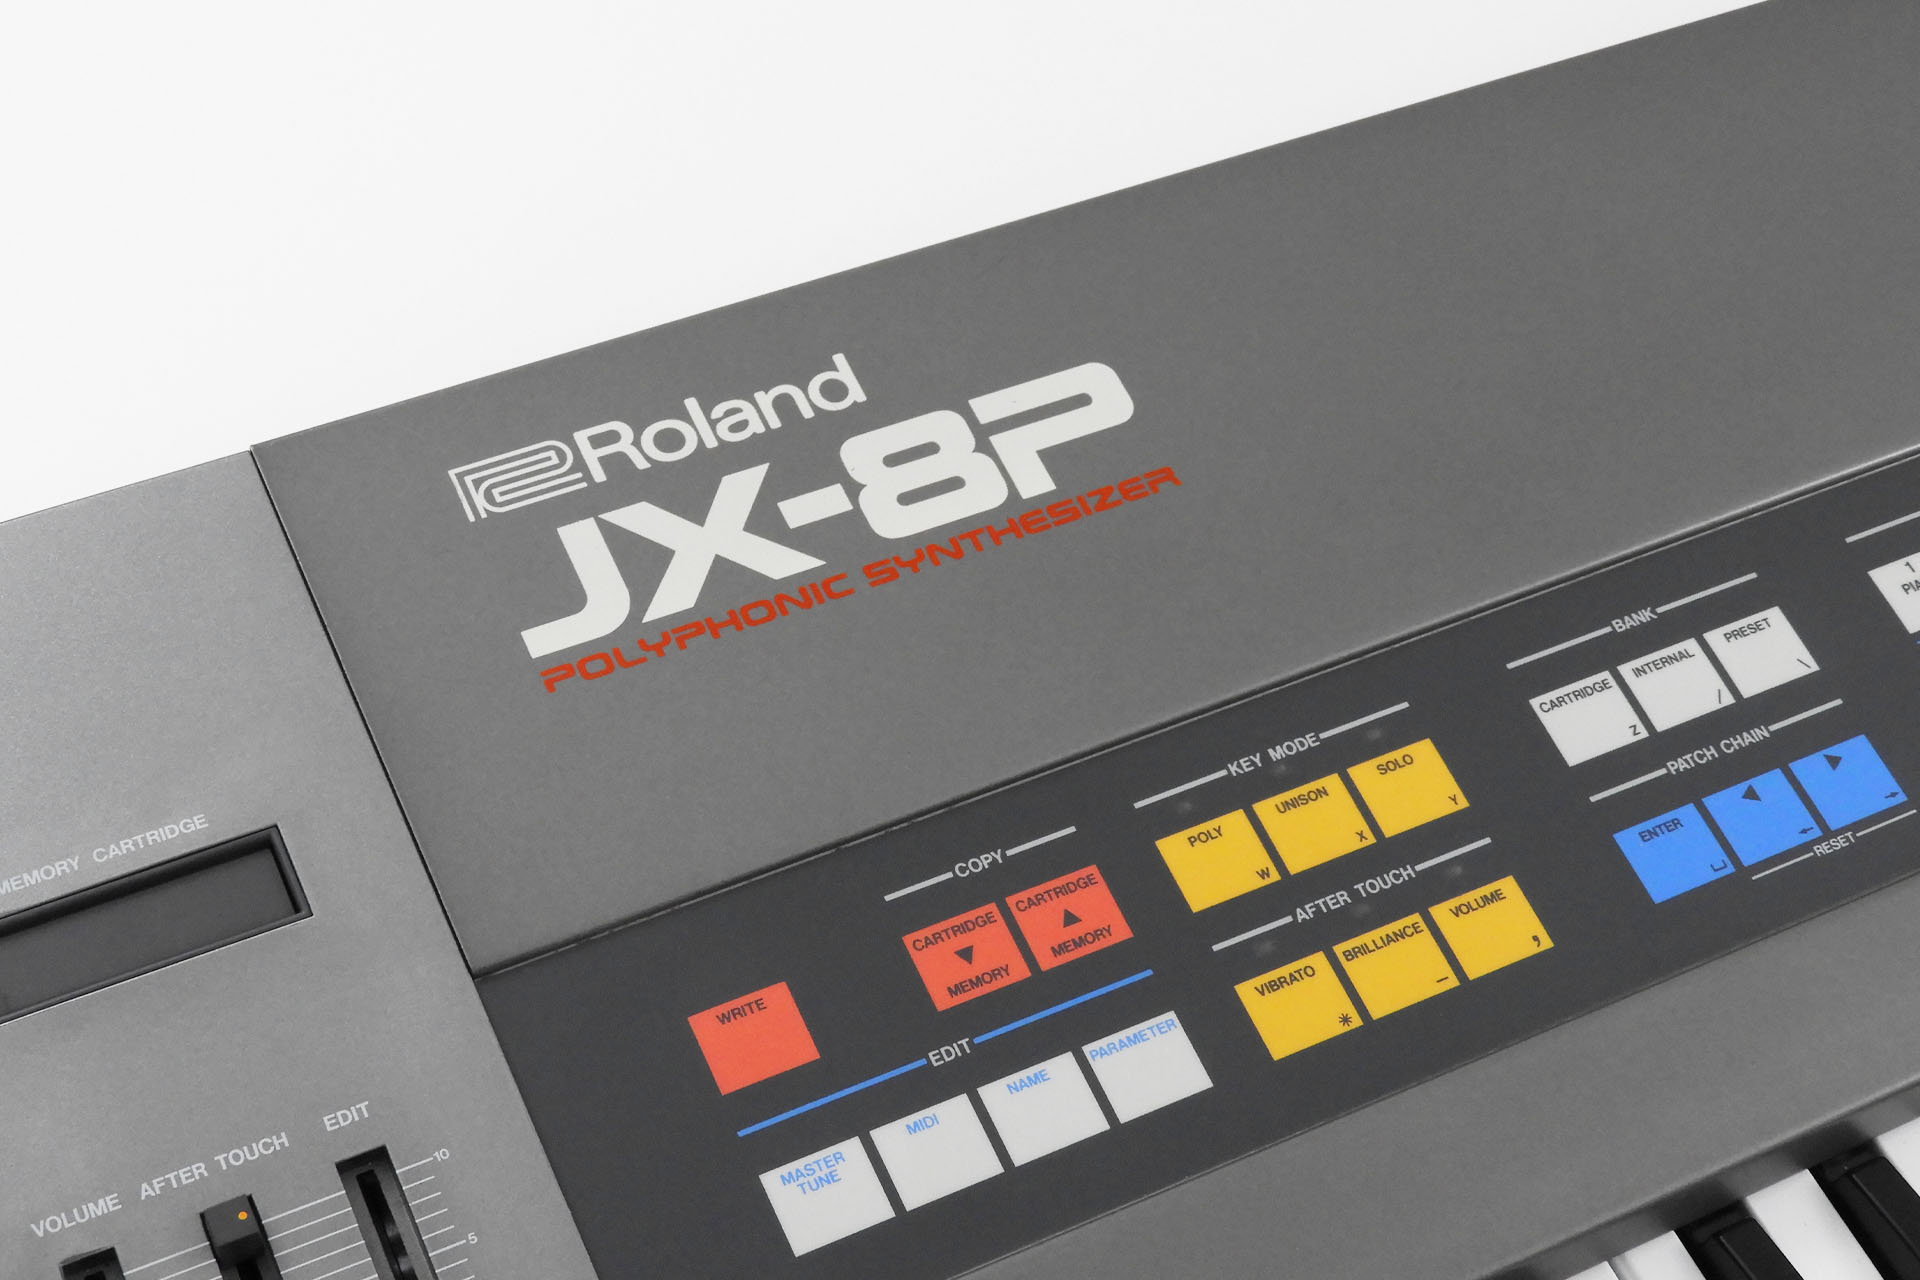
The forerunner to the Super-JX, the Roland JX-8P was one of the most successful synthesisers ever. What do I mean by ‘successful’?
Well, for a start, Roland simply couldn’t make enough of them and despite having gone through several revisions under the bonnet, the JX-8P ended up being produced in huge quantities and selling by the truckload, all over the world.
Secondly, the feature packed JX-8P has appeared on countless hit records. Artists absolutely loved using this machine for their live performances, too. The JX-8P sounded like a million dollars and looked ultra-cool. In fact, some artists used several, in their live sets.
With designers like Fred Vecoven and Guy Wilkinson producing peripherals to keep our favourite vintage instruments going, my replacement aftertouch sensor for the Roland JX-8P is but a humble contribution to the community.
Don't hesitate to contact me, if you have any questions. In the meantime, here are some Roland JX-8P resources:
https://greatsynthesizers.com/en/review/roland-jx-8p-a-good-all-rounder/
https://www.vintagesynth.com/roland/jx8p.php
https://articles.roland.com/jx-8p-the-whole-story
https://en.wikipedia.org/wiki/Roland_JX-8P
https://www.facebook.com/groups/204432683004
UPDATE- 26th April 2023
Oh! I didn't realise how popular this would be! Thank you to all who pre-ordered. I'm expecting to have everything I need to start supplying these, in about a week (the first week of May).
UPDATE- 3rd May 2023
First week of May and as promised, everything's in stock for me to offer this great little kit. 🙂
UPDATE- 10th May 2023
A week after my last update and another two JX-8Ps and another JX-10!
UPDATE - 21st May 2023
This afternoon who should pop over but my friend Guy Wilkinson to pick up his JX-10, now with fully working aftertouch. After playing with his JX-10 for a while, Guy said that he's now smiled nine times this week! 🙂
From Guy's websiteOpens in a new window:
"I just picked up my JX-10 that I loaned to Alex of Plasma Music to develop an exciting new product. He has developed a new aftertouch sensor strip that simply reinvents the expressiveness of the keyboard. Simply put, I am so happy with this upgrade!!!
So we had a celebratory launch moment with my JX-10 in his fabulous workshop.
After checking out the technical aspects using the diagnostic menu, I started working through patches. Some non-factory patches need some adjustments in the patch menu, there are three settings for aftertouch: Vibrato, Brilliance, Volume – plus the sensitivity slider.
The factory patches have some really great settings for aftertouch and others just need a simple adjustment. Clearly the old strips didn’t work for very long because users who created and distributed patches didn’t configure Aftertouch parameters. As I worked through patches and editing settings, I breathed new life into them and I couldn’t help smiling as I played."
UPDATE - 29th May 2023
Now in development:
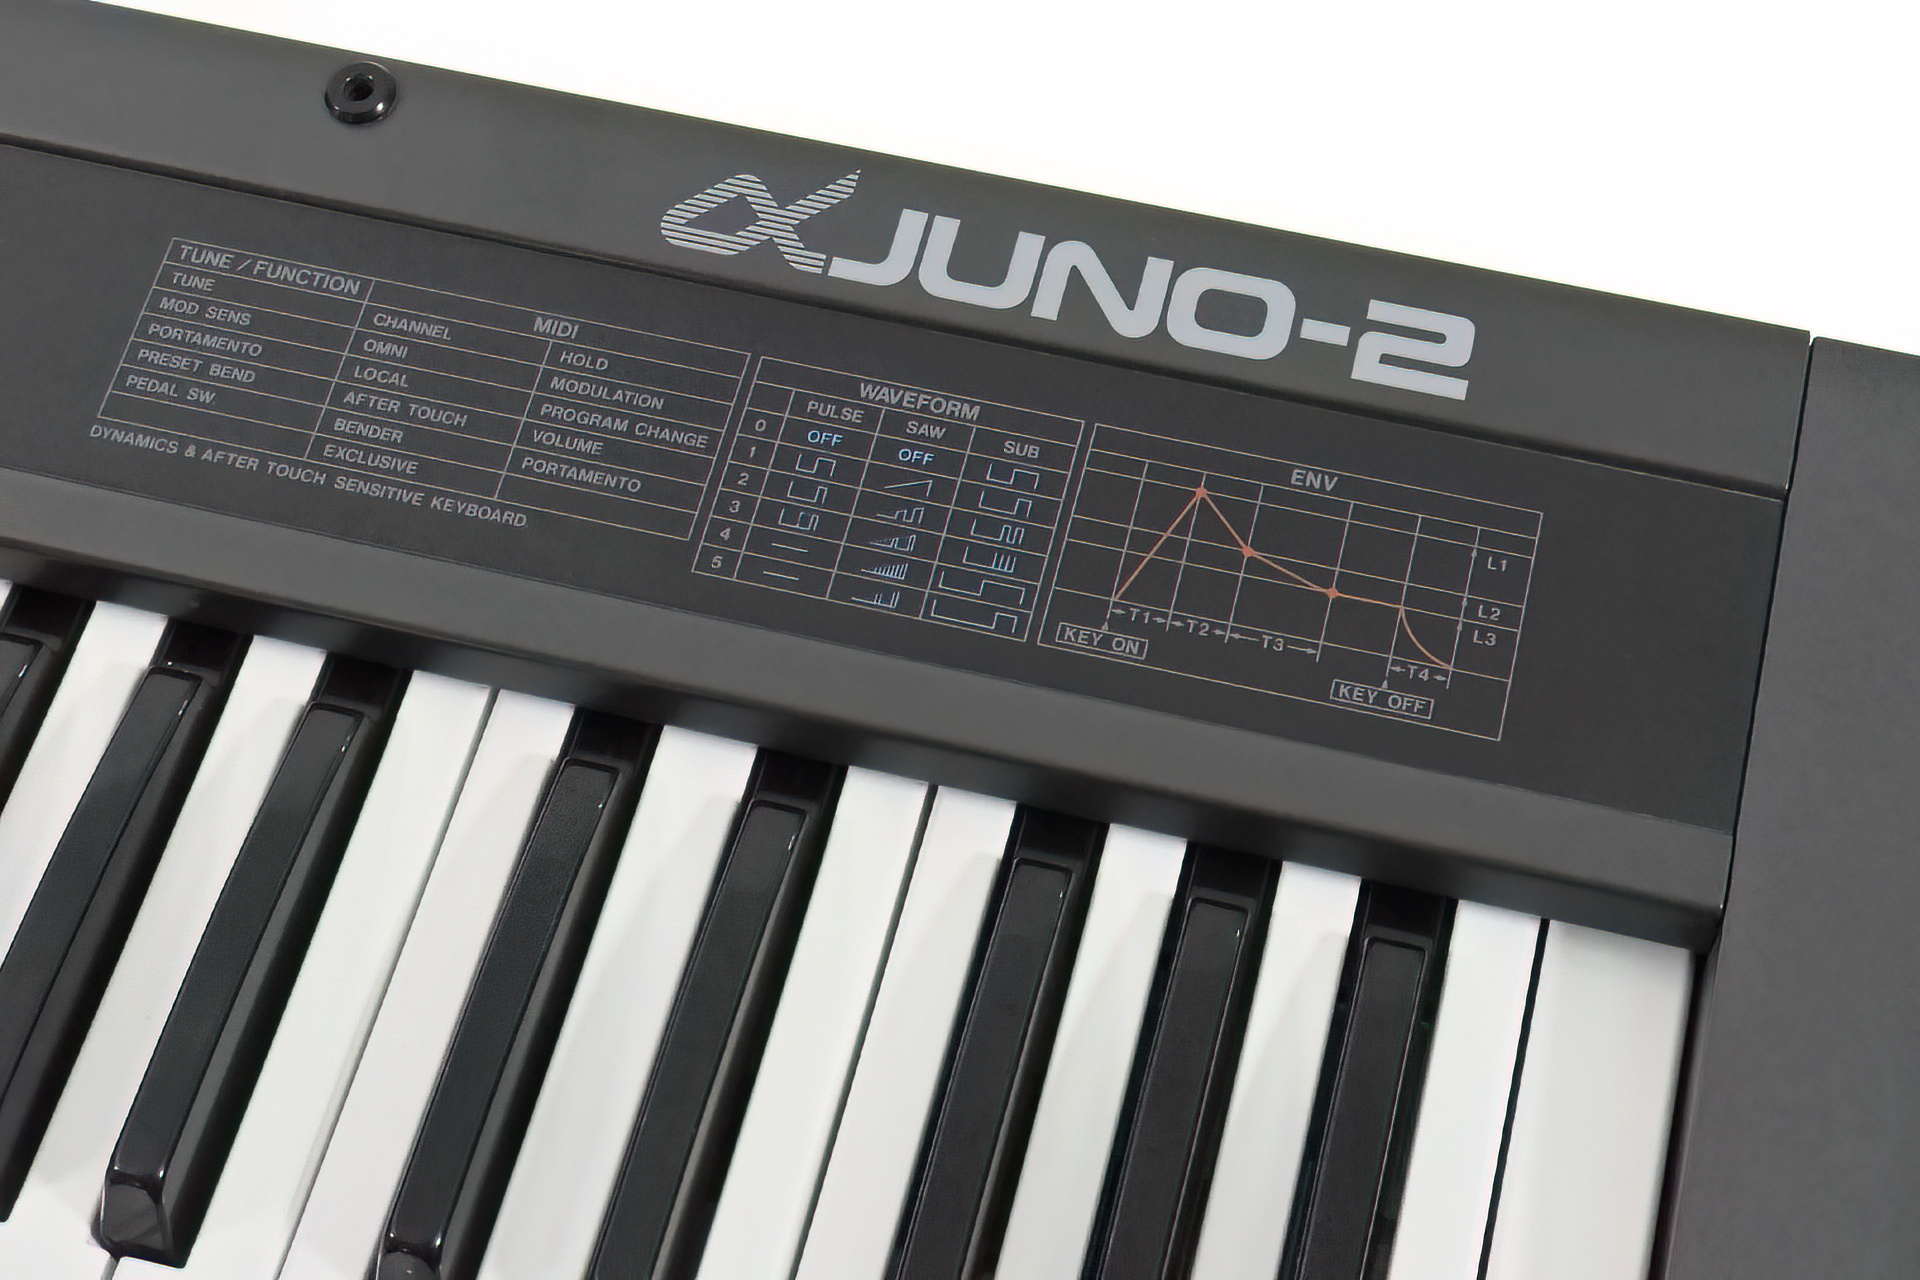
- AT-AJ-2 - Aftertouch sensor for the Roland Alpha Juno 2.
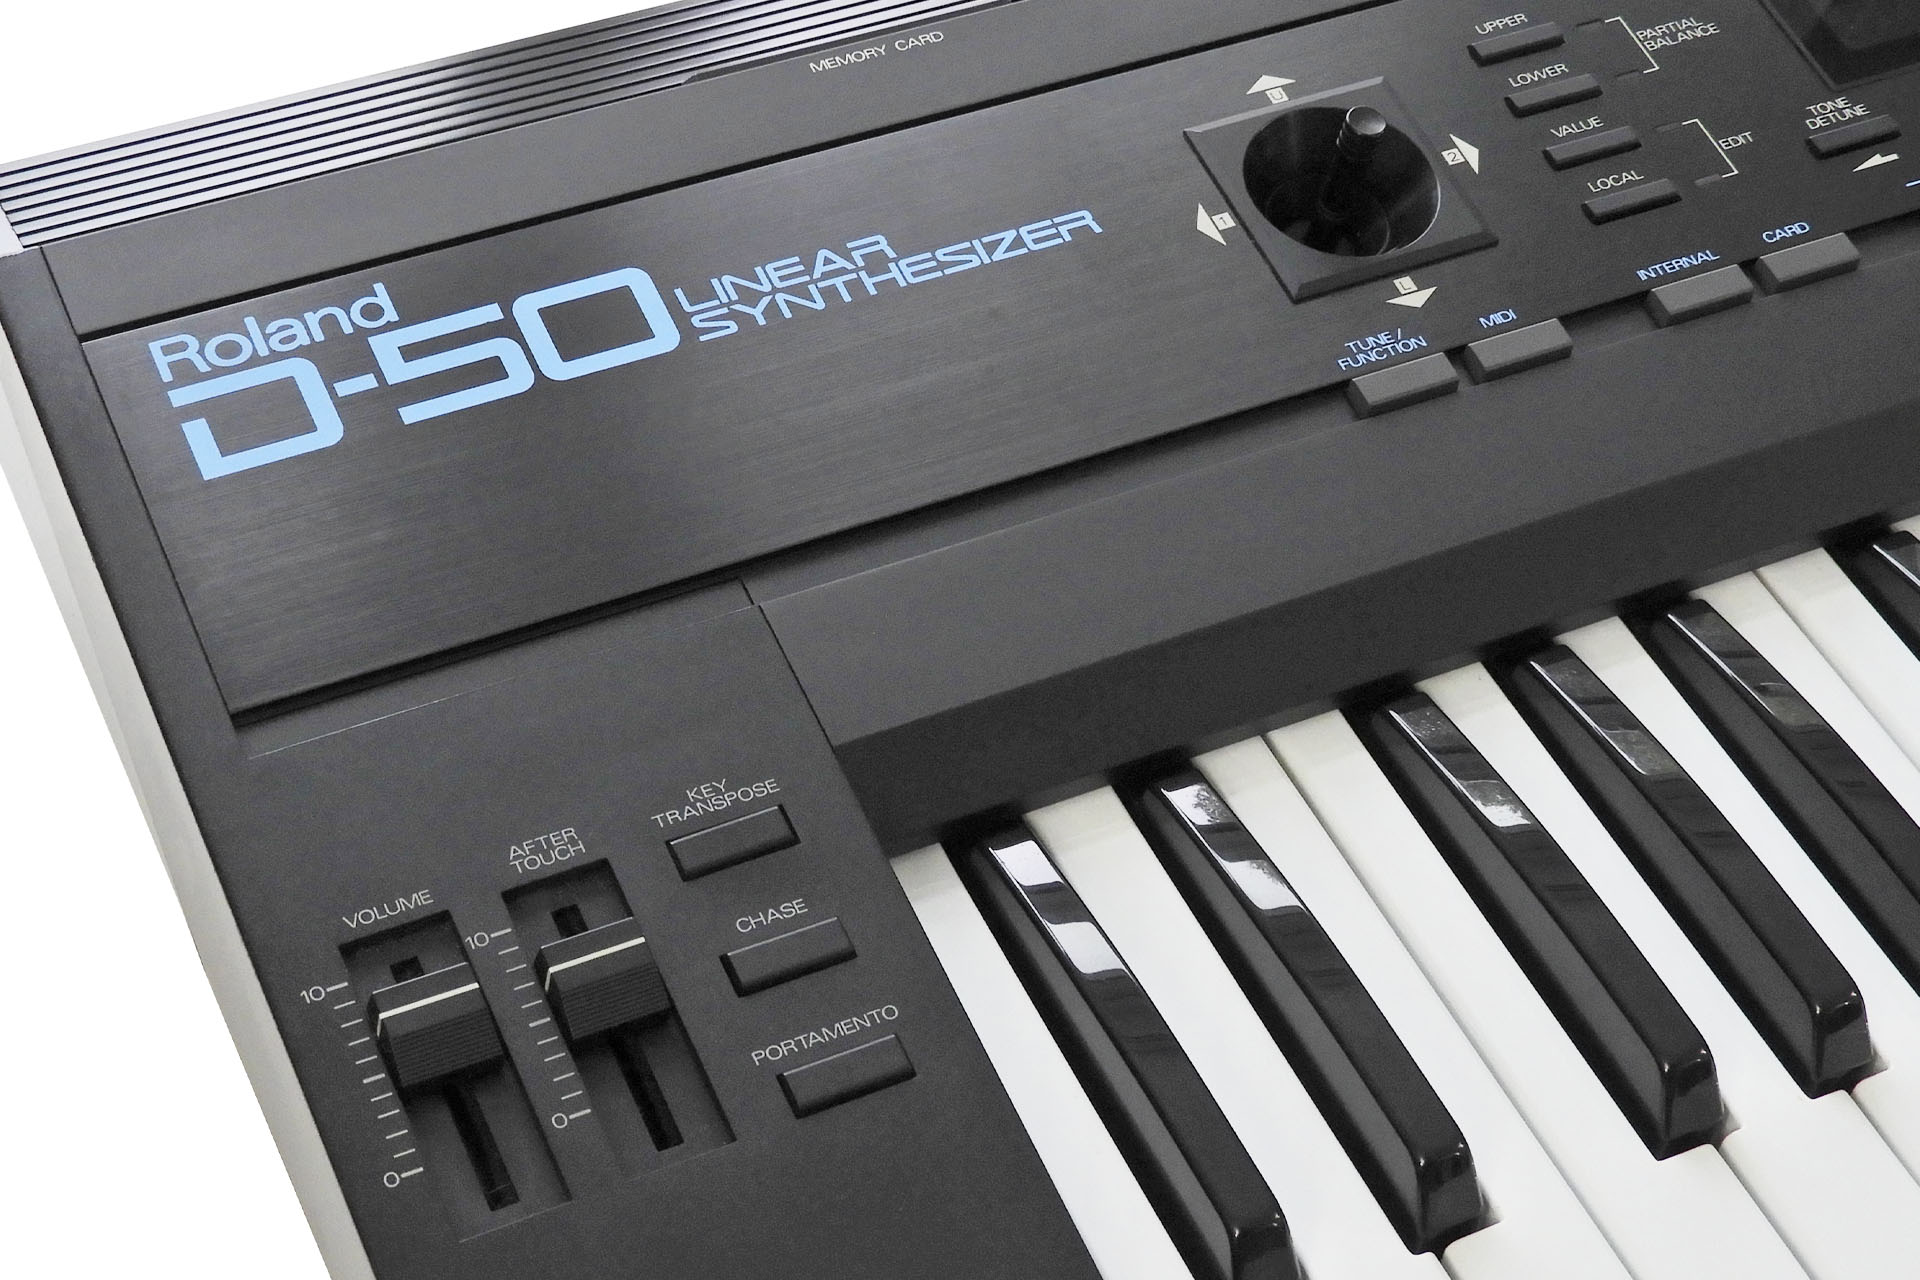
- AT-D-50 - Aftertouch sensor for the Roland D-50.
Please let me know if you're interested in these FSR-based replacement aftertouch sensors.
UPDATE - 29th June 2023
Just letting everyone know that my AT-AJ-2 replacement aftertouch sensor for the Roland Alpha Juno 2 is now up 'n' running. You can read all about it here.
UPDATE - 12th July 2023
When you get e-mails like this, it makes it all worthwhile:
Hi Alex,
I have installed it now.
Its amazing! What a great job you did inventing this!
The feel is so great. I will definitely buy this for my own JX8P as soon as I get the funds.
Installation was easy, great manual. I have found it practical to use one of the large hardboard pieces from the packaging to align the at strip to the chassis. I clamped it onto the chassis left and right and aligned it so that I got the 2mm clearance as recommended.
Thank you for making this possible.
Viele Grüße / Best Regards
Arne Kohlscheen (Digital Audio Service)
UPDATE - 28th July 2023
My AT-D-50 FSR-based replacement aftertouch sensor for the D-50 is a go! You can read all about here.
UPDATE - 2nd September 2025
With the advent of my AT-JX-8P Mk II, this post has been updated.