I try hard to keep my prices as low as possible but quality is equally if not more, important and my philosophy is that there is no point in me doing all of this, if the quality of what I make is not the best I can deliver. I’ve never wanted to be involved with making or selling cheap crap so I've spent quite a lot of time recently, looking into new IEC C14 connectors for Plasma Music power supplies.
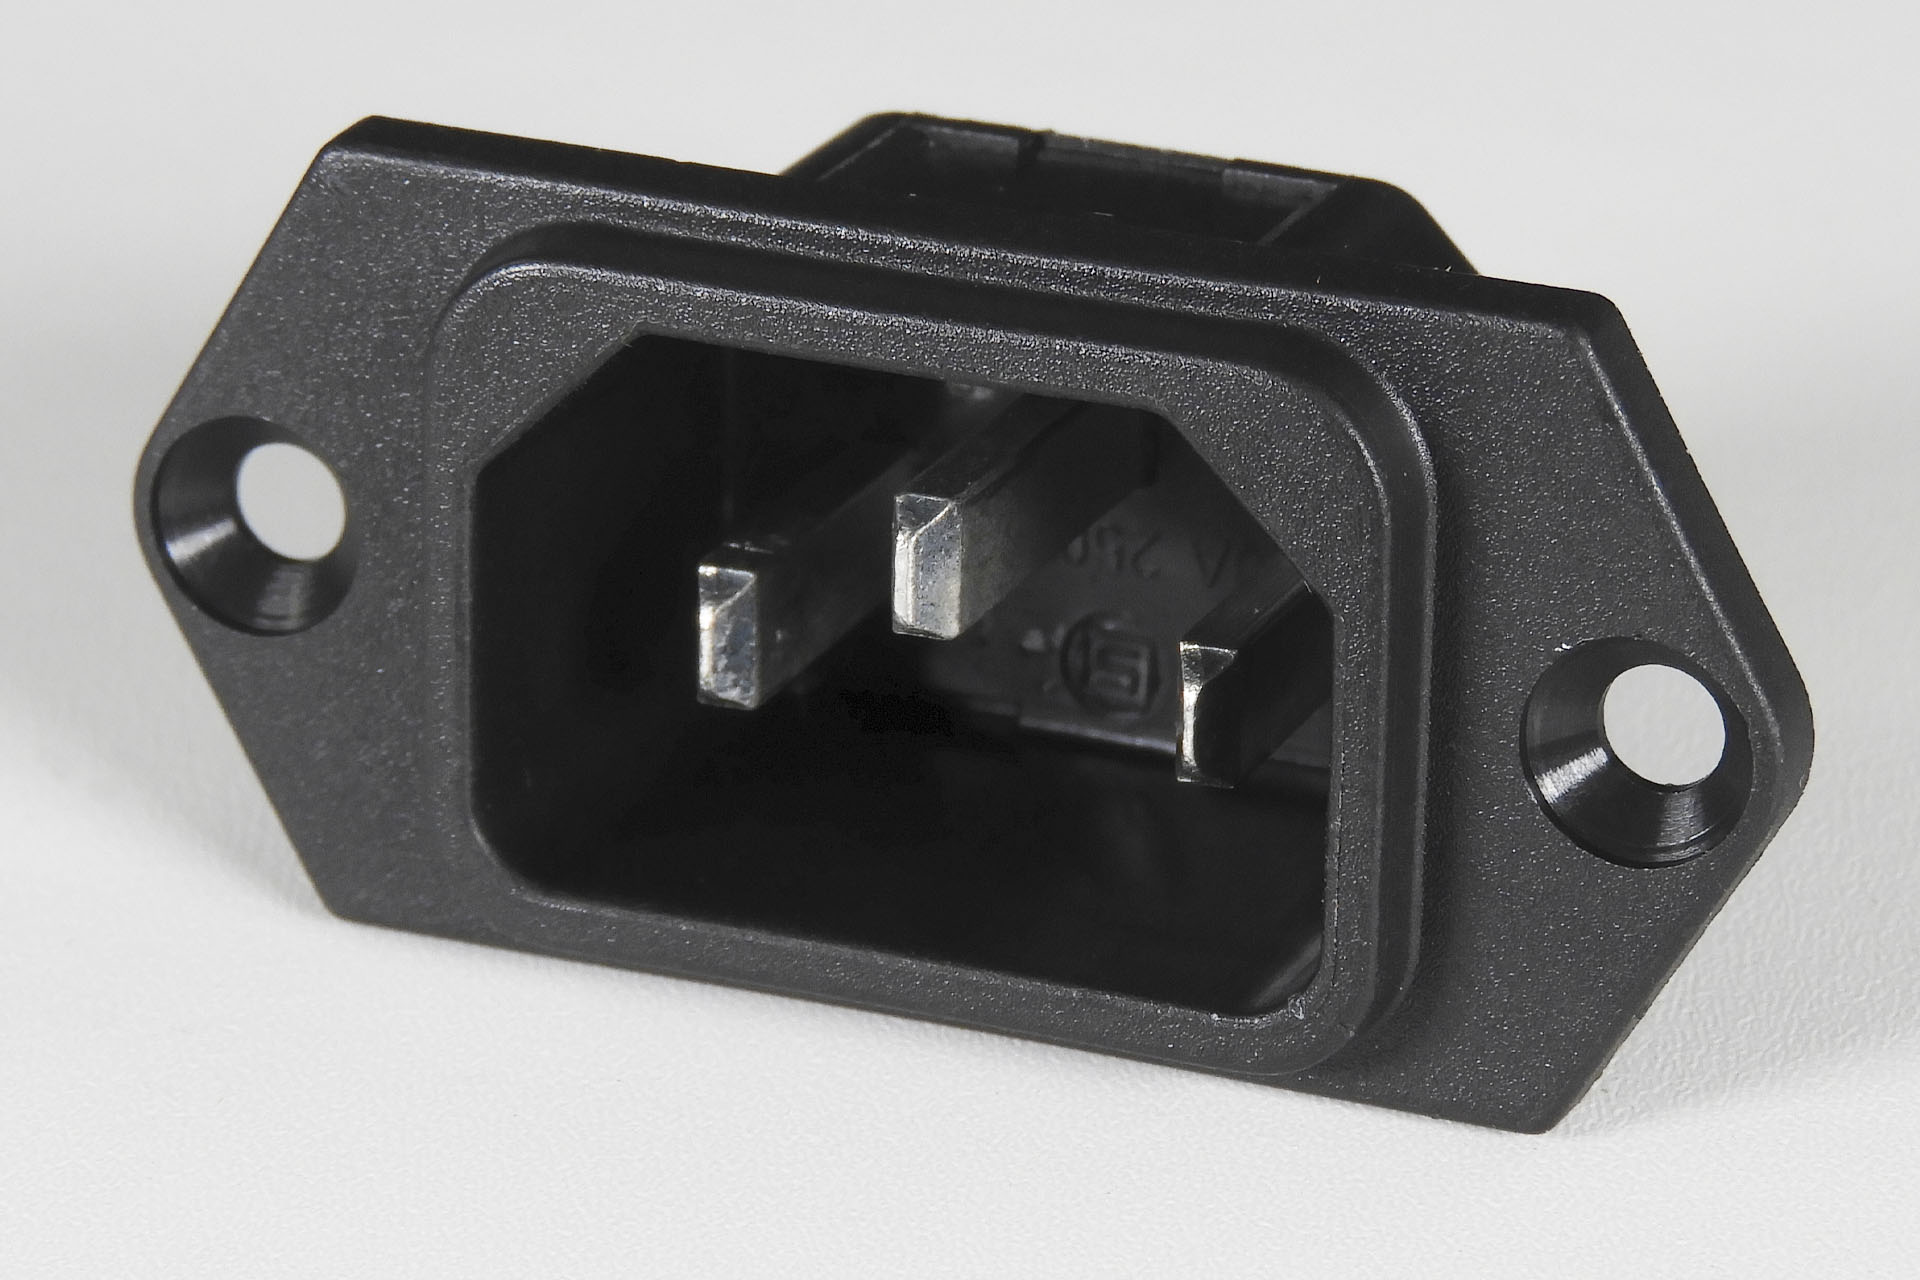
Over the years, I’ve used a variety of IEC C14 connectors but for the power supplies I design and supply specifically for vintage synthesisers, space behind the power inlet socket is often limited. Connectors with 6.3mm (1/4") spade terminals for example, are often quite impractical and so I try to source C14 connectors with shorter solder tags only. Unfortunately, there's not too many to choose from.
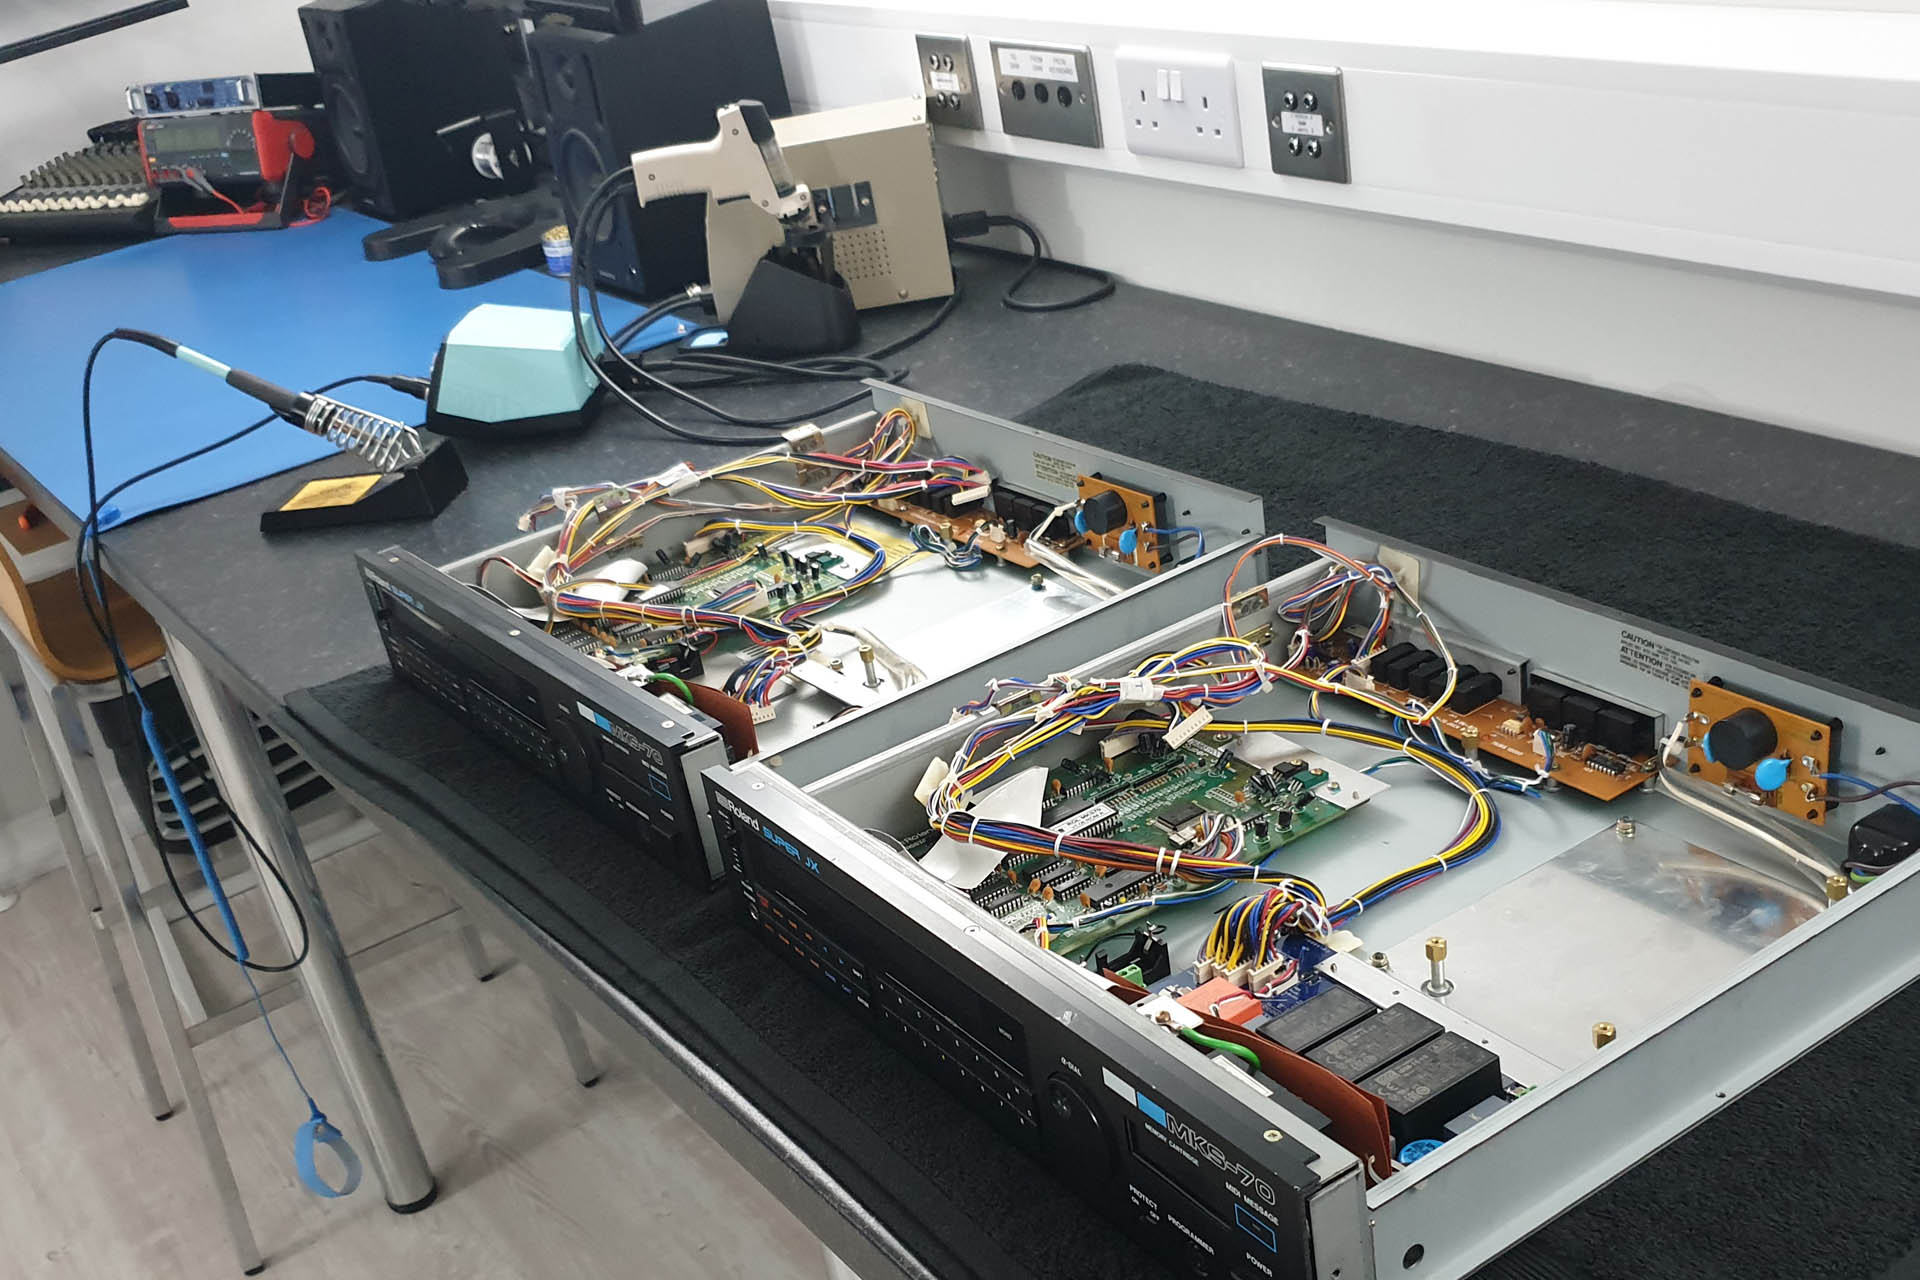
The space behind the IEC C14 power inlet socket on machines like the Roland MKS-70 and MKS-80, is limited. While the 6.3mm spades on the back of the C14 may (just) fit, crimped power cables will not.
Despite changing my soldering iron tip to something a little more heavy duty, I’ve got a bit fed up with just how difficult it can be sometimes, to get solder to adhere to the solder lugs. Quite honestly, if I find it challenging, then I'm concerned for my customers! I’ve therefore, recently changed the make of the chassis mounting C14 connector that I include in my earth bonding kit and that I fit in-place of the now obsolete C10 2-pin IEC connector.
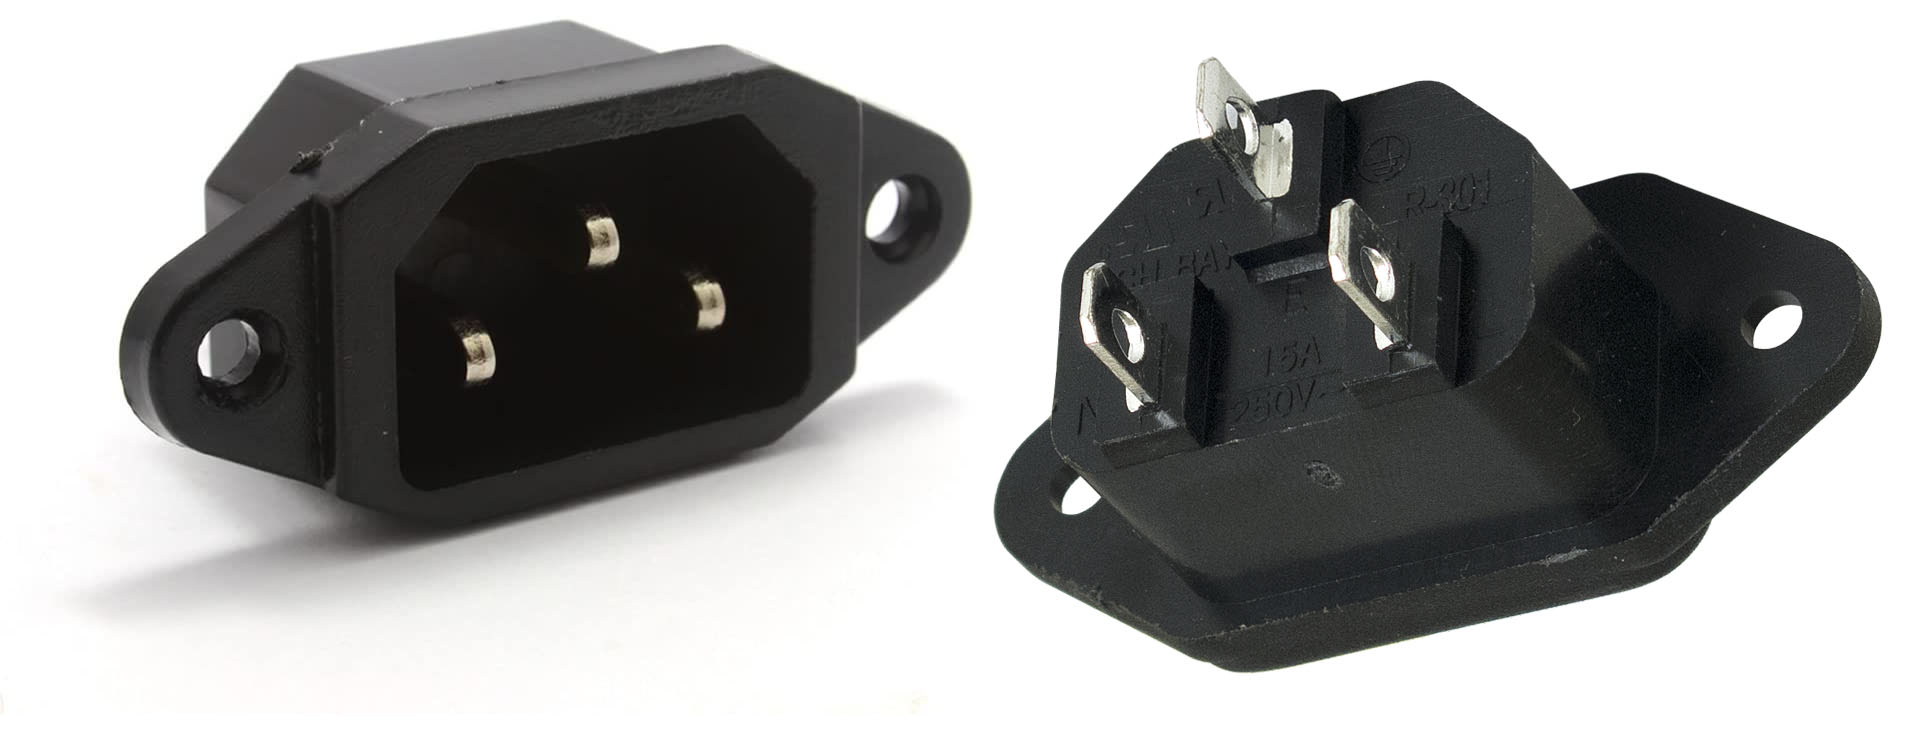
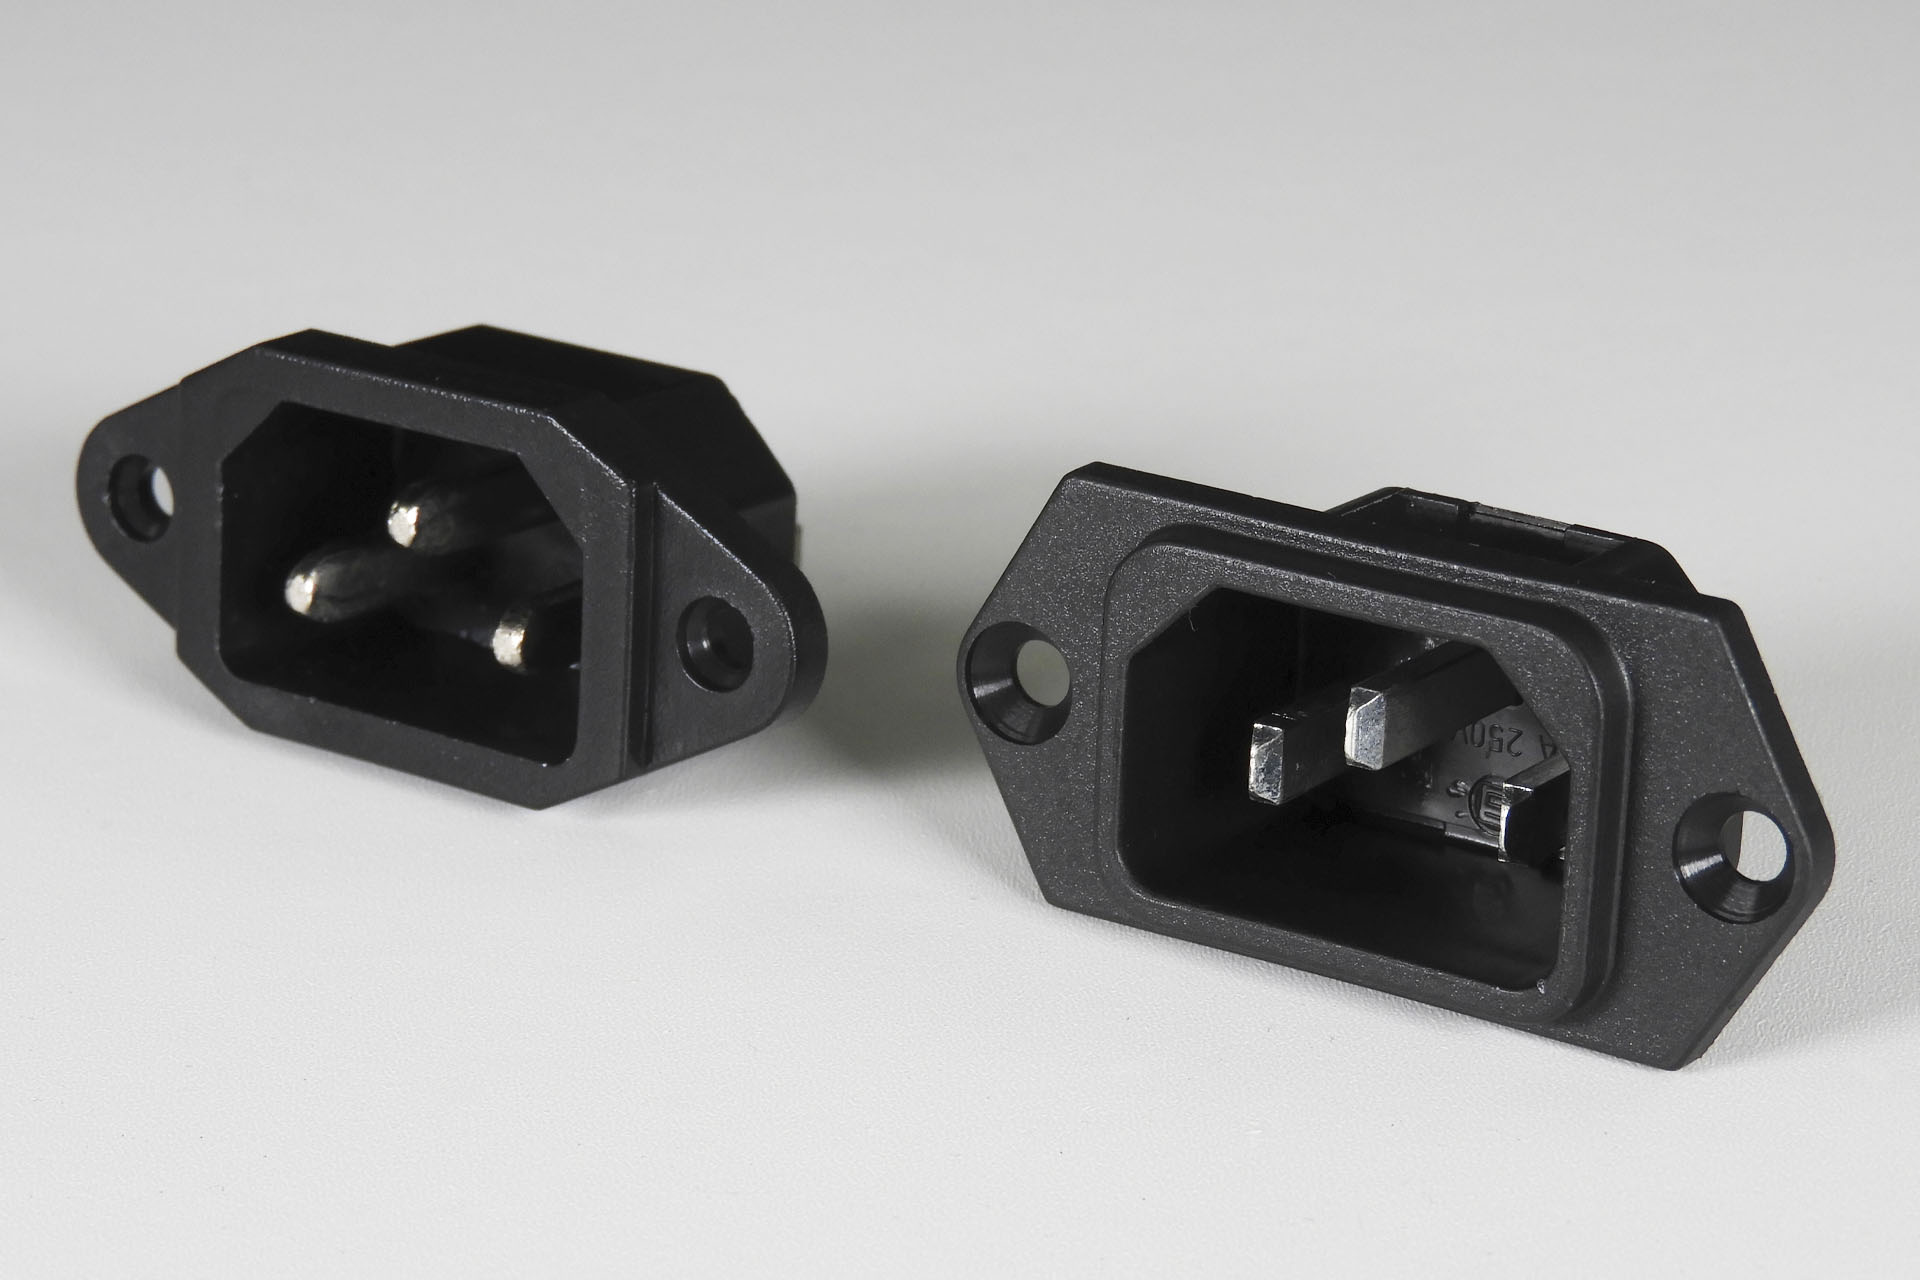
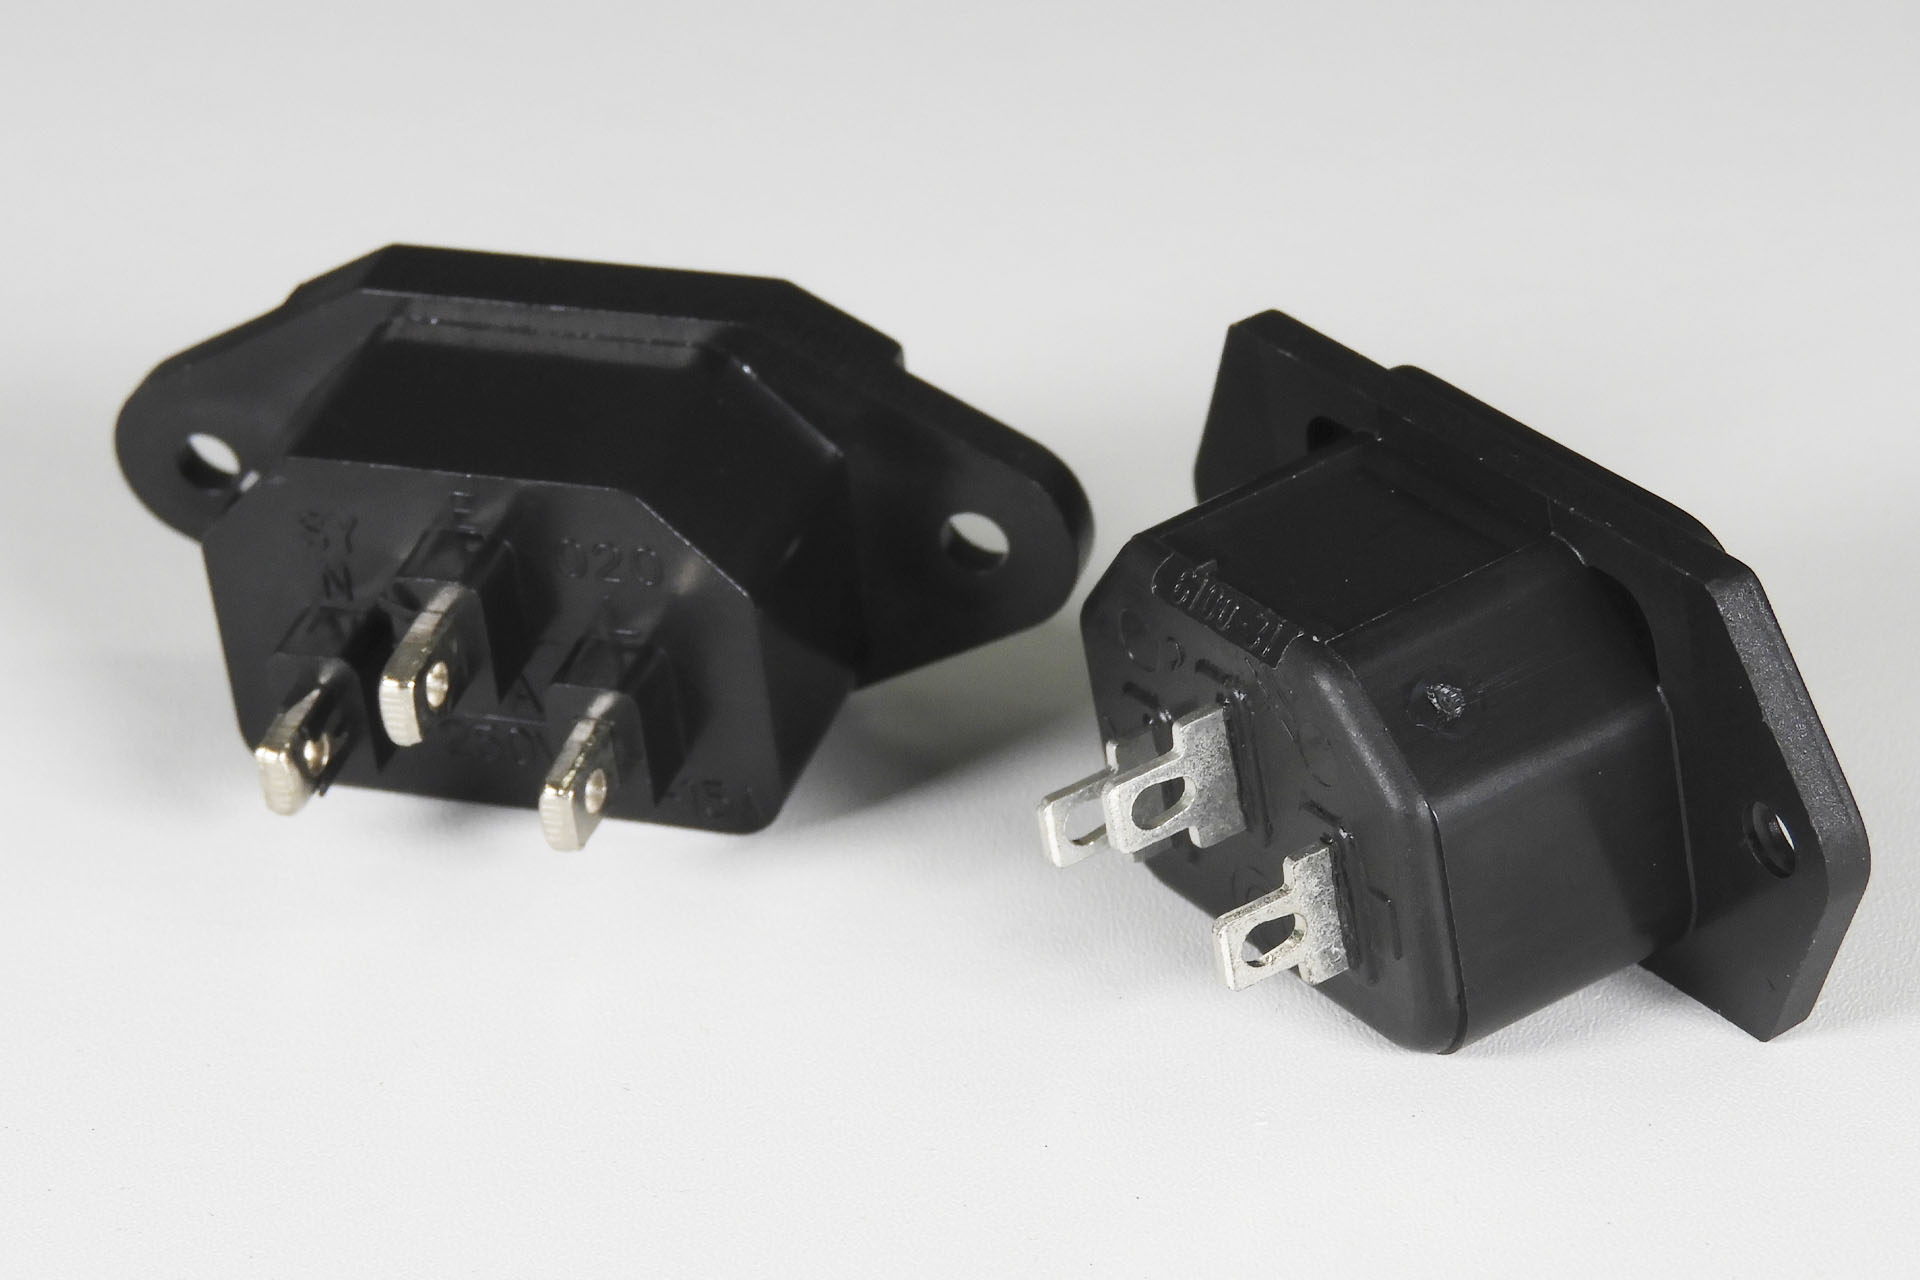
My old IEC C14 is on the left and the new, slightly more contemporary looking C14 is on the right. The tags on the new sockets are much easier to solder, although I still recommending using a more substantial soldering iron tip. They're also much sturdier.
Some may consider that the visual difference between the old and new connectors is perhaps substantial with the newer C14s have a more modern feel about them. More importantly however, they're a better fit for the cut-outs on vintage gear. Hey don't worry, the mounting holes are still 40mm apart! 🙂
While theoretically able to handle more current, the thicker tags on the old C14 connector on the left, simply took a lot more heat to get solder to adhere safely and securely, than those on the new C14 connector on the right. And let's face it... how much current does a synthesiser need?
Replacement power supplies like Guy Wilkinson's P0004 for the Roland Super JX, my Aurora for the Roland MKS-80 and my Supernova for the Roland Juno-106, all have reduced exposure to mains, making them much safer than Roland's original power supplies. To keep things as safe as possible from the power point of entry, I always fit a boot over the rear of the new C14 chassis mounting socket. This boot is also included with my earth bonding kit.
My C10 to C14 conversions and PSU installations ALWAYS include the fitting a boot over the rear of the new C14 socket.
FOR YOUR INFORMATION
The IEC C14 socket that I use, is a drop-in replacement for the 2-pin IEC connector found on many Roland keyboards and rack modules. It is NOT necessary to drill, file, cut or modify the case to fit this IEC C14 socket.
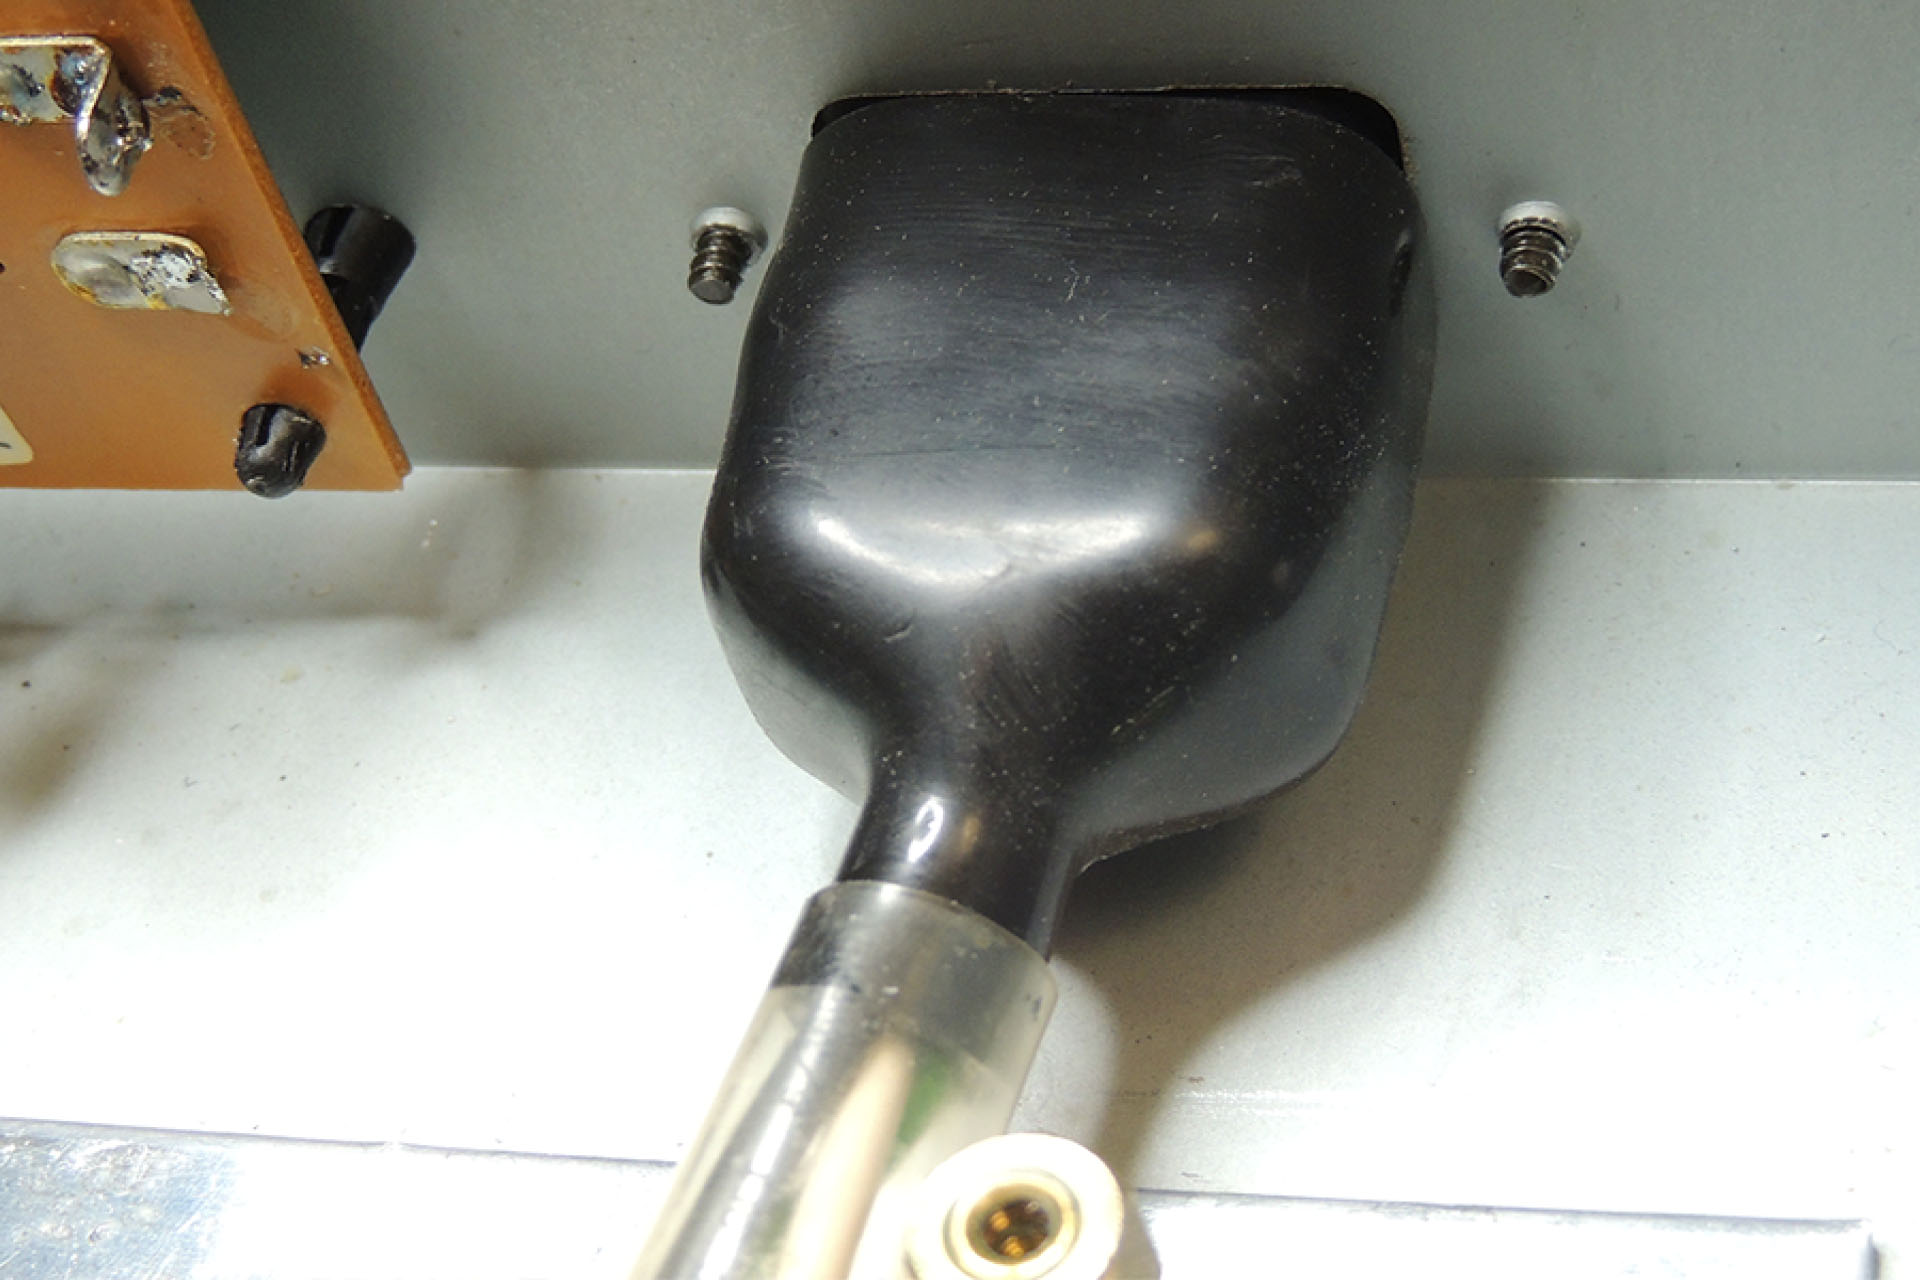
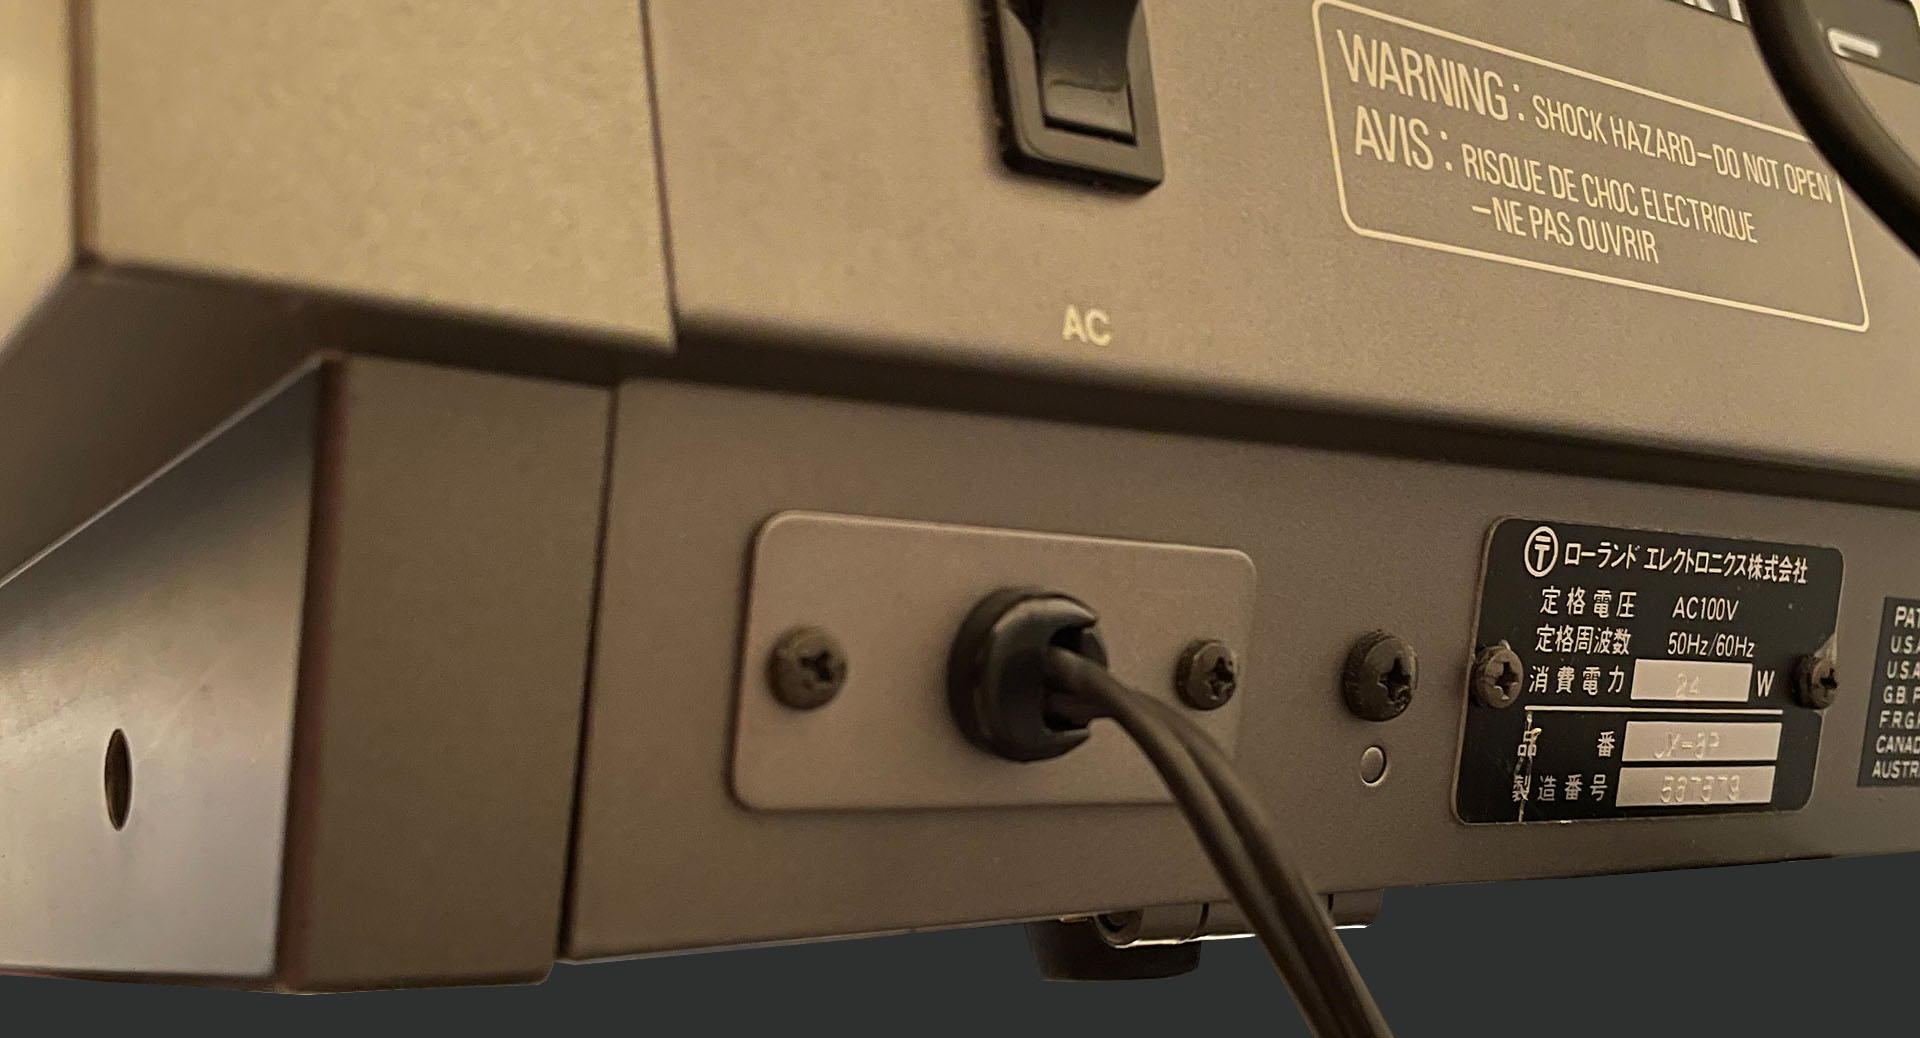
A little known fact is that even keyboards with integral (hard-wired) power cables, have the power cable mounted to a metal bracket which is secured to the same screws holes and with the same type of screws, that are used on versions with IEC connectors! Behind that plate, is a cut-out for an IEC C14 connector.
Below is an image of the back of a Japanese JX-8P with a hard-wired power cable. You can clearly see that the cable goes into a cable gland which is in a very IEC C14 sized metal plate. T H A N K Y O U, Roland!!!!
99% of the time, the new IEC socket needs to be wired in situ, as it's often soldered to existing live and neutral wires within the machine in question. As such, the easiest, quickest and most reliable solder tags are necessary. Cheaper C14 sockets tend to have heavily plated and quite thick tags which require a lot of heat so as to allow solder to adhere properly. Often made from budget plastic, applying excessive heat can result in the connection pins (which are the other side of the solder tags) becoming loose. That's seriously not good! 🙁 A trick I use to reduce the risk of that, is to plug in a C13 connector into the C14 and then lock the whole thing into a vice.
I use a C13 to 'hold' the pins inside a C14 connector while I solder on to the solder tags on the rear.
The new IEC C14 connectors that'll be used on Plasma Music power supplies and that will be shipped as part of my earth bonding kit, will make life easier a lot for my customers but I always welcome feedback so please don't hesitate to contact me with any comments or opinions.
In my post of 24th June in which I discuss changing the battery on the Roland M-64C, I mentioned how sometimes it seems necessary to destroy the label to open the cartridge. I also mentioned that to help out a few people, I thought I'd design a replacement label for the Roland M-64C memory cartridge. This post elaborates on the design that I've come up with.
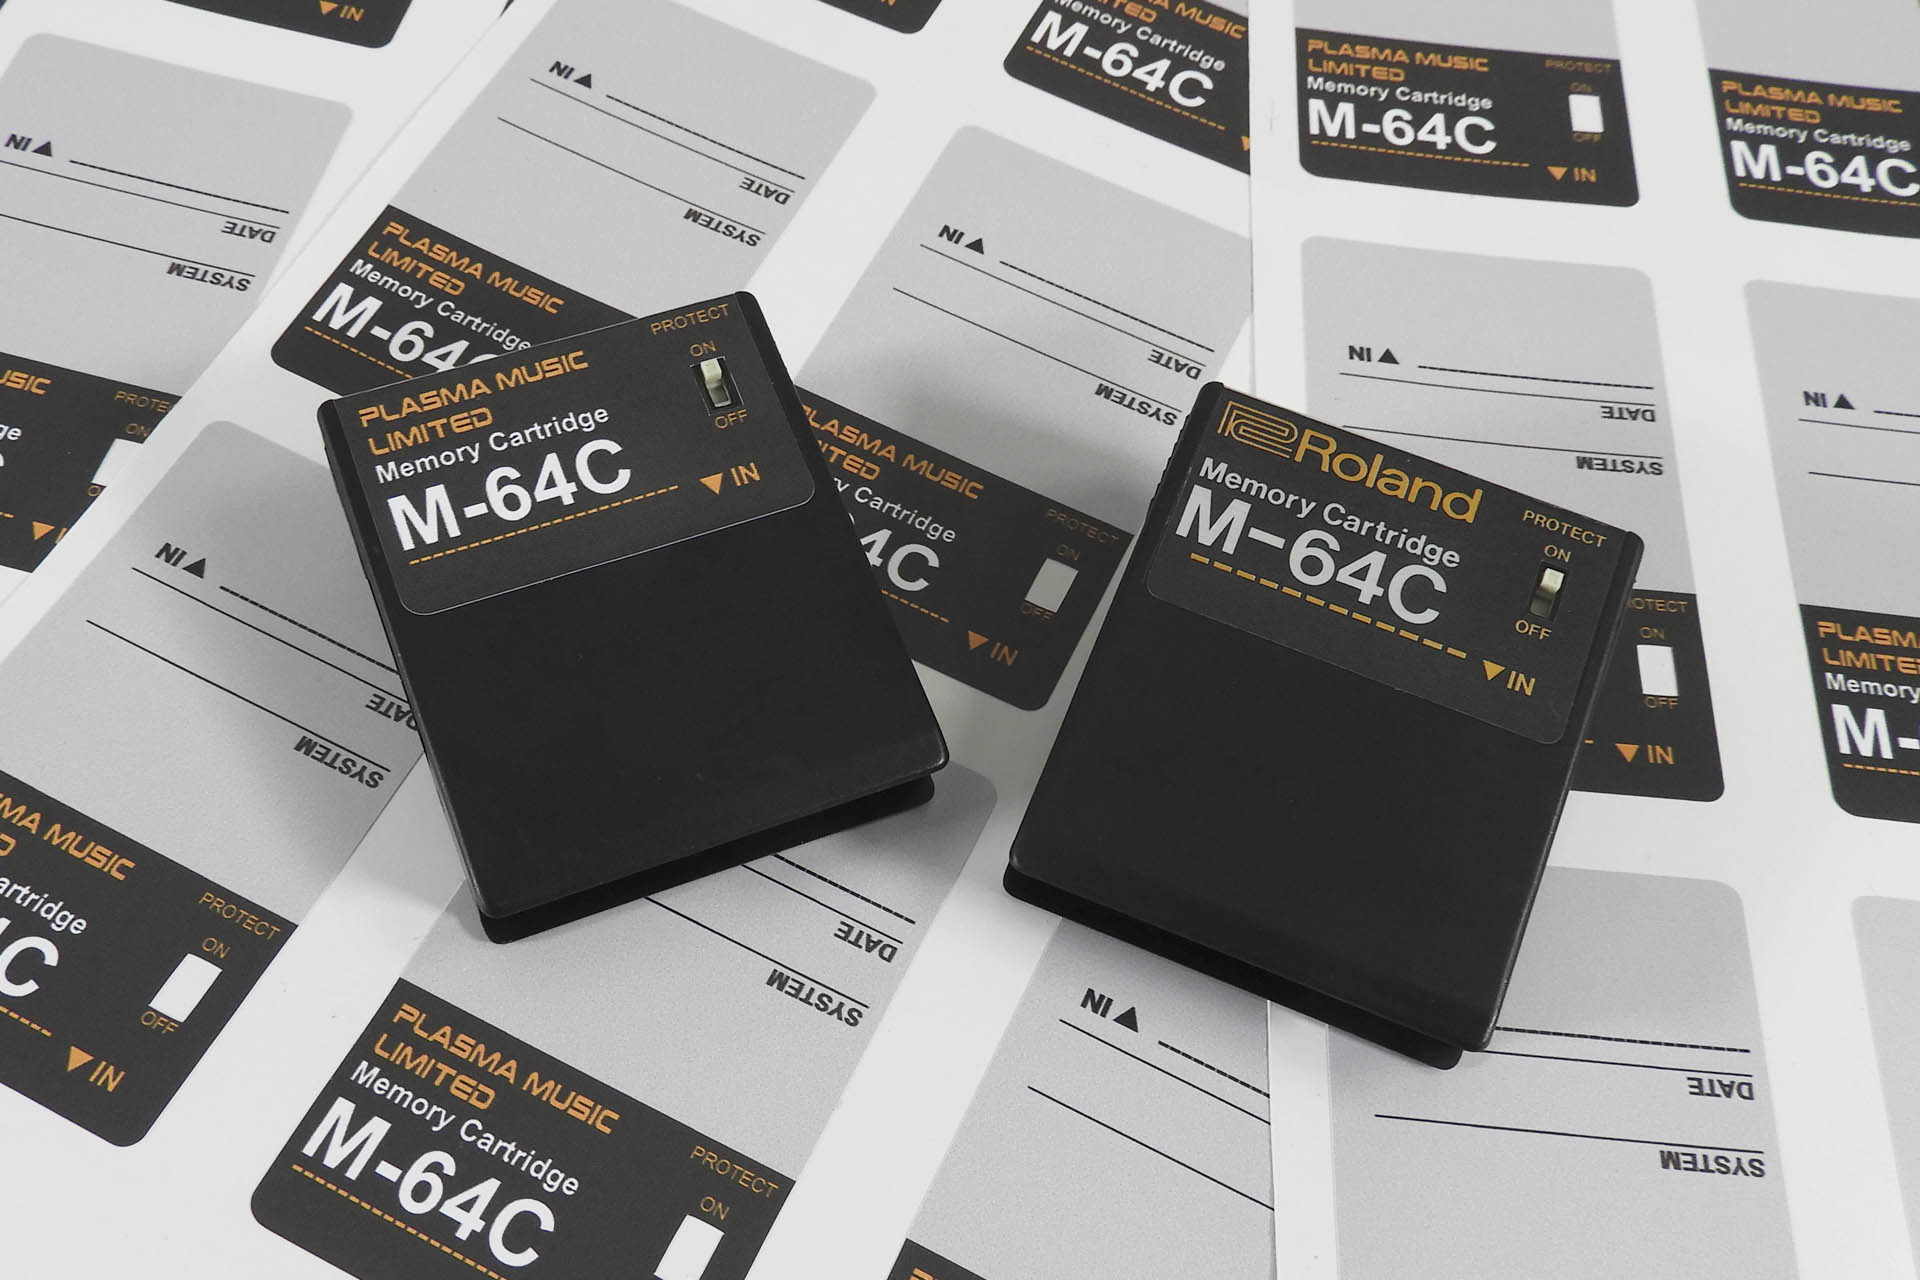
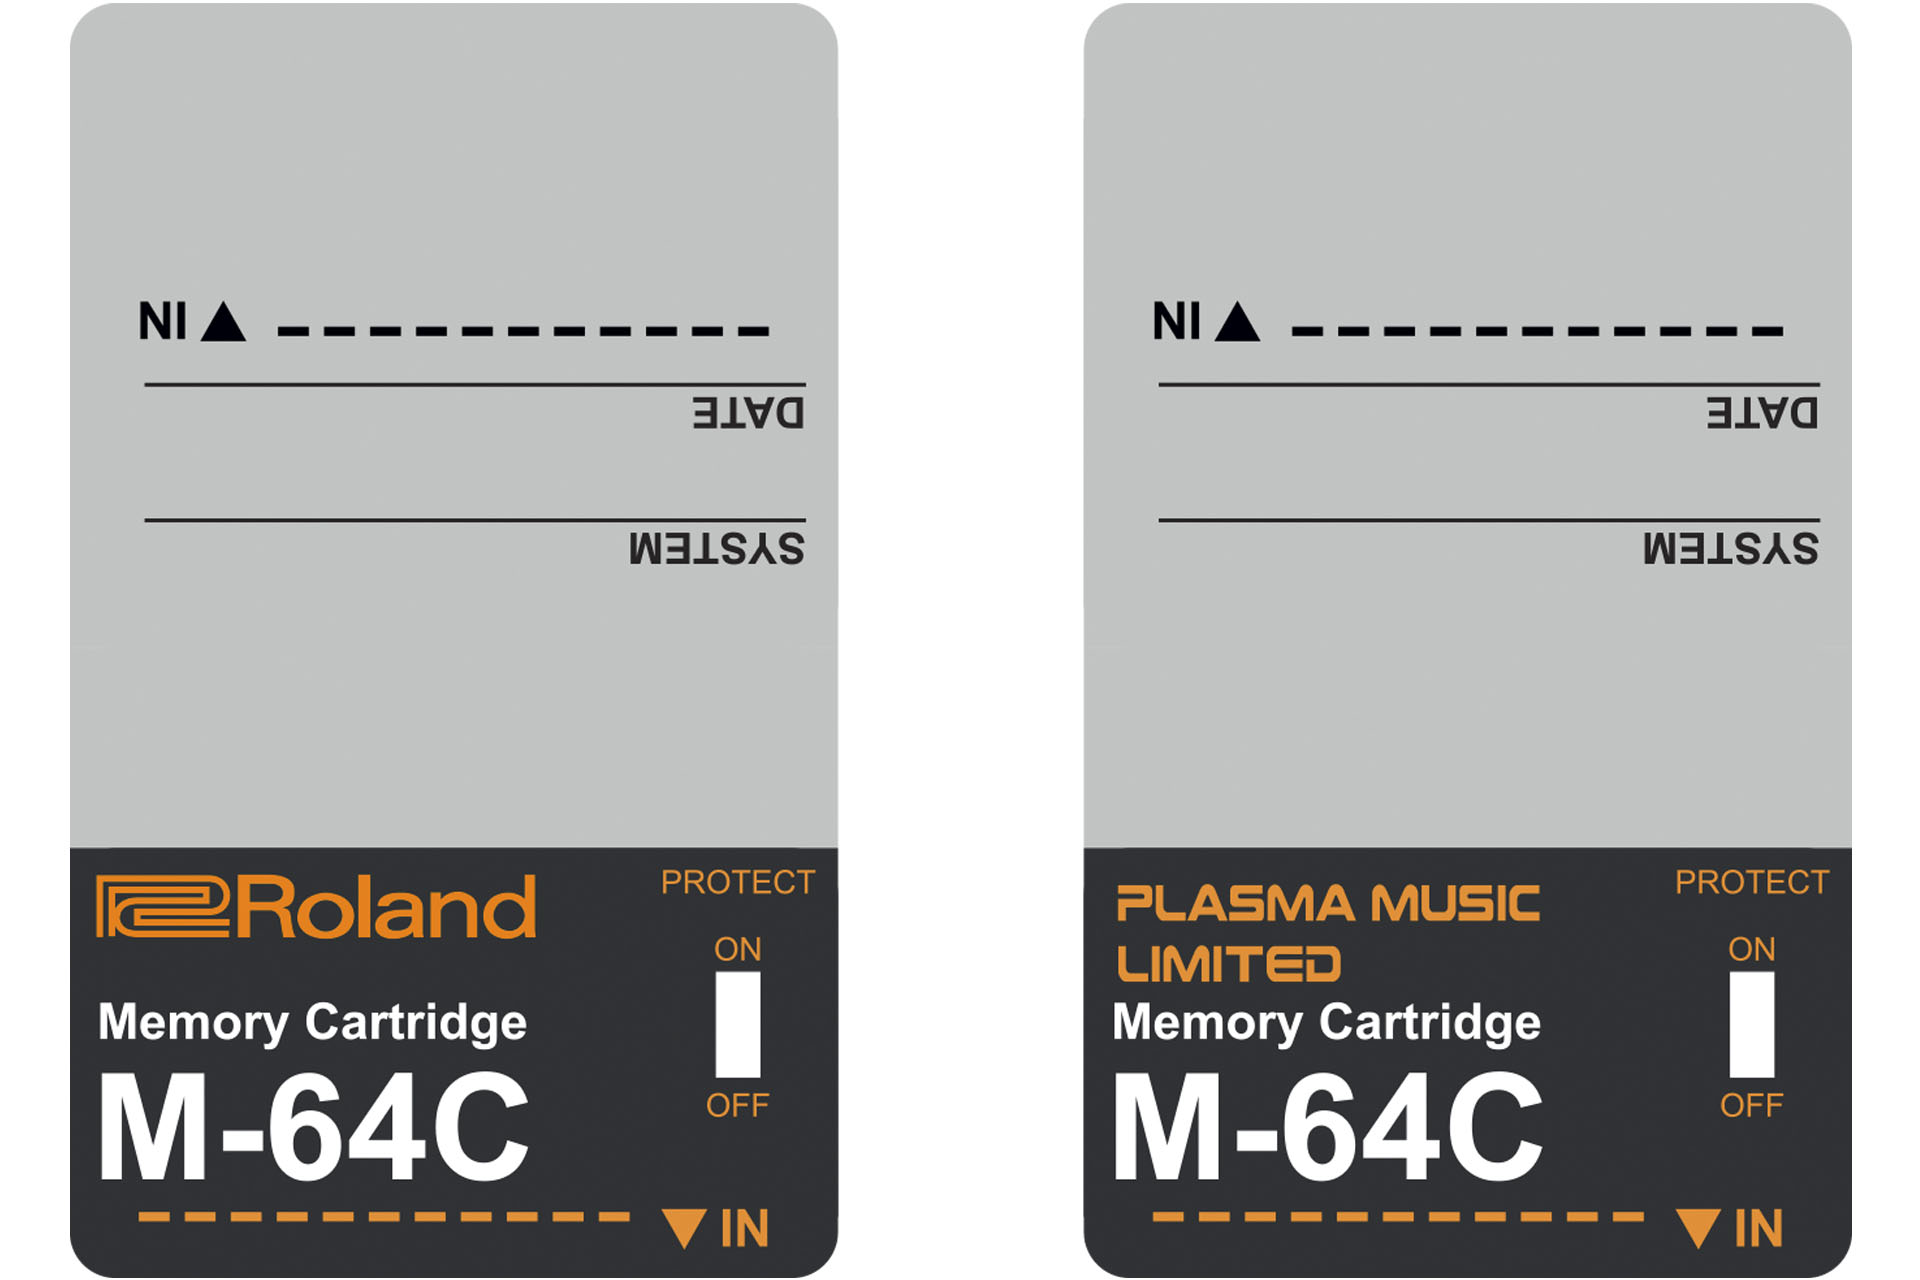
Here's my second attempt of a replacement label for the Roland M-64C. This has now been tweaked (third version) and the orange line at the bottom, now more resembles the original.
Roland printed the original on a super-thin metalized medium. That was difficult for me to do but my printer did manage to produce a thin, self-adhesive, vinyl label. Diverse Print & Design advised me to include a bleed layer and a cut layer on the file. The test print of version 3, was pretty good!
Here's my third version with an orange line at the bottom that's more like the original. Not wanting to infringe any copyright so the version on the left, was scrapped.
So as it happens, I've just repaired and modified a MKS-70 to full 'mod spec' and it's ready to ship back to Washington, USA. The customer asked me to change the battery in the M-64C that he included with his machine and this was the ideal opportunity to design a replacement label for the Roland M-64C memory cartridge.
I'm now thinking that I'm just going to give these away when I get eighties Roland gear in for repair, service or modifying. If you want to have a go at printing these yourself, you can download the Adobe Acrobat file here. Either you or your printer will need Adobe Illustrator to isolate the bleed and cut layers.
So I posted on Facebook and of course someone came back saying that they have a couple of M-16C cartridges. 😂🤣Here you go!
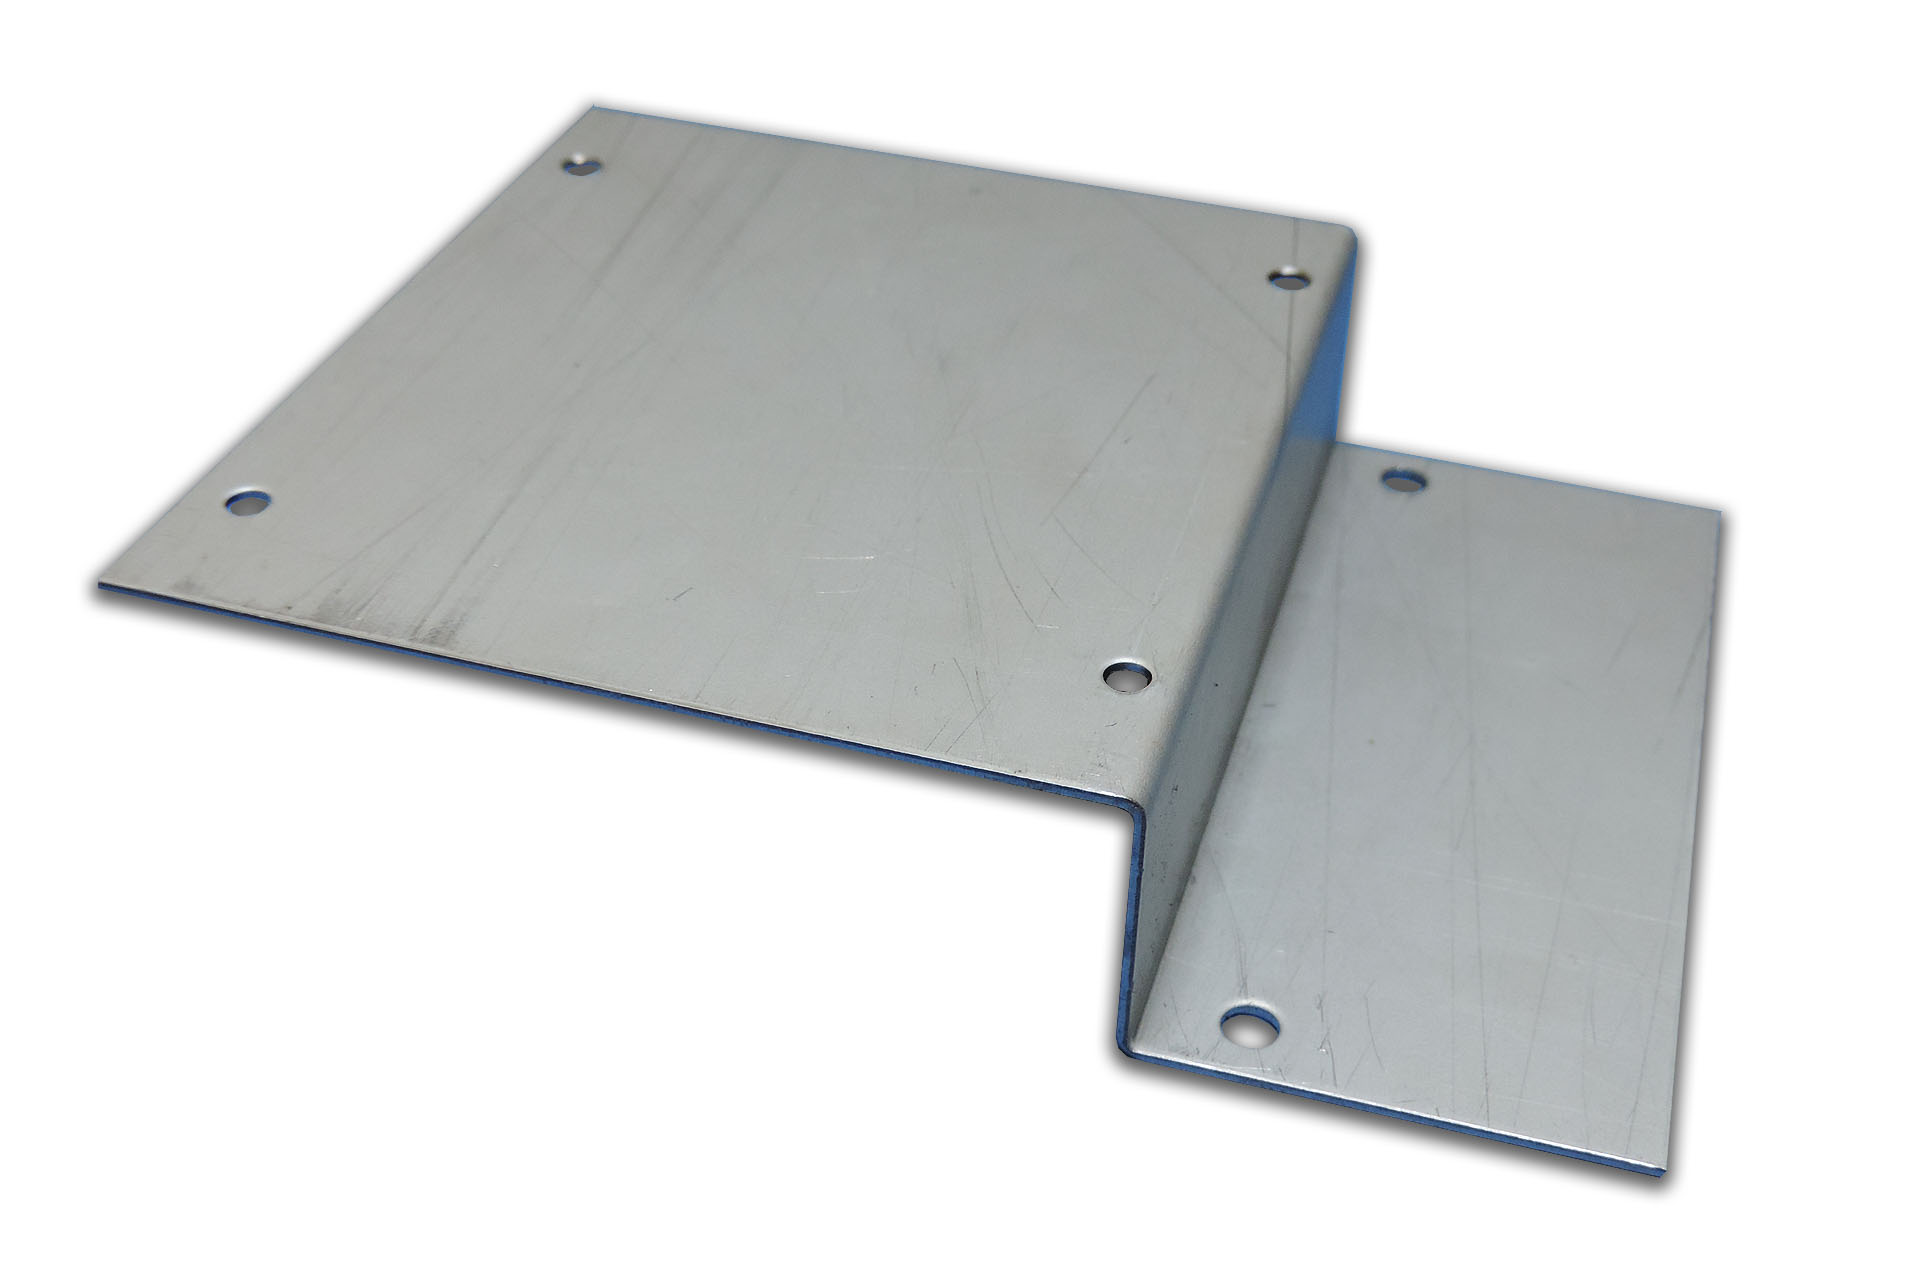
After fitting a couple of Guy Wilkinson's VFD modules and realising that the controller PCB needs to be mounted to the rear of the MKS-70 front panel by drilling holes and using hex-spacers, I figured on trying to re-purpose my old V02 bracket. By adding three more holes, the V02b mounting bracket for the MKS-70 VFD module was suddenly born! 🙂
Here's my original V02 which removed the necessity to drill holes into the MKS-70 voice-boards, so as to mount Fred Vecoven's original PWM daughter-boards.
When I was installing a lot of Fred Vecoven's original PWM kits, I designed a bracket to make things easier. The V02 could only be fitted to MKS-70s that had Guy Wilkinson's P0004 power supply as it occupied the space previously taken up by the transformer. My original V02 however, removed the necessity to drill holes into the voice-boards to mount Fred's PWM daughter-boards.
Here's my custom V02 bracket holding a pair of Fred Vecoven's original PWM daughter-boards.
Fred Vecoven then released his fabulous digital PWM upgrade which easily mounts to the MKS-70 voice-boards in place of the original MKS-70 counter chips. My V02 wasn't necessary anymore. 🙁
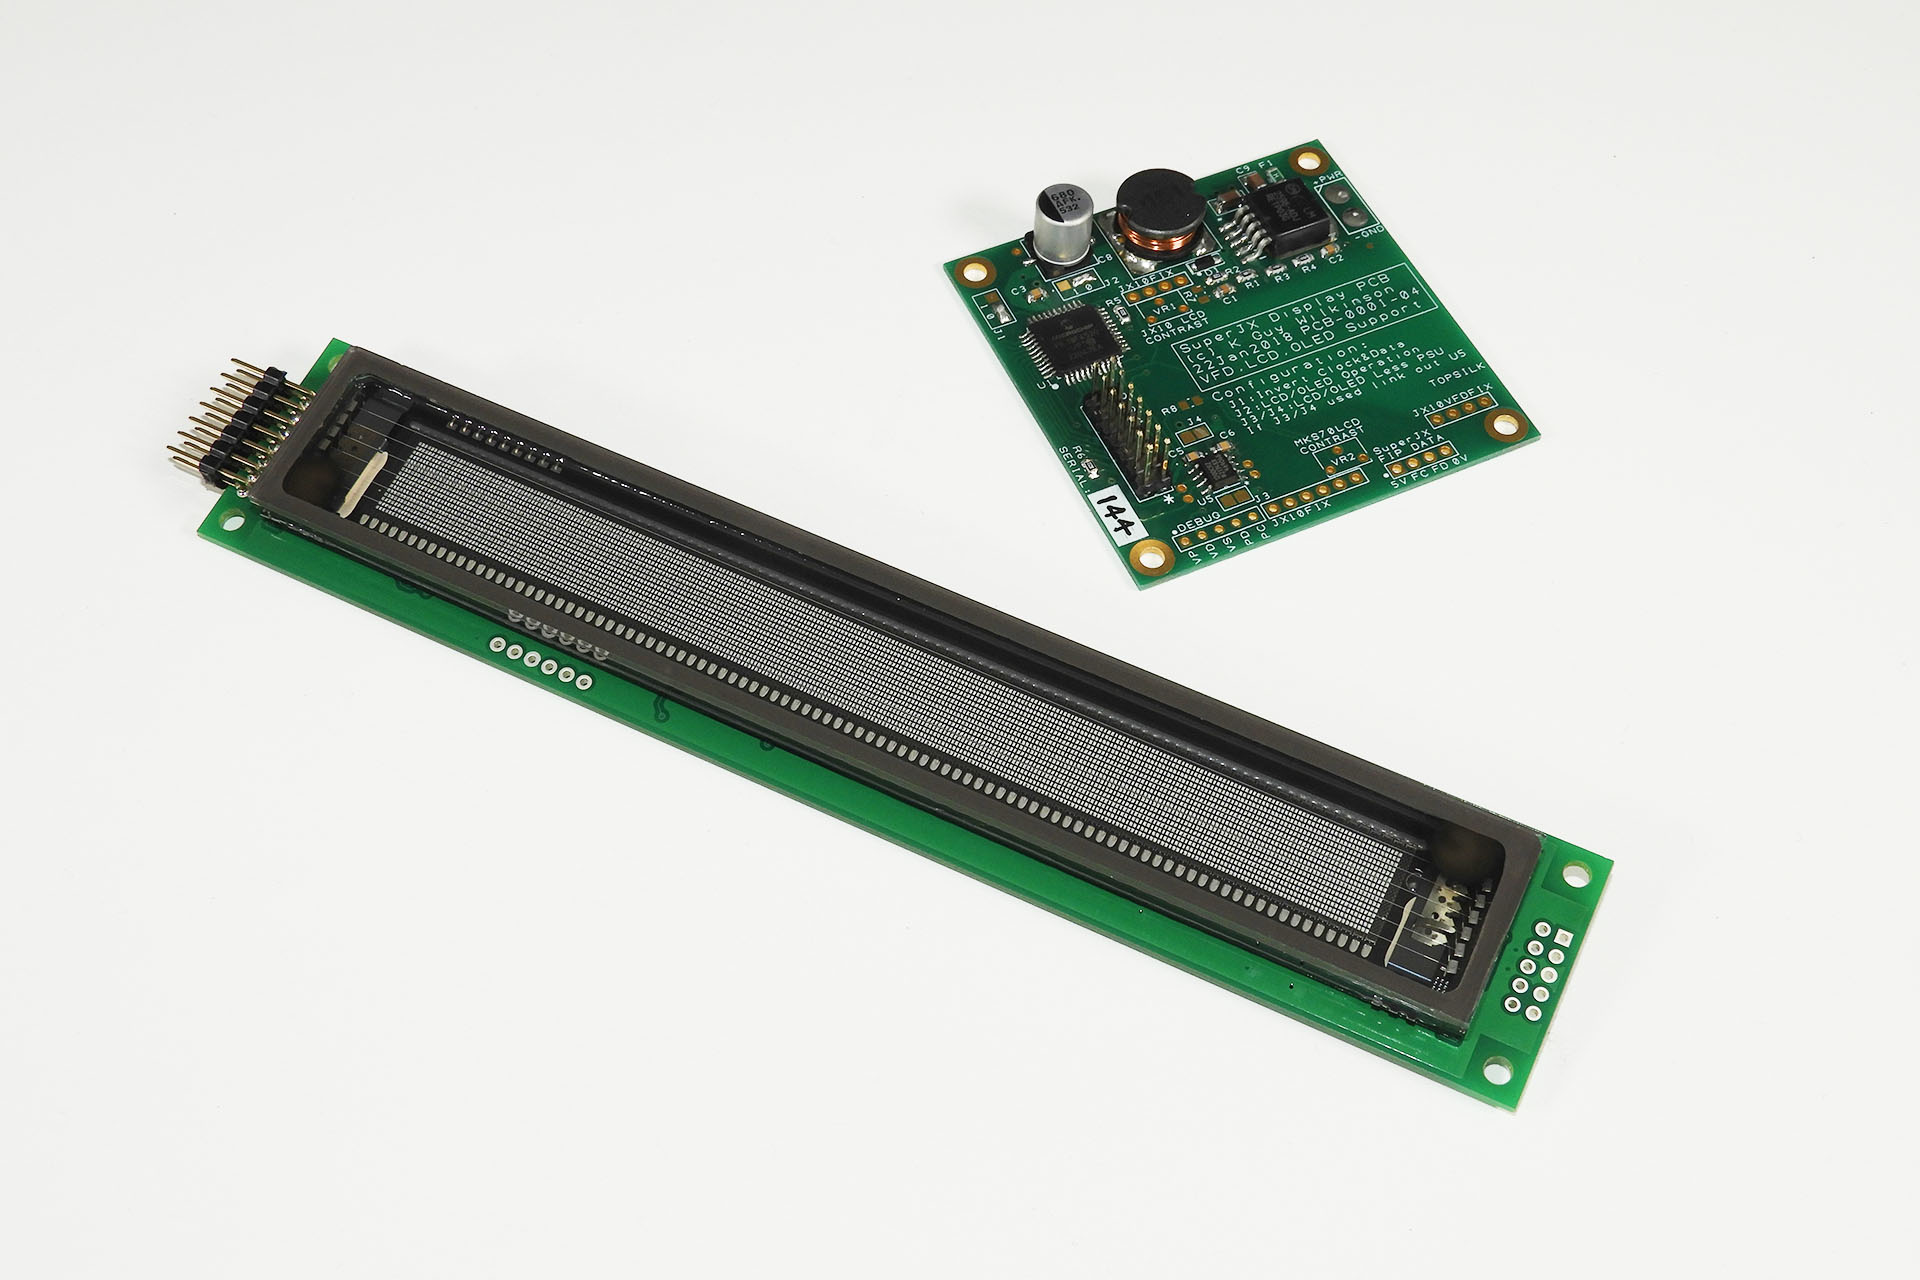
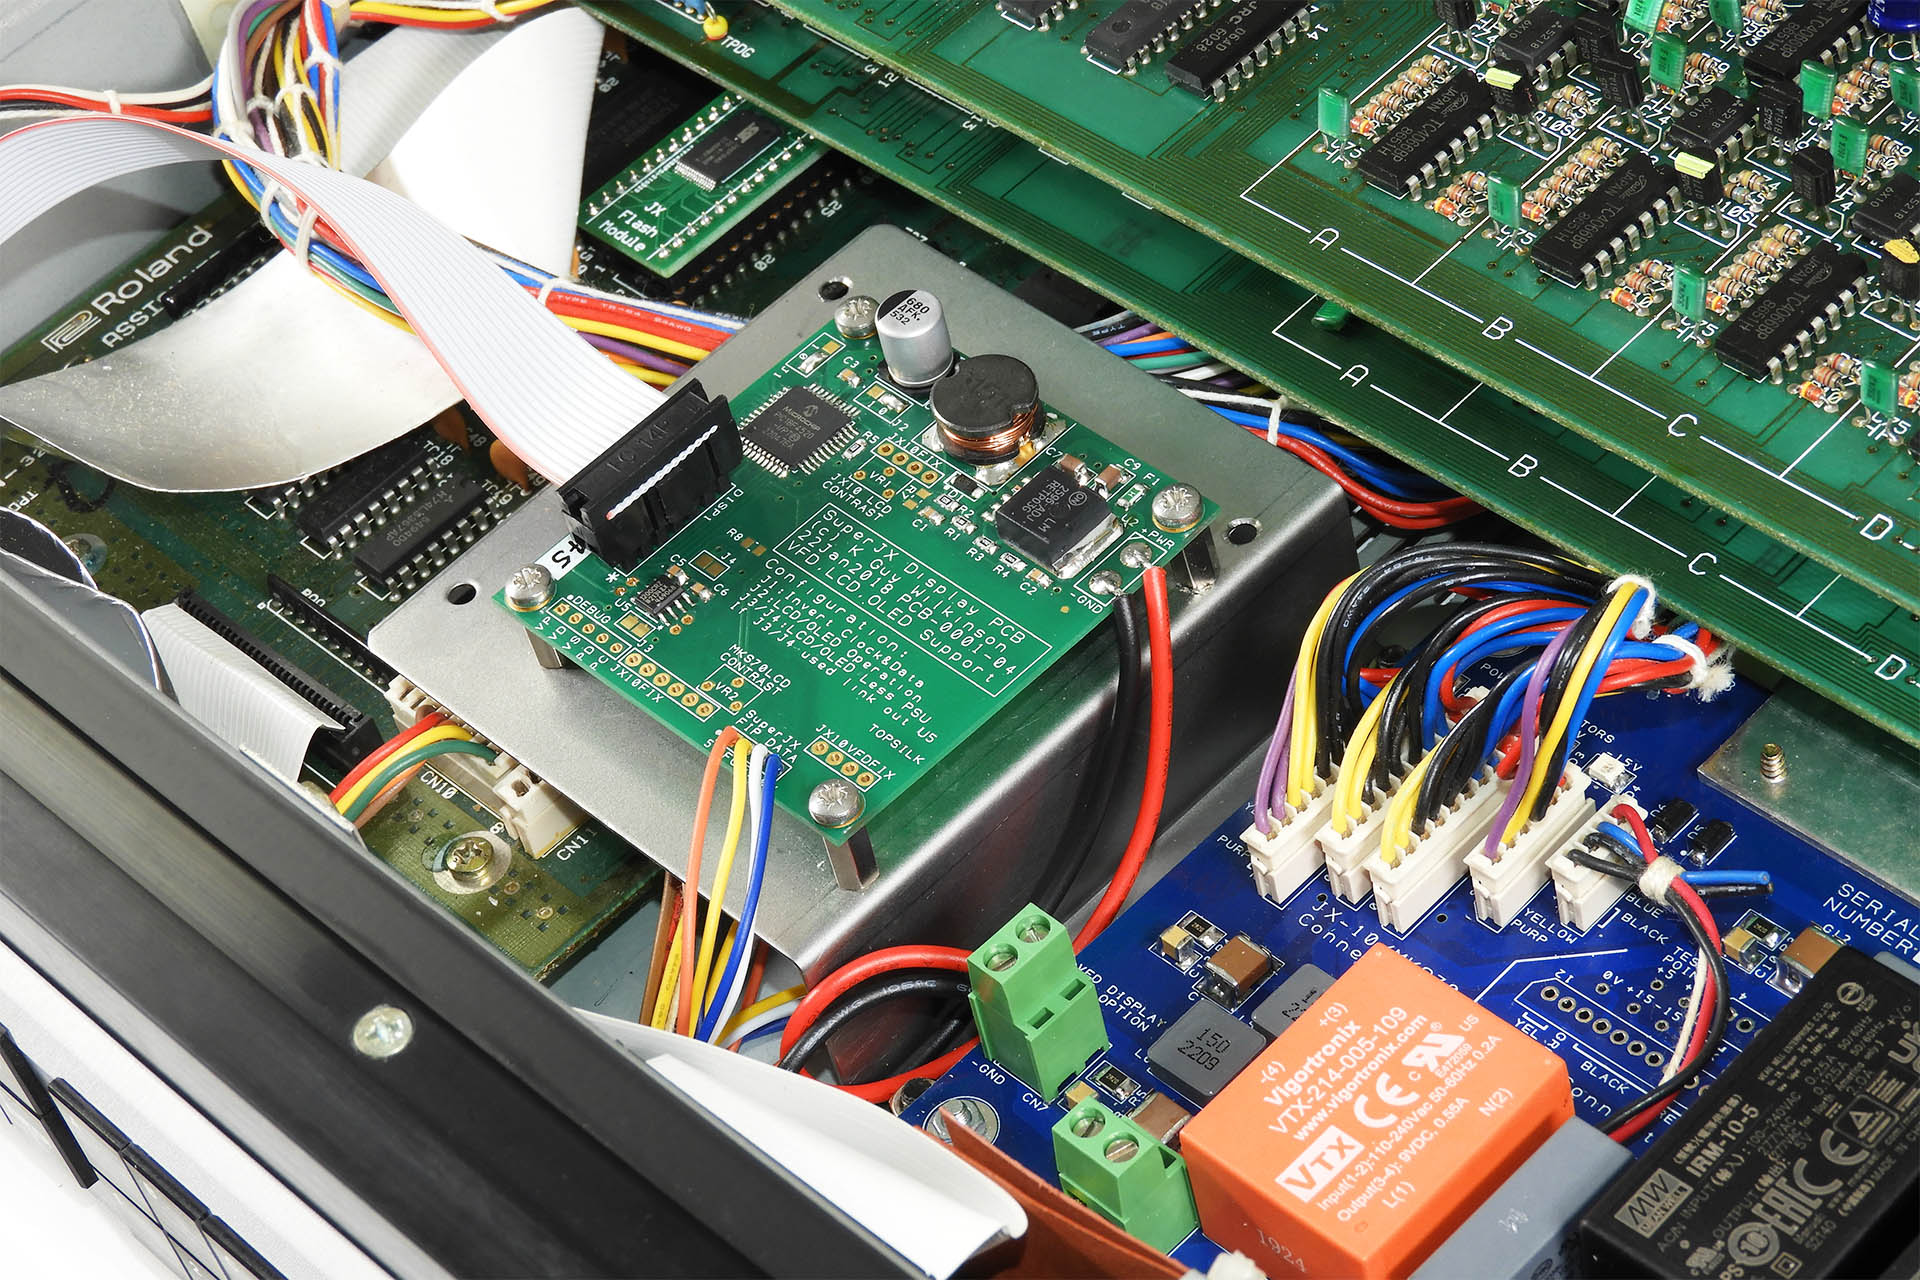
Guy Wilkinson's VFD module for the Super-JX is amazingly popular and rightfully so. Retaining a good degree of visual familiarity when compared to the original display, it's a great bit of tech and a super upgrade for these old machines.
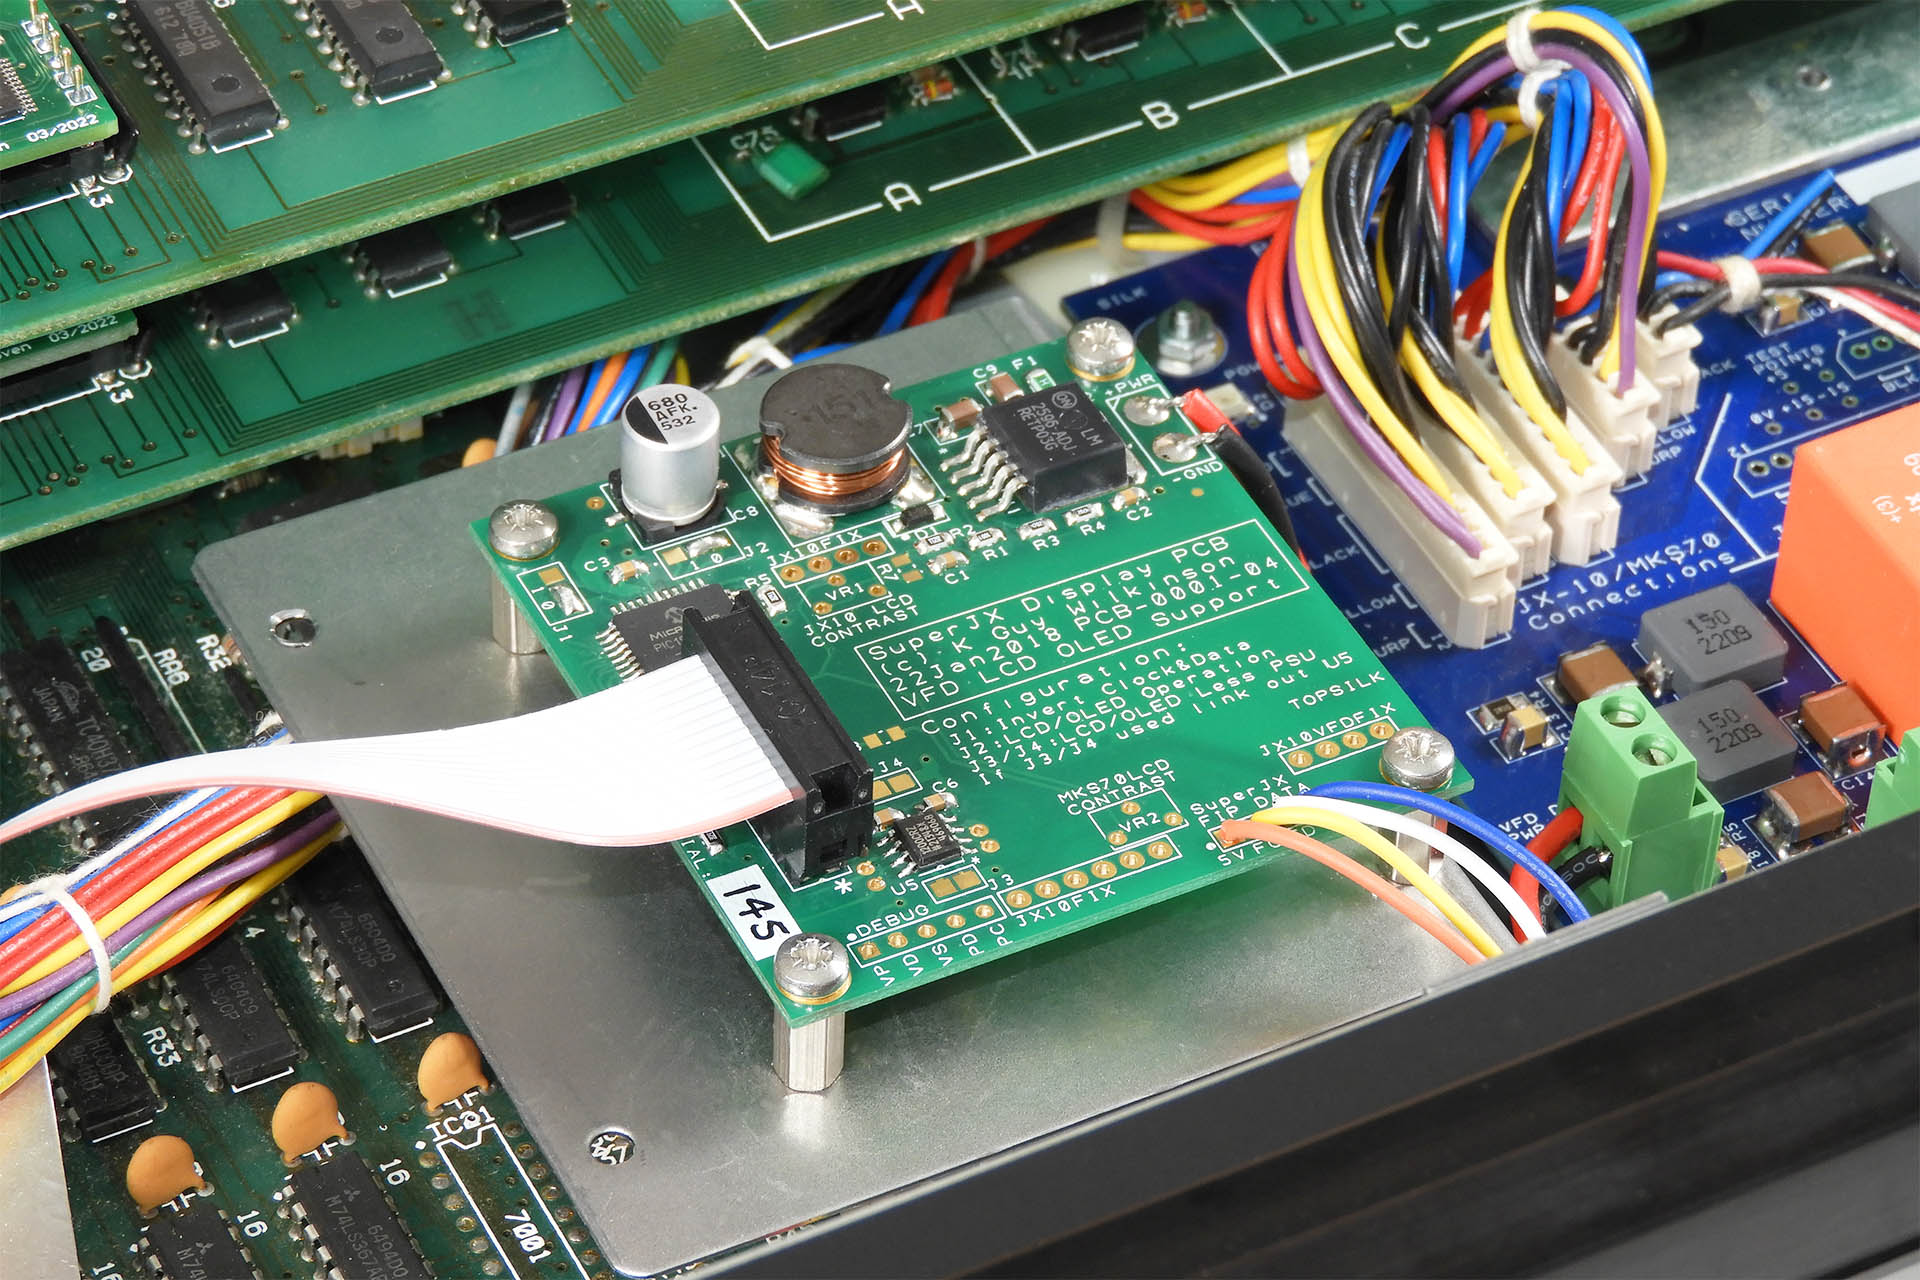
The two components of Guy Wilkinson's GU-280 VFD kit for the Roland Super-JX; the display itself and the controller module.
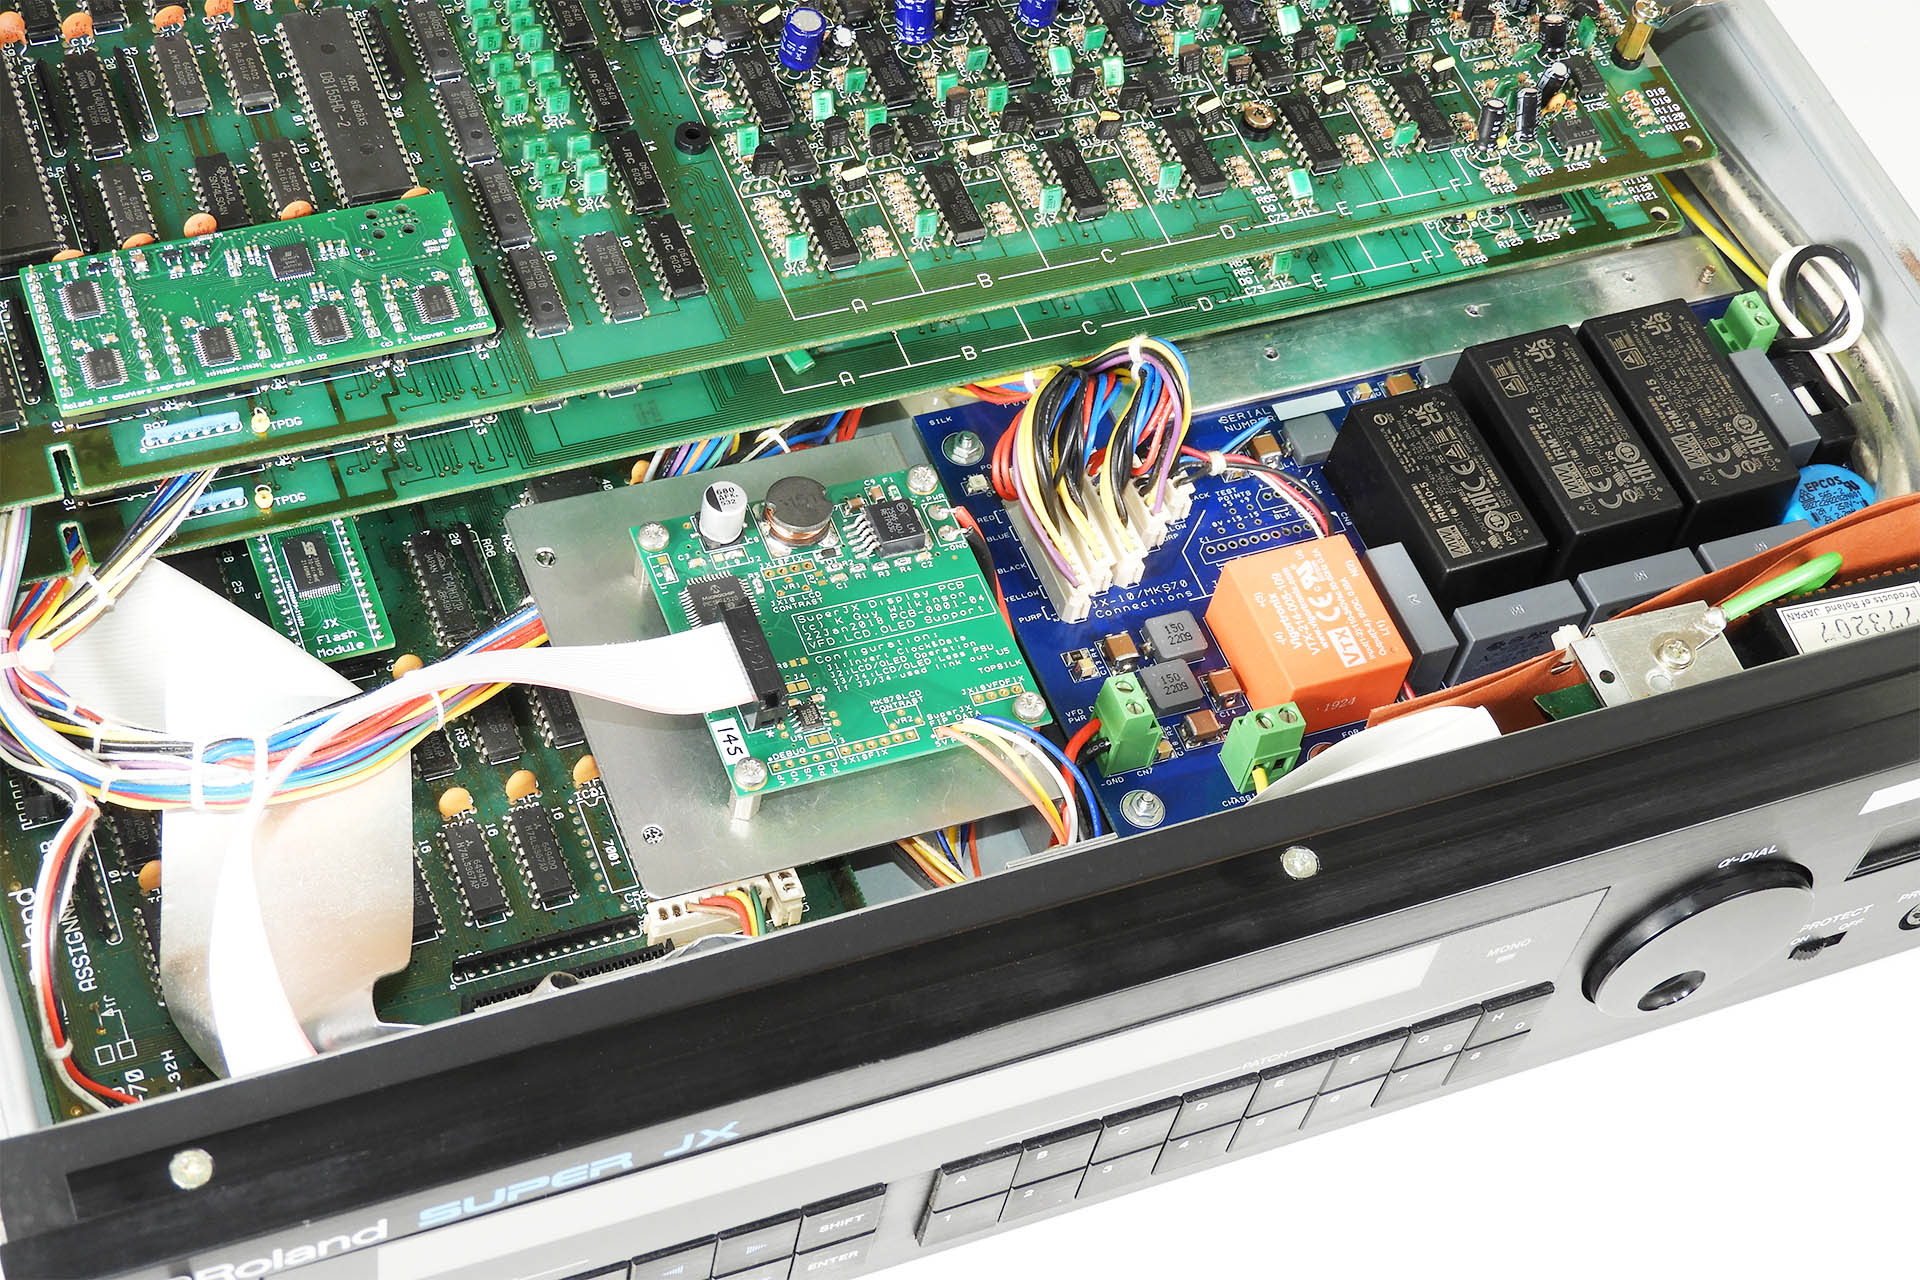
The GU-280 comprises two components; the actual VFD (display) and the controller-board. Guy Wilkinson's recommended installation requires holes to be drilled into the MKS-70 display-board (to mount the VFD) and according to Guy's installation instructions, the front-chassis, facilitating the mounting of the controller-board to the rear of the front-chassis. While the former can't be avoided, the latter isn't exactly a prospect that everyone will relish. Using my V02b however, means that at least you won't have to drill holes into your MKS-70 metalwork!
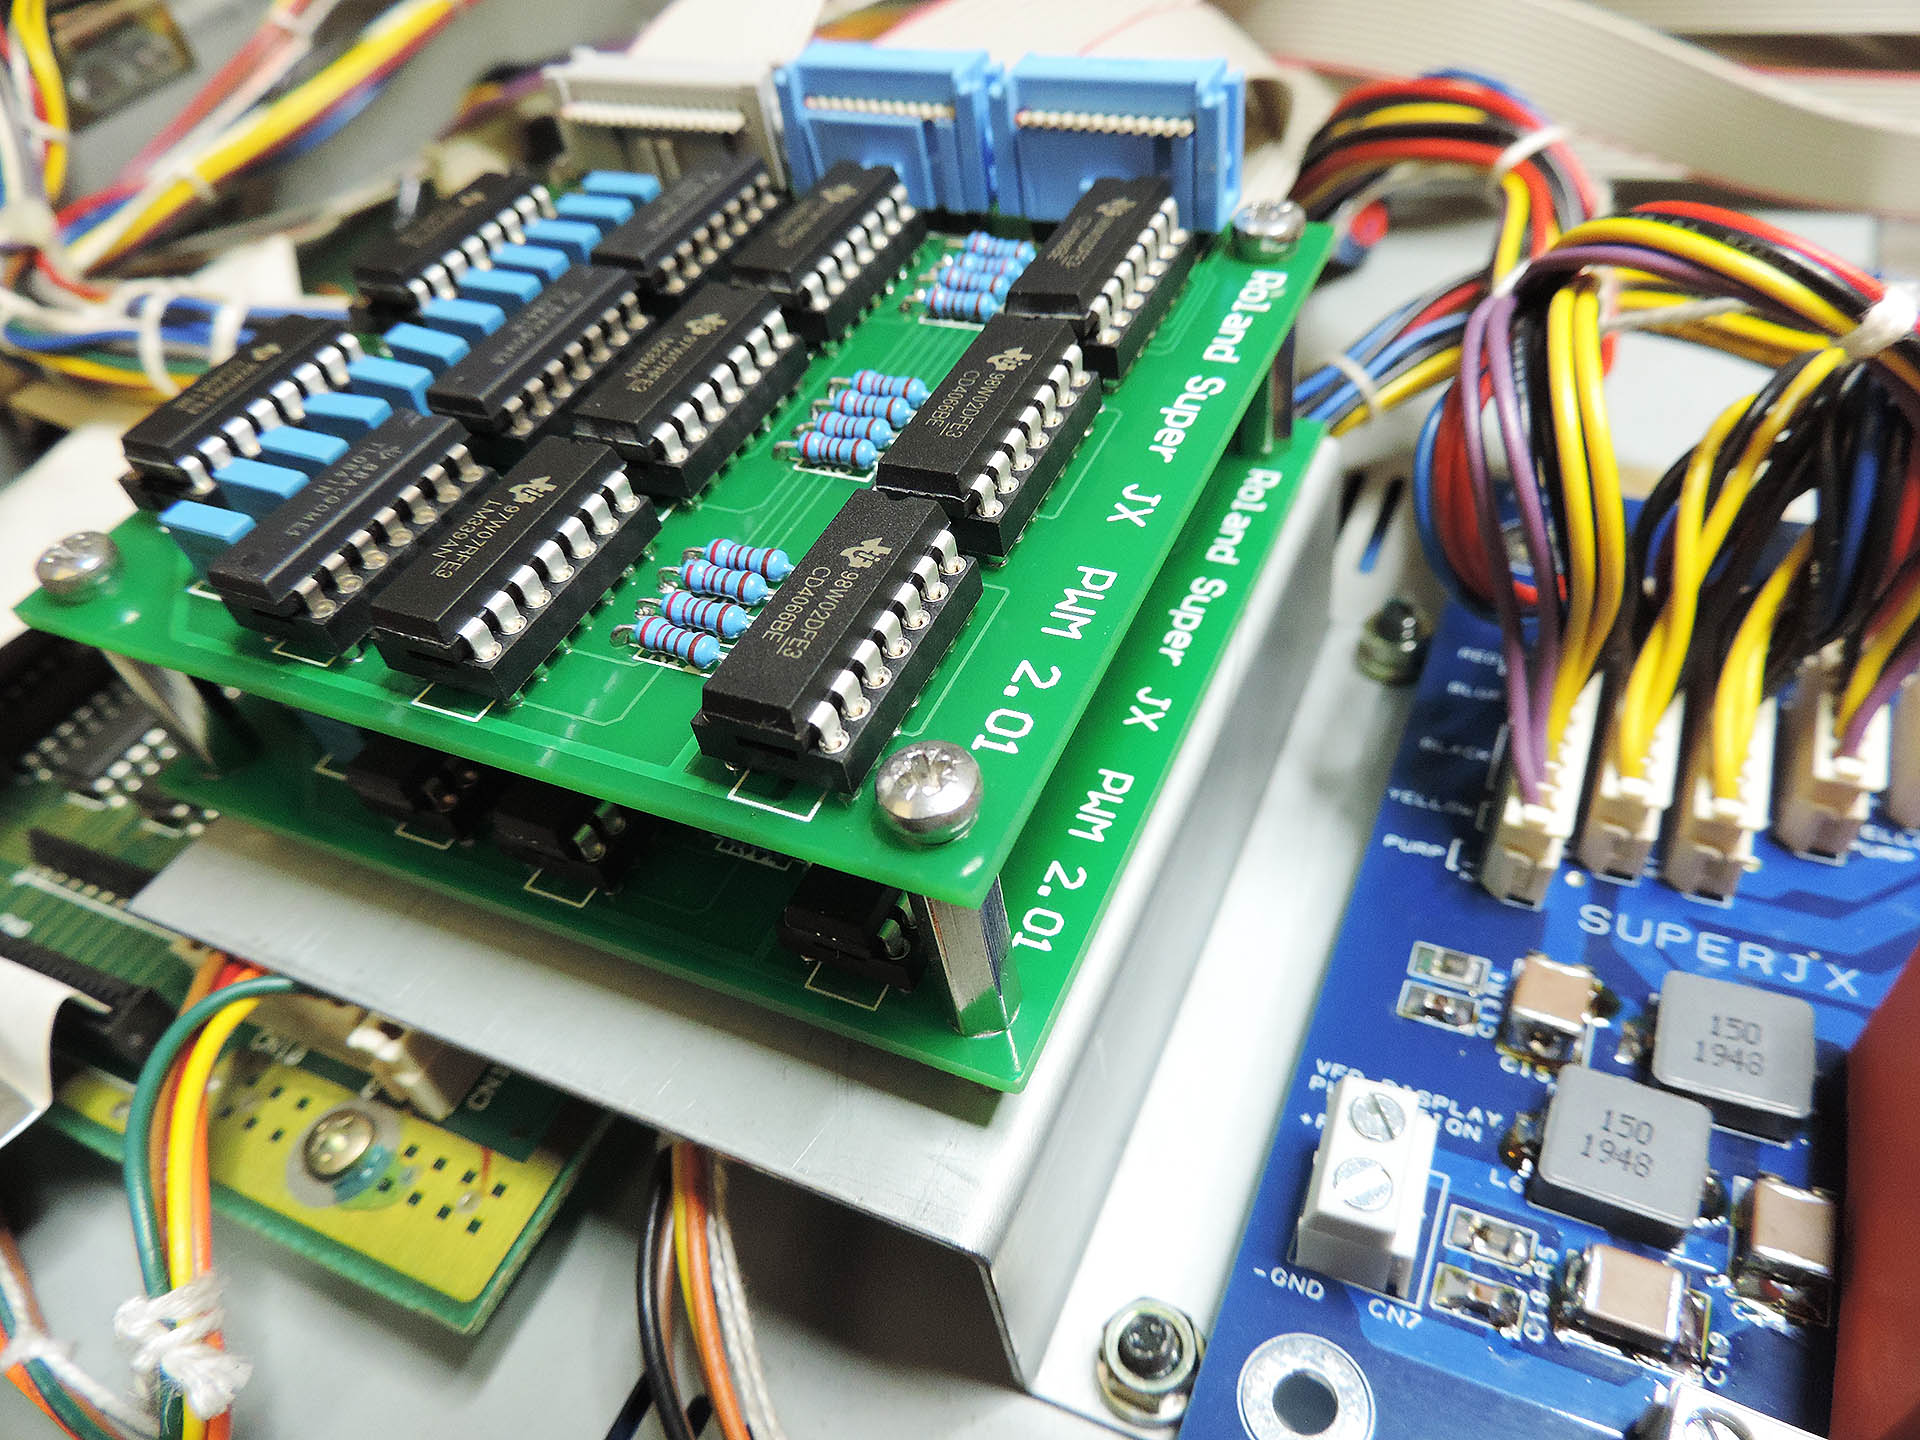
Just like my original V02 bracket, the V02b still mounts in the space originally occupied by the transformer, using the M4 transformer mounting studs. This means that you'll need Guy Wilkinson's P0004 installed to use my V02b. Incidentally, Fred Vecoven's digital PWM daughter-board for the top voice-board can be seen in the top right.
IMPORTANT: I know I've already mentioned this but I feel I need to be quite clear that the V02b bracket occupies the space taken up by the MKS-70 transformer. Hence, it can ONLY be used if you have a P0004 power supply installed.
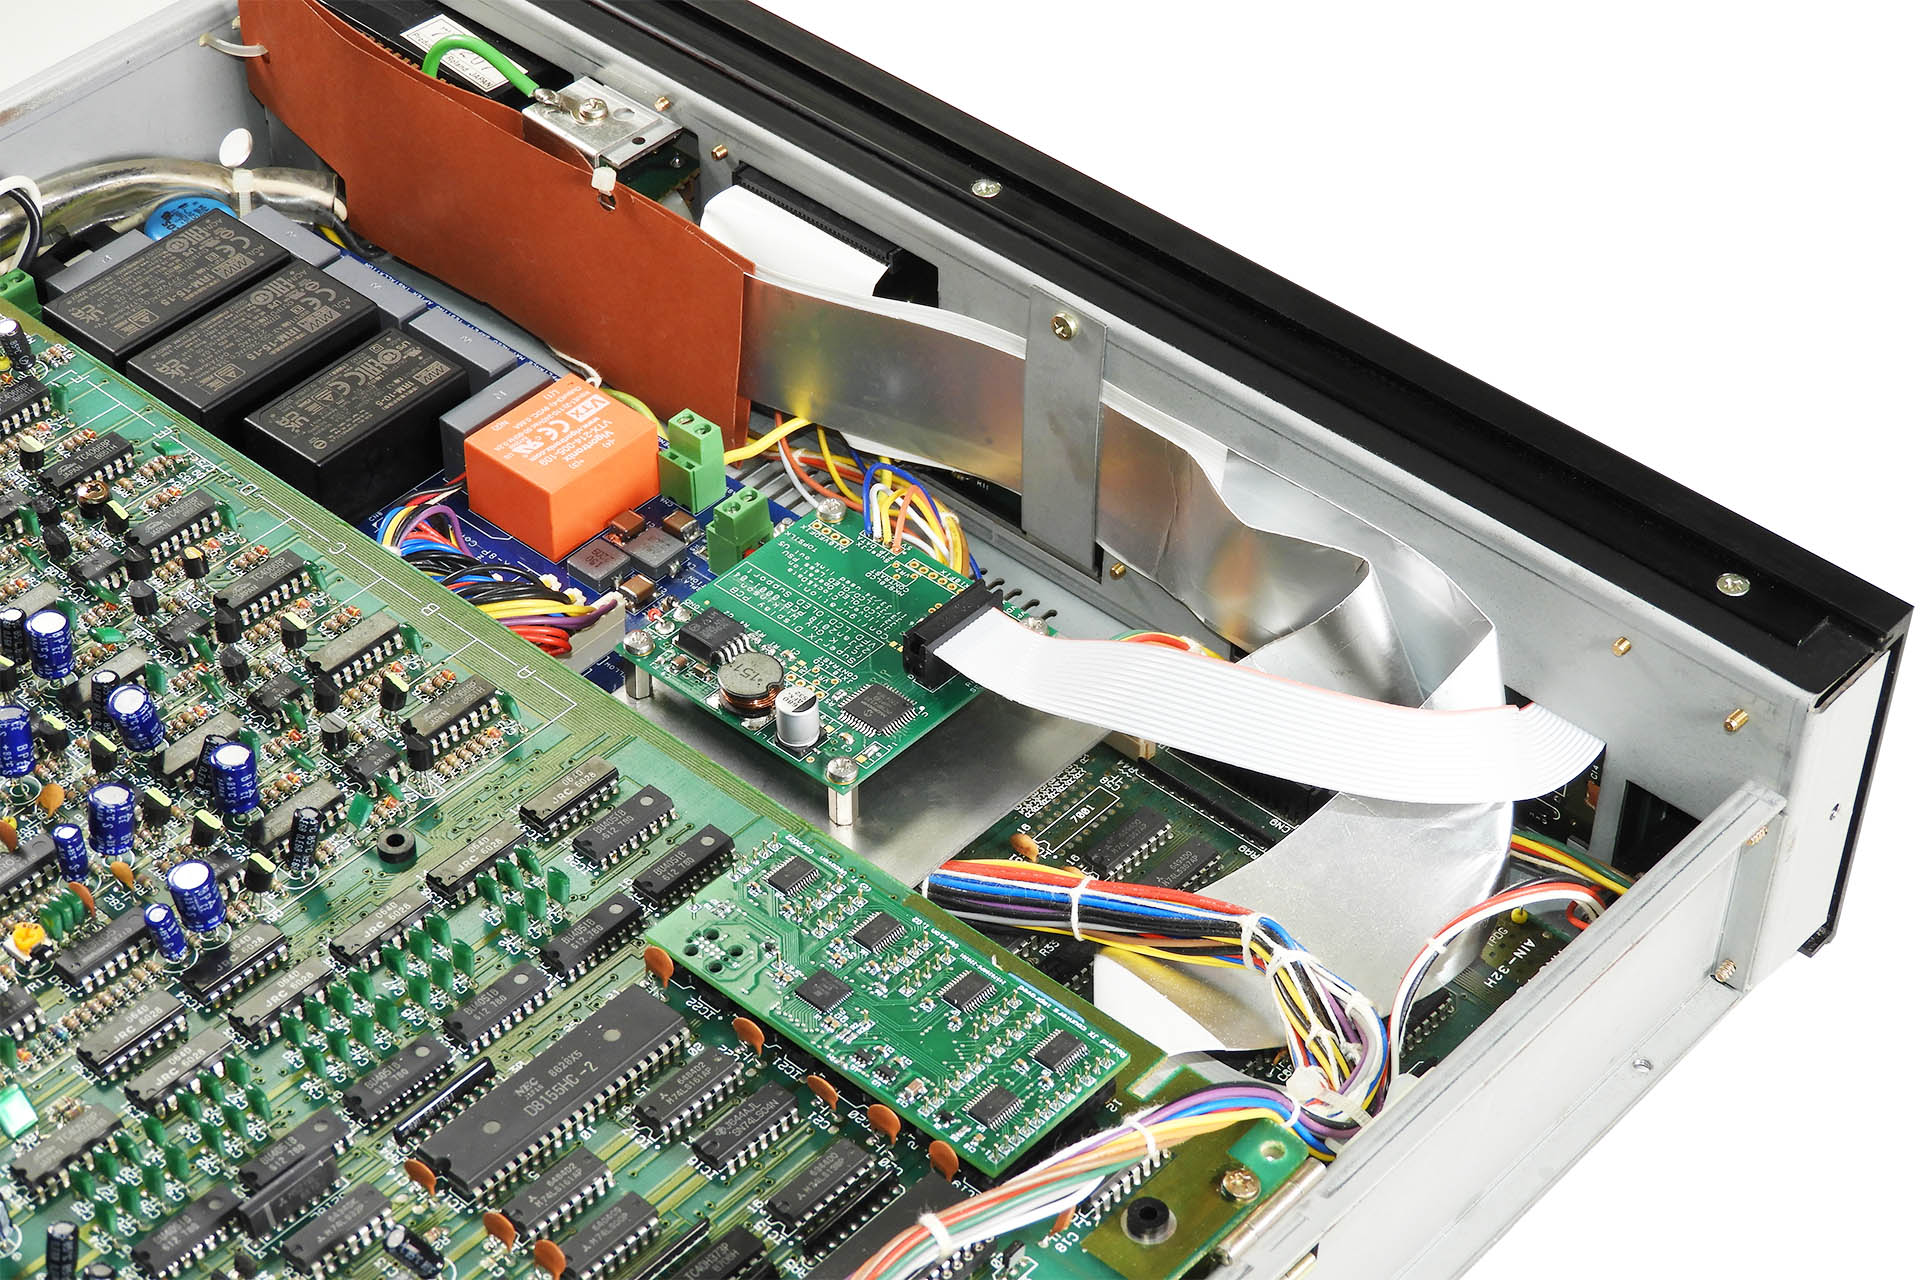
Note that the cables that Guy supplies with his GU-280 to connect the display part of the kit to the controller-board, reach just fine, when using the V02b.
When mounting the controller-board to the back of the front-chassis, only the top two screw points on the PCB can be used, as the front-panel ribbon cable running along the back of the front-chassis, prevents drilling of holes lower down. With the V02b, all four screw points are utilised, making for a more secure fixing. The VFD controller-board isn't going anywhere!
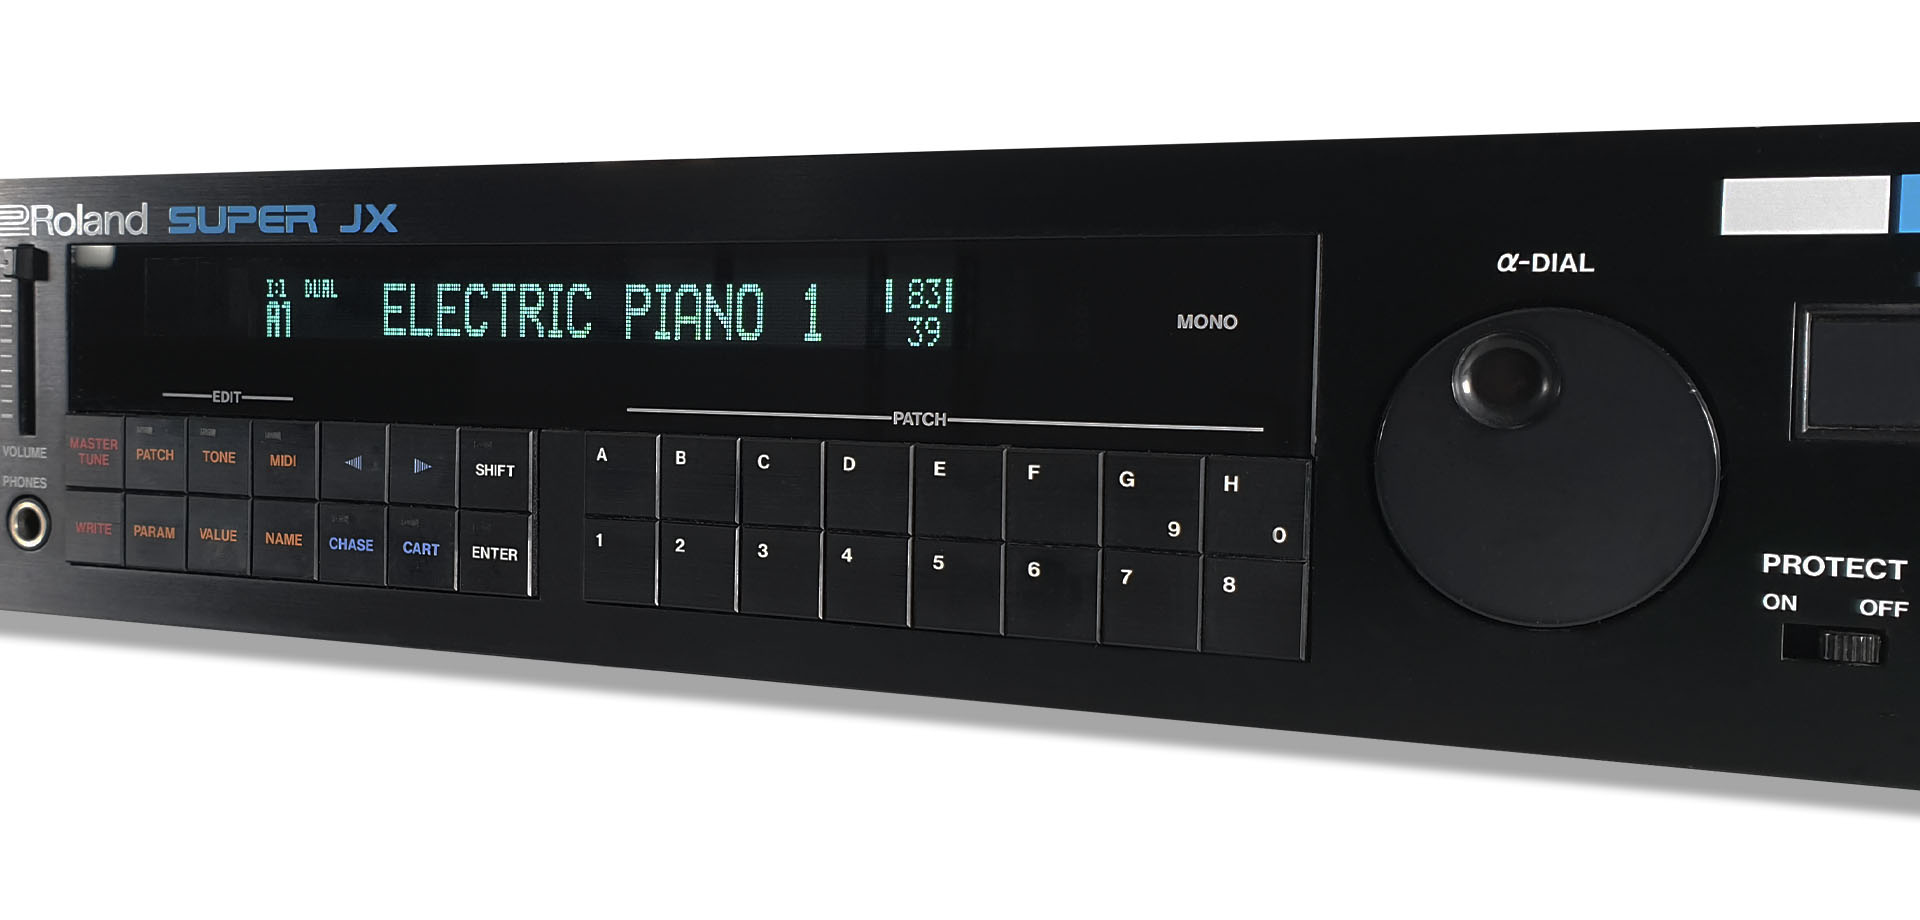
Guy Wilkinson's GU-280 VFD for the Super-JX, installed in a Roland MKS-70. Although functionally quite different, the GU-280 visually resembles the original Roland VFD more closely than the OLED.
By the way, if you don't know about this, then you're missing out! Hey, you can read all about Guy Wilkinson's GU-280 VFD module for the Super-JX here.
If customers ask for it, I mount my Live-Forever battery upgrade under the V02b bracket. Convenient, eh?
I currently have quite a few V02 brackets but I am hoping that my V02b mounting bracket for the MKS-70 VFD module will be available in my on-line store soon. Don't hesitate to contact me if you're interested, though.
UPDATE - 19th September 2022
Okay, so all my V02 brackets have now gone and I only have V02b brackets which can be purchased in my online store here.
The humble Roland M-64C memory cartridge which was used to store data on soooo many Roland synths, drum machines and other gear, back in the day. The problem is, that just like the memory inside your favourite eighties synth, the memory in the M-64C is retained using a small battery. These cartridges have stored our patches for decades but the internal battery won't last forever. Here's a little post on the Roland M-64C battery change procedure.
Yes, I know there's quite a lot of clever people out there, who have made some awesome replacements which have huge memory storage and no battery but many of us still have M-64Cs and if all you have to do is change a battery once every couple of decades, then why not?
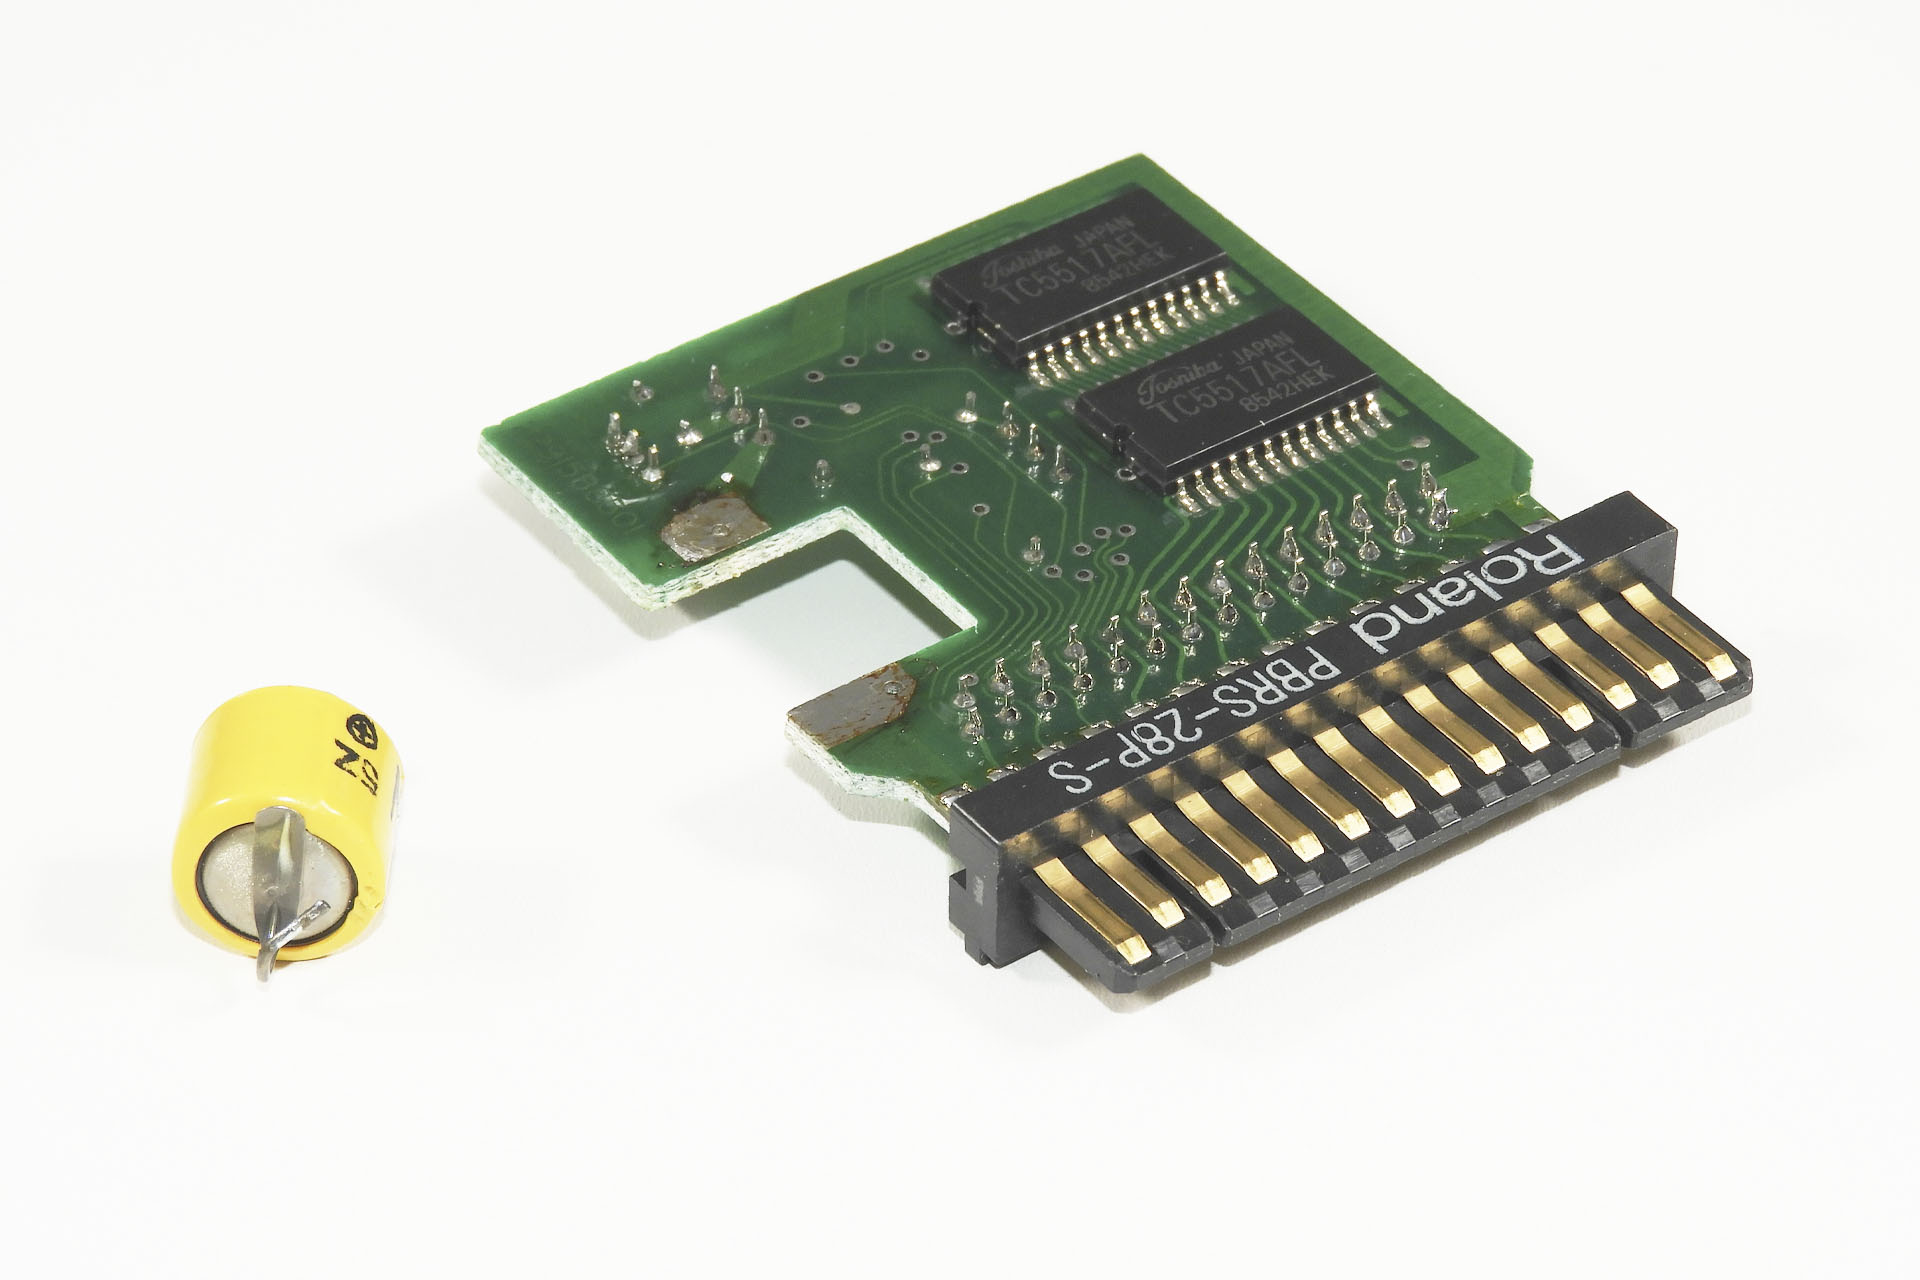
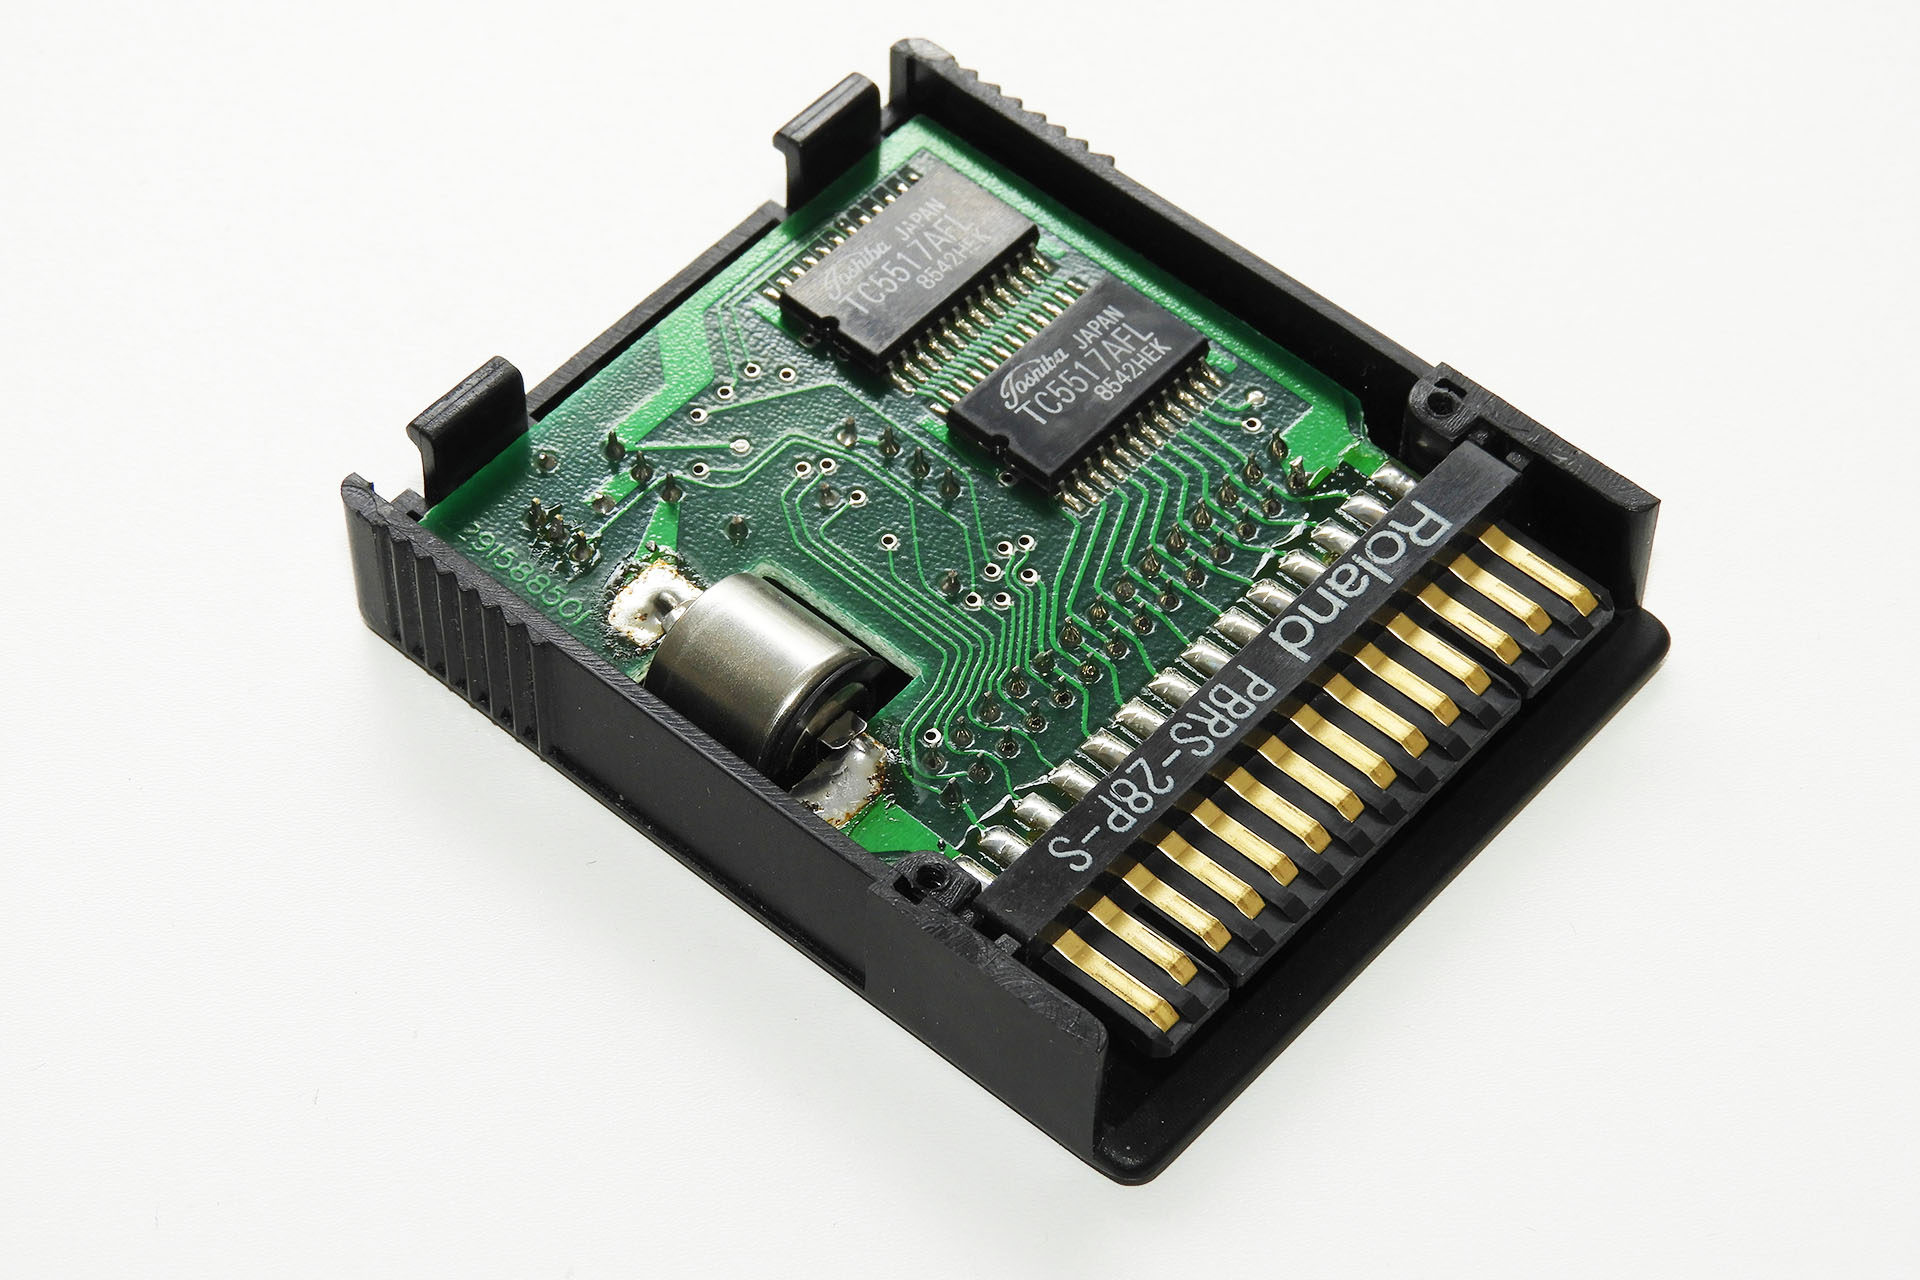
The case of the M-64C is held together with only two screws but... you'll have to remove the label to open it. YouTube videos suggest that the label is cut but actually, that's not necessary. The original Roland label is printed on to a type of self-adhesive metalized medium and NOT anything that's paper based. Hence, if you're careful, you can peel it off and there's no need to destroy it. The customer who supplied the example pictured in this post, unfortunately didn't know that! 🙁
Once open, make a note of the orientation of the battery. The positive terminal is facing the top of the cartridge, furthest away from the edge-connector.
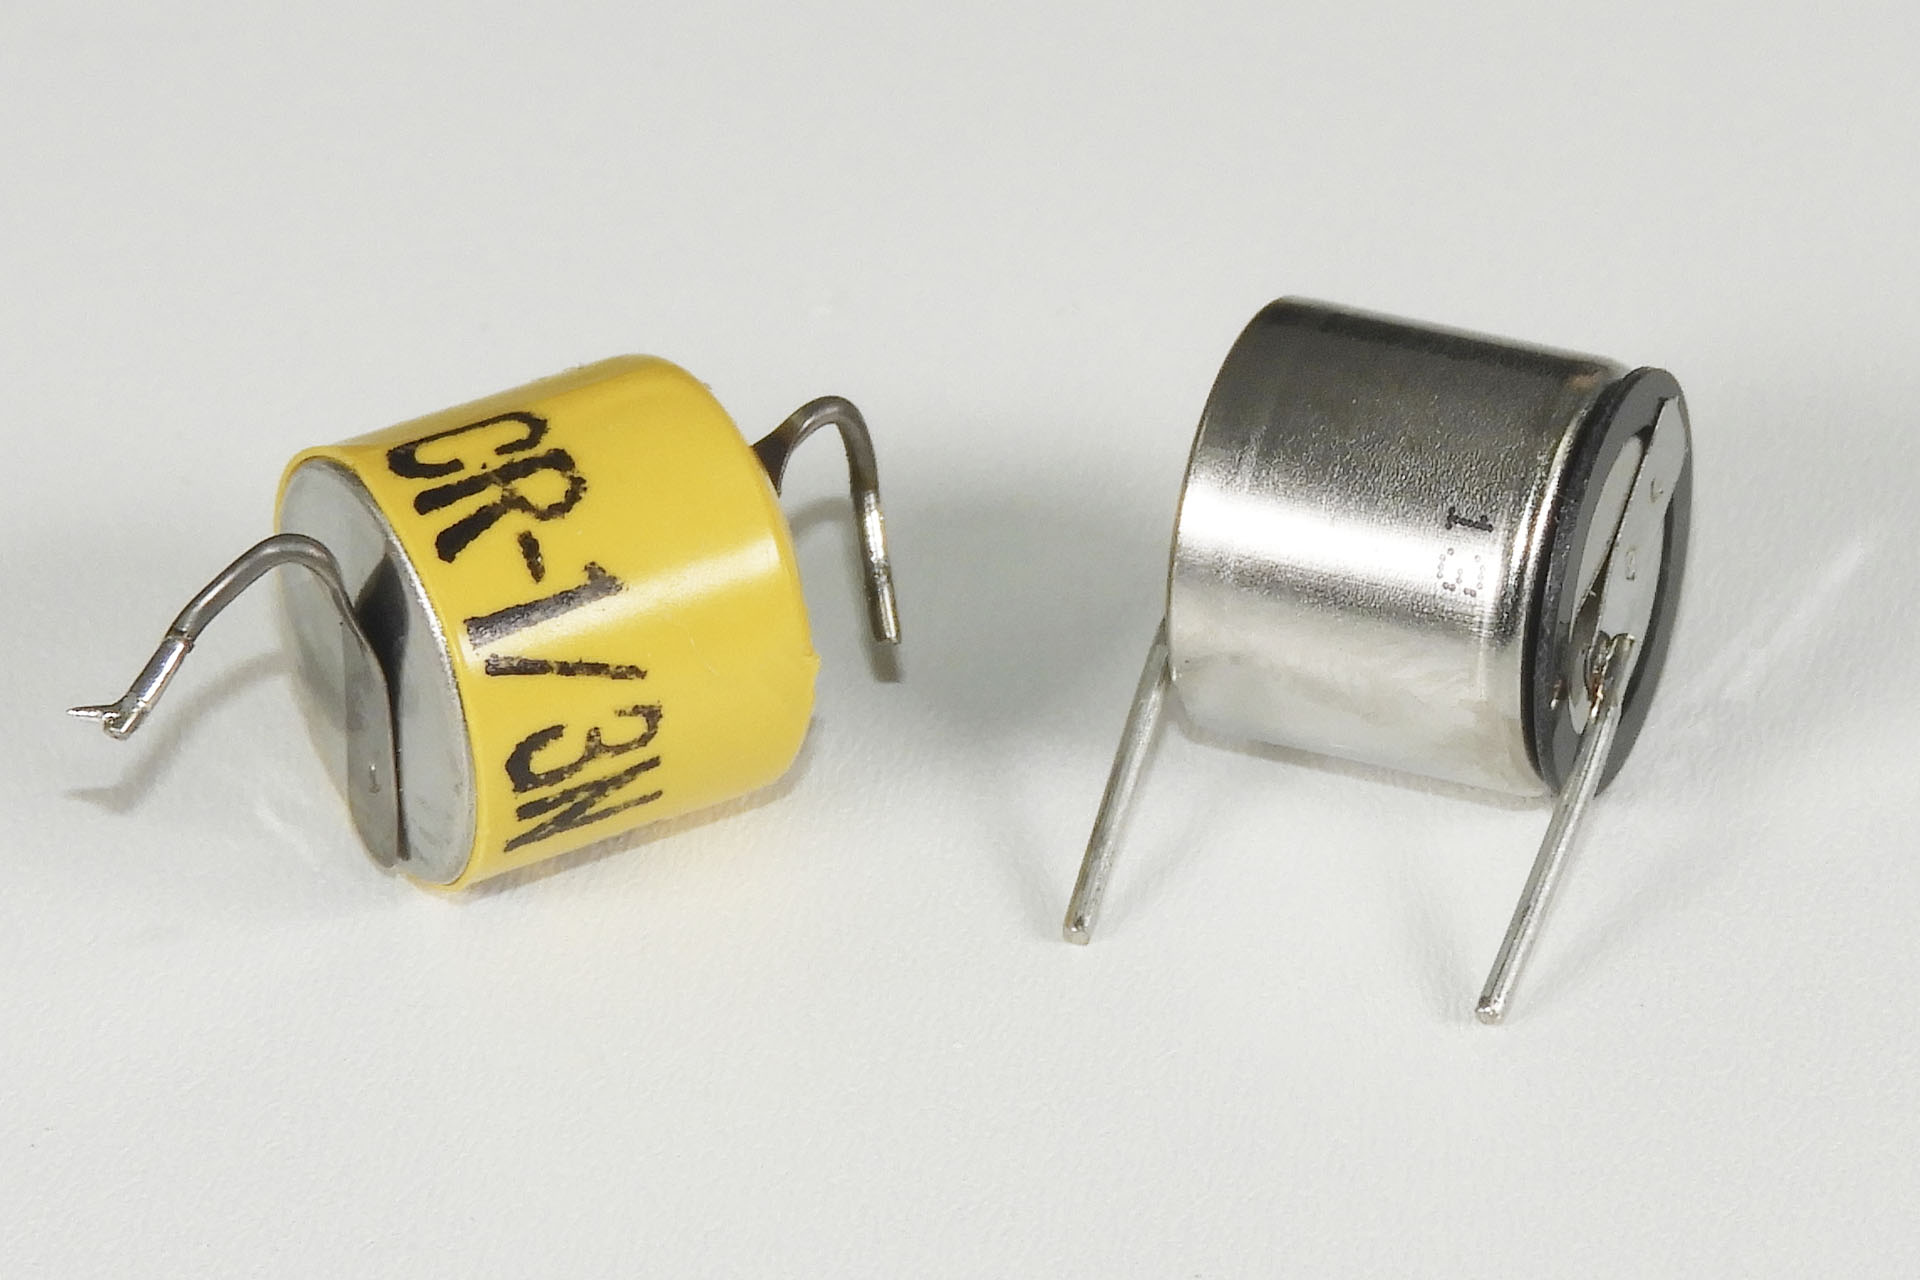
The battery is a CR-1/3N which is (still) readily) available although it might be challenging to find one with solder tags. Yes, that's right. The CR-1/3N normally turns up WITHOUT solder tags and if you're like me, then the idea of soldering directly to a battery, isn't particularly appealing.
Original CR1/3N battery on the left and replacement version on the right.
Okay so I need to own up! 🙄 I thought I'd try something. Your average CR-1/3N has a capacity of about 160mAh. The CR2032 however, has a capacity of about 210mAh and so I thought I'd give it go, LOL. There was just NO WAY I could get the CR2032 to fit inside the M-64C case, LOL. There goes that idea!
When mounting the new battery, take care to keep it as close the the PCB as possible, otherwise the two halves of the M-64C case won't snap together.
Performing a Roland M-64C battery change isn't as difficult as you might think and as mentioned, the CR-1/3N battery is still available. The annoyance however, is that you might have to scrap the label. Hey but don't worry. Half-an-hour with a ruler and a little Adobe Illustrator magic and....
I'm currently designing a replacement self-adhesive label for the M-64C which I will make available soon.
Coming soon, my replacement label for the Roland M-64C.
If your M-64C label is a bit tatty, then watch this space. 😎
UPDATE - 5th July 2022
I got these back from the printer today!!! 😀
Here is my first attempt (left) which has now been tweaked to have the broken orange line at the bottom, closer resembling the original M-64C.
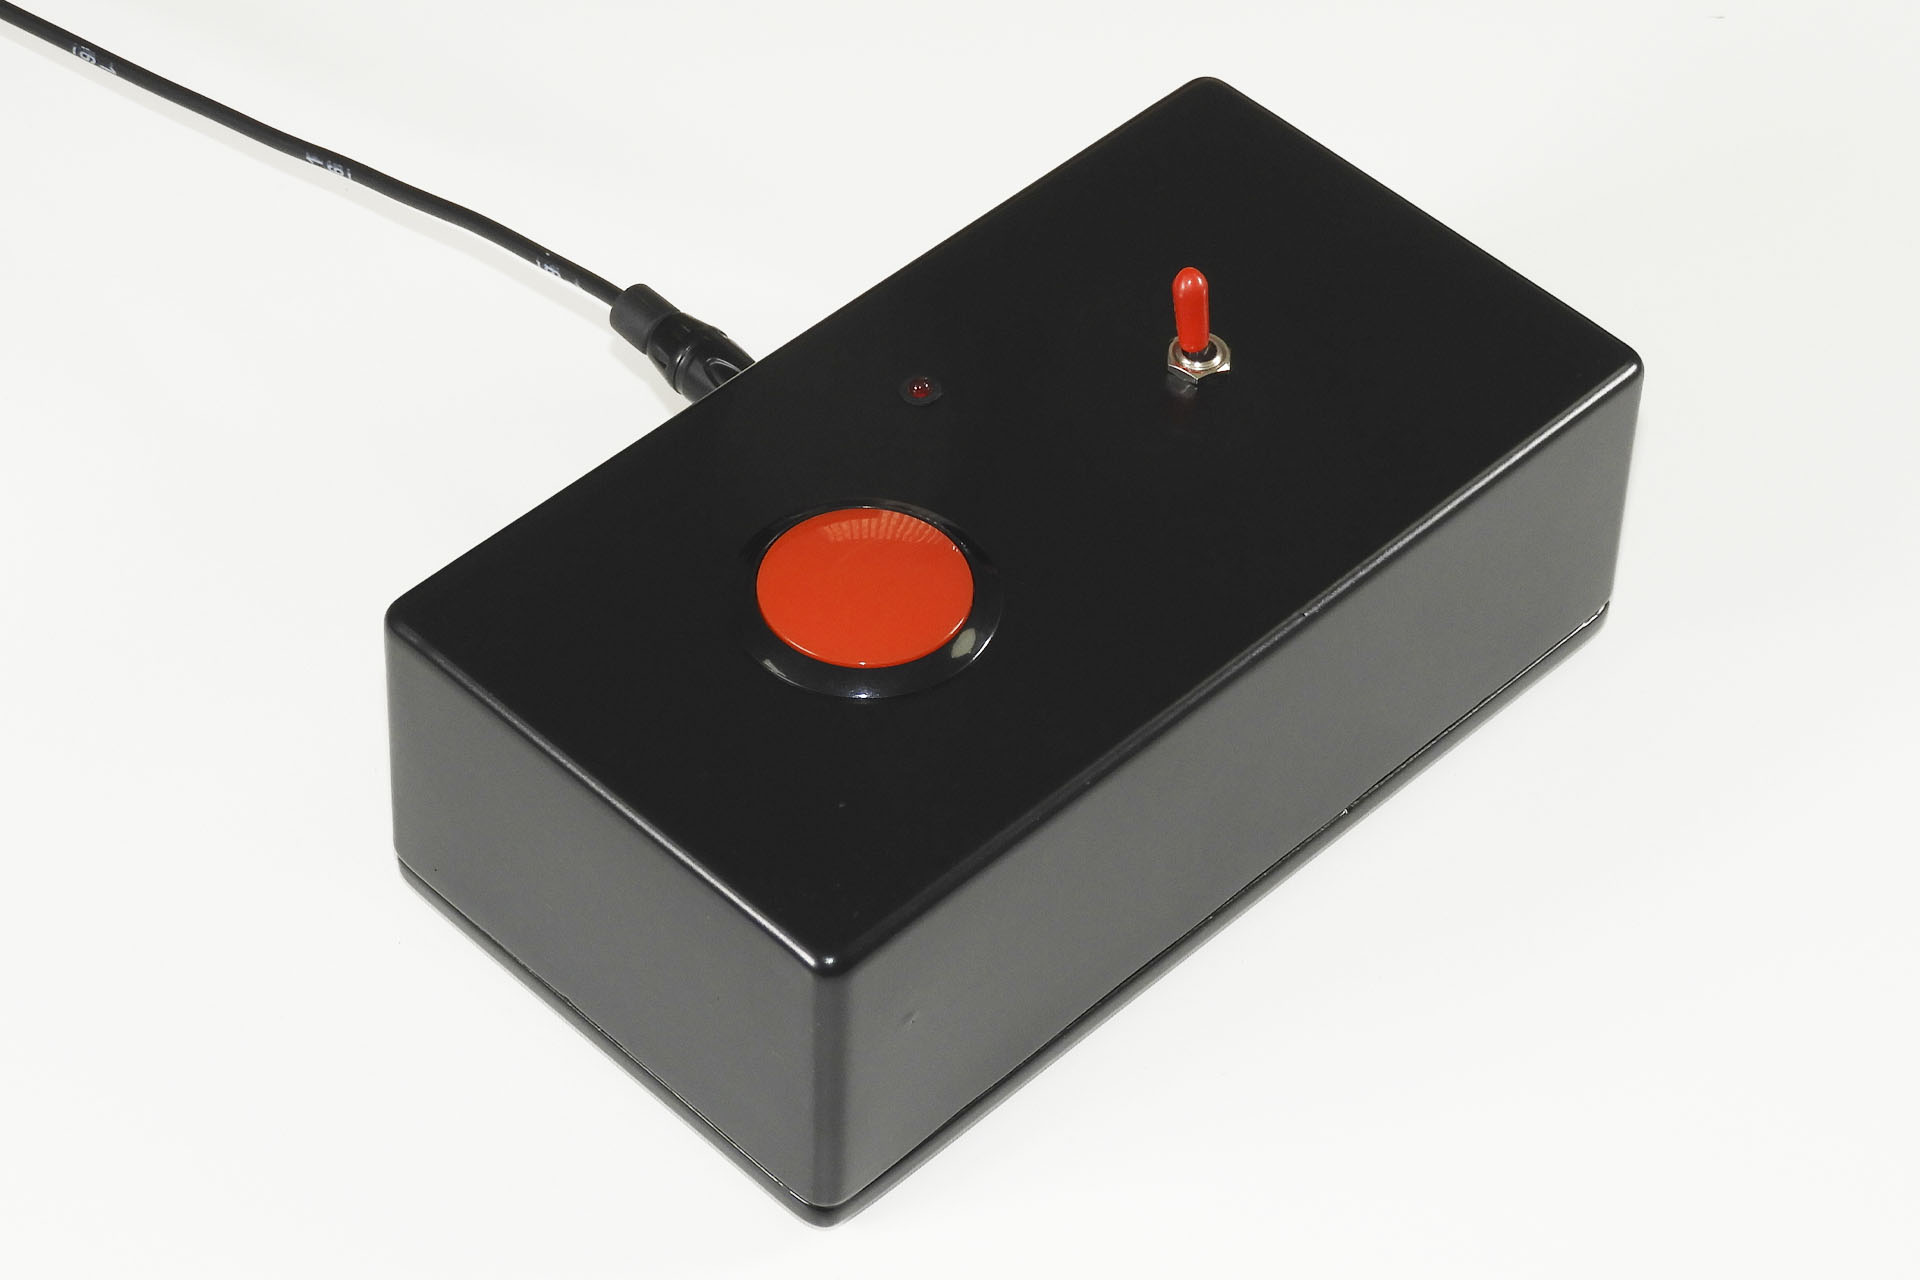
Remote Back in October 2019, I published a post discussing how I took advantage of the Yamaha GPI protocol on my DM2000 and which I use to remotely switch equipment on and off in my studio, from the mixing desk. Unfortunately, my new premises isn’t quite as large as what I had before, so ergonomics have been sacrificed slightly and one of the compromises is the position of my mixing desk. Situated away from my DAW desktop, I had to build myself a remote switch for talkback; The Big Red Button remote talkback switch!
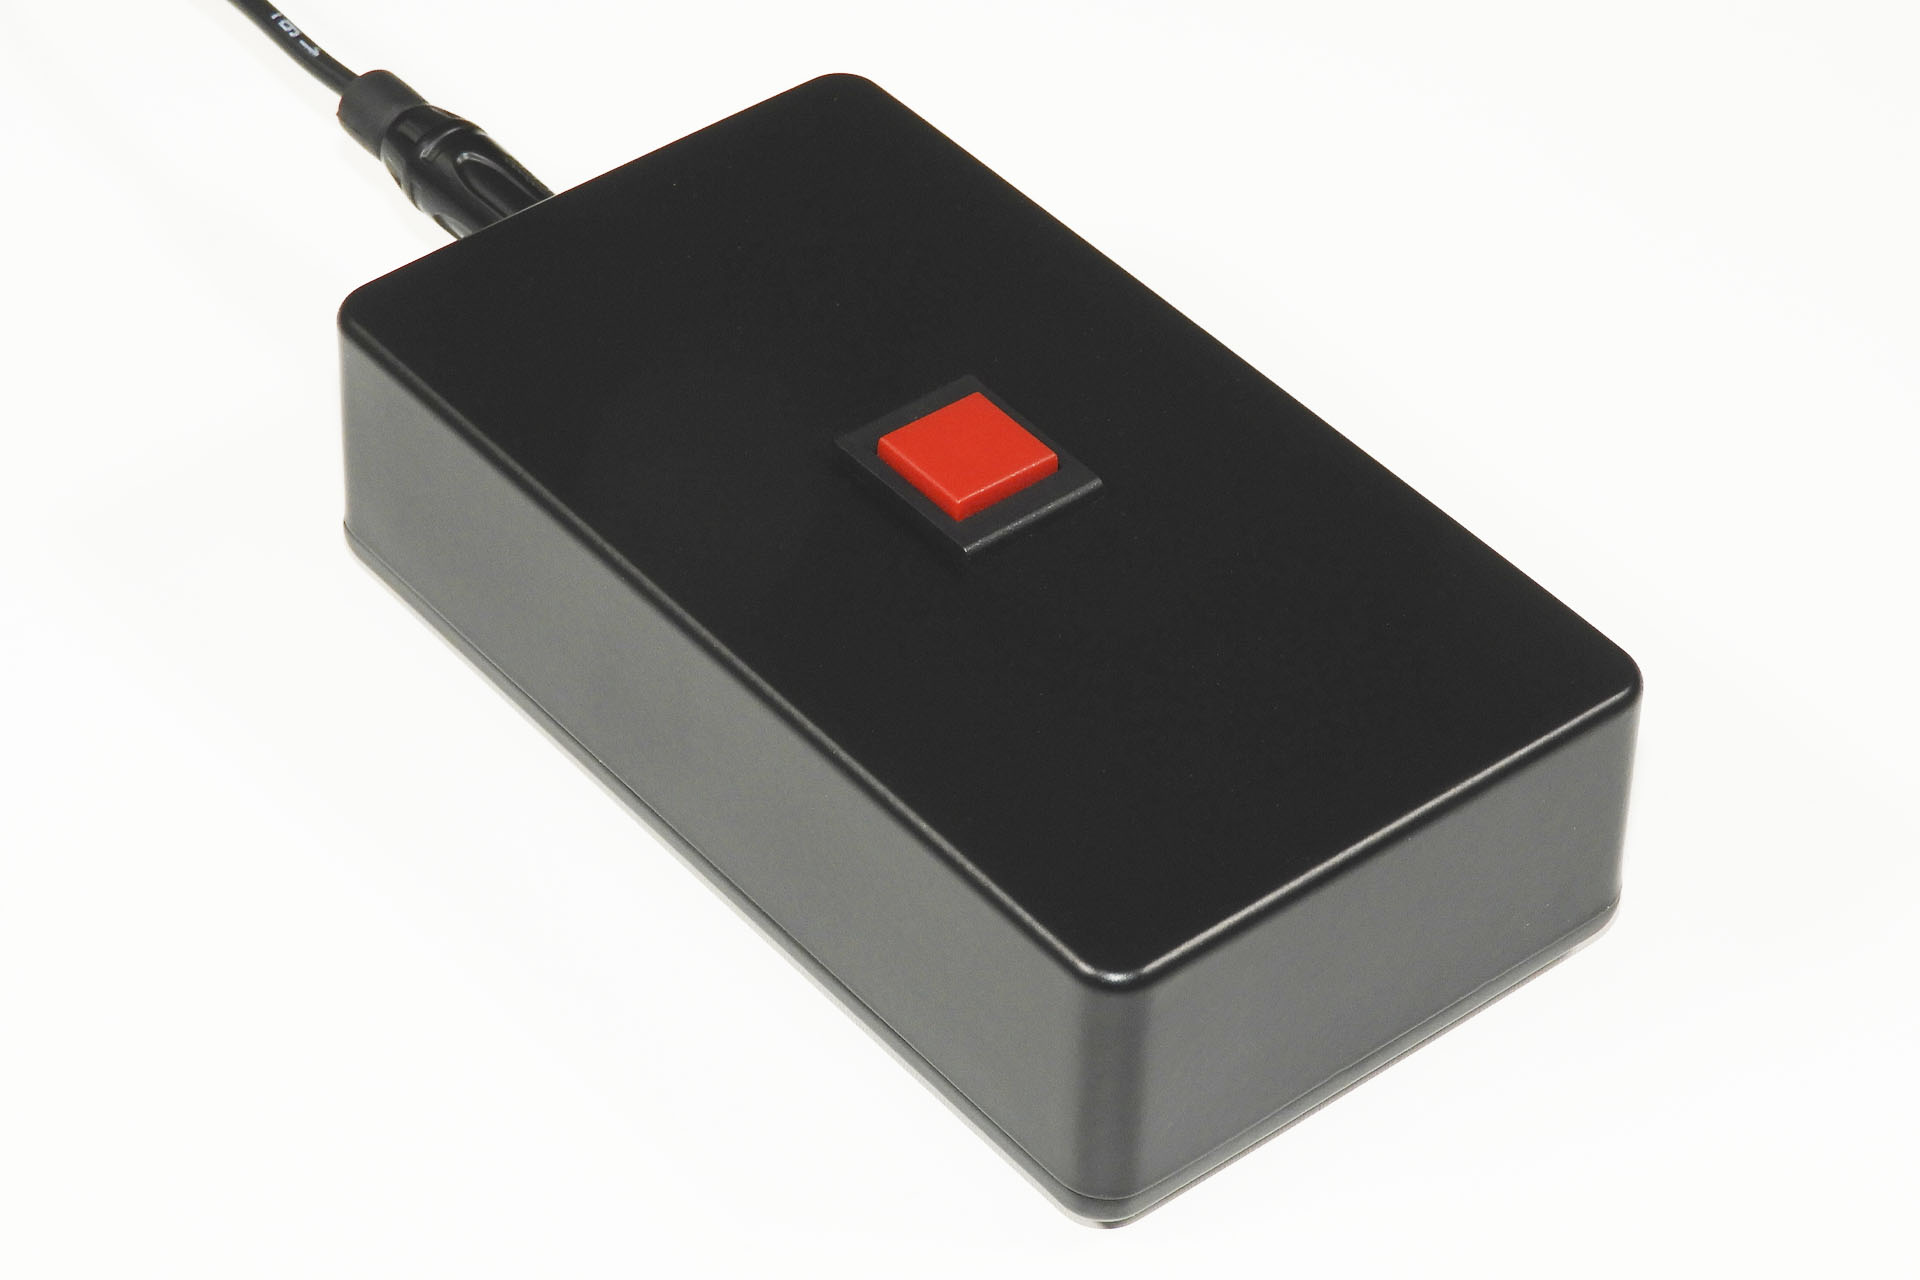
A little convenience; a remote talkback switch for Yamaha DM1000, DM2000, 01V and other desks equipped with Yamaha GPI.
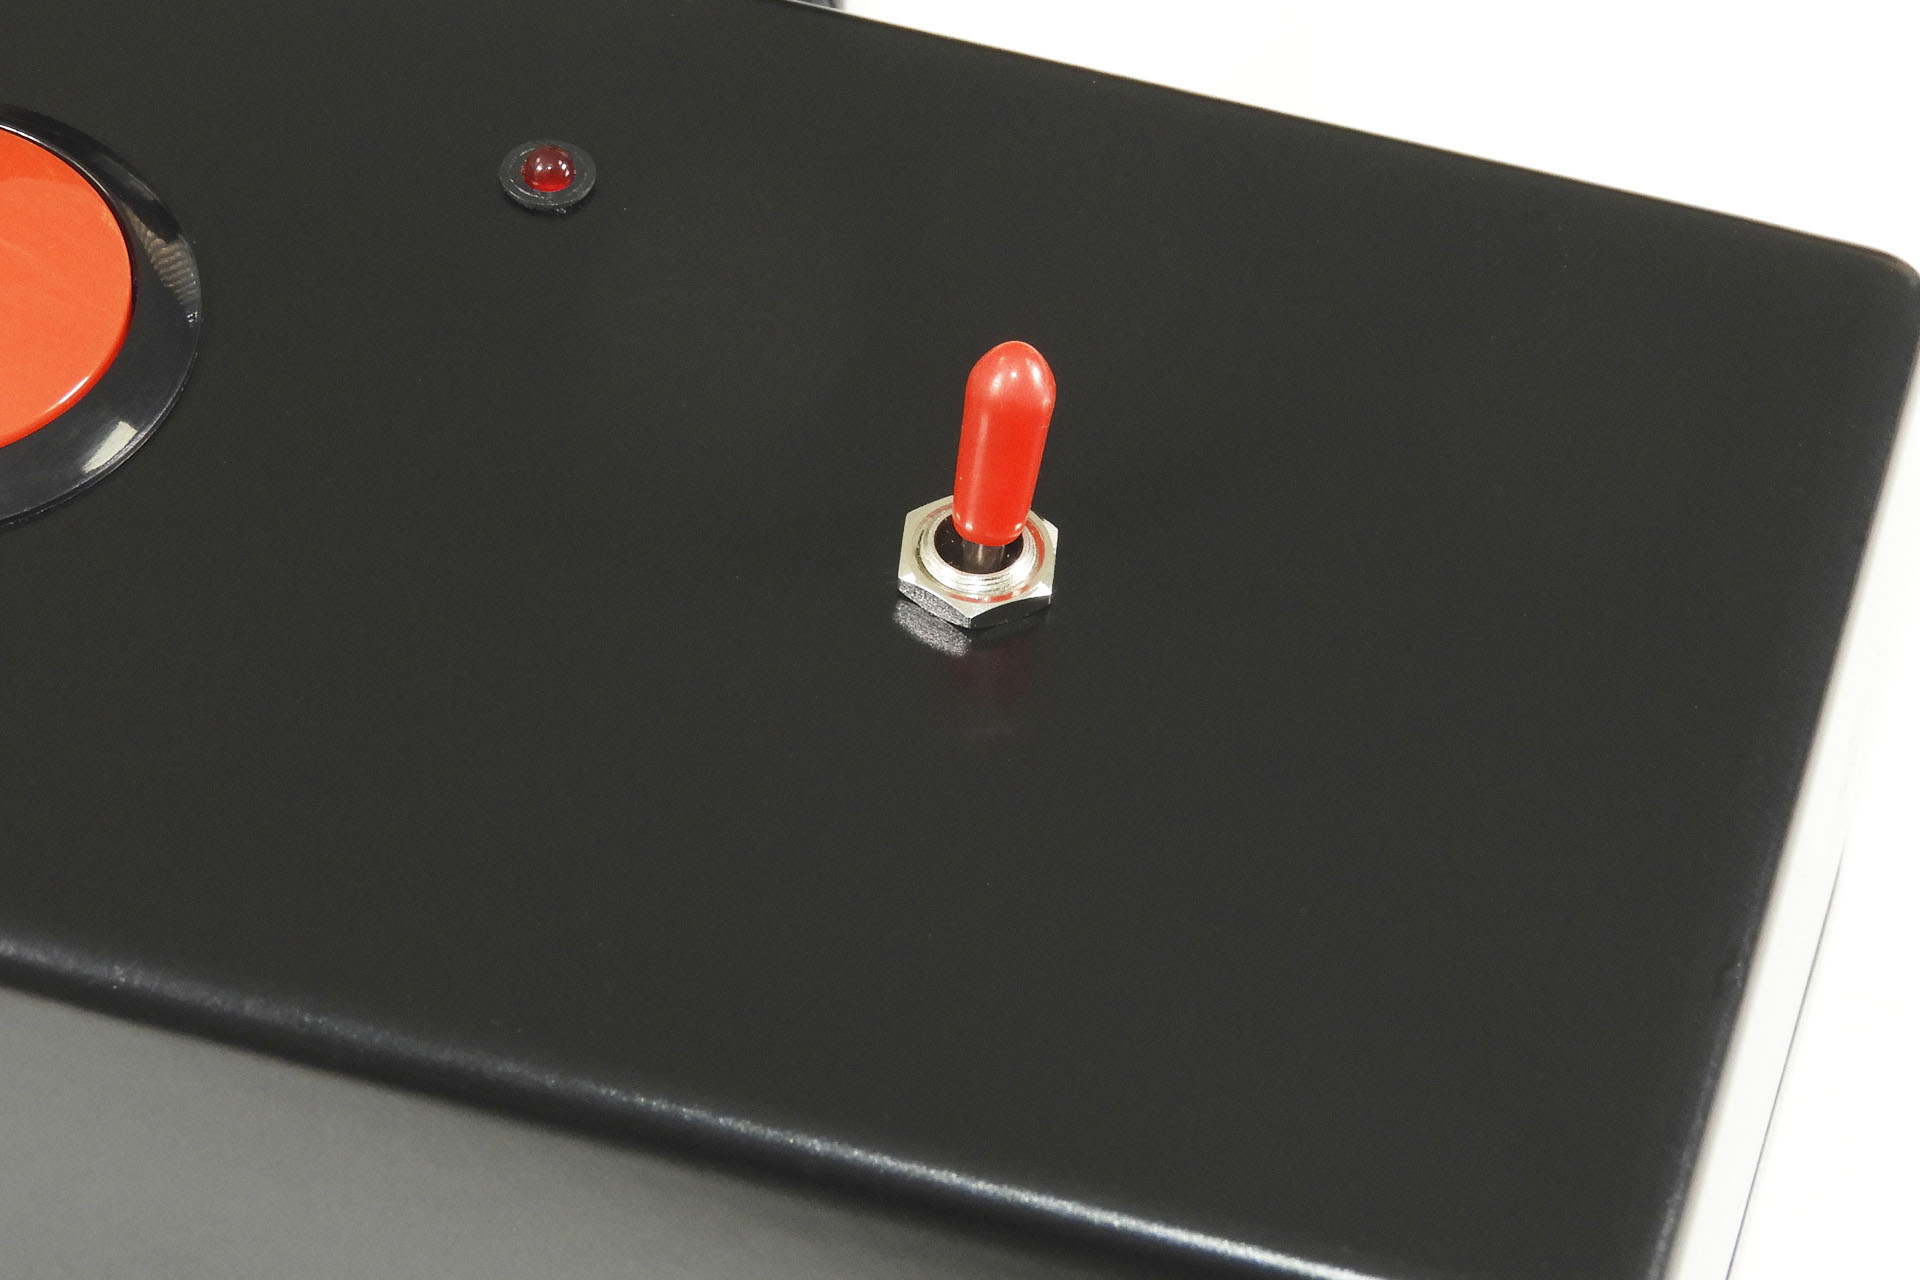
My Big Red Button remote talkback switch is a little more versatile than the switch on the DM2000 itself as it actually comprises two switches; a momentary push button switch and a miniature toggle switch. I decided to implement the latter to give me the option to ‘lock’ talkback in the ON position, just in case I needed both hands free, while talking to an artist in the vocal booth or the my keyboard room.
The miniature toggle switch allows you to lock talkback on, if you need both hands free.
The challenge with the project was finding a suitable momentary push switch, ideally a very quiet DPST. After trying several, I settled on a particular product by Apem which although ridiculously expensive for a bloody switch does the job perfectly. The toggle switch didn’t impose such problems.
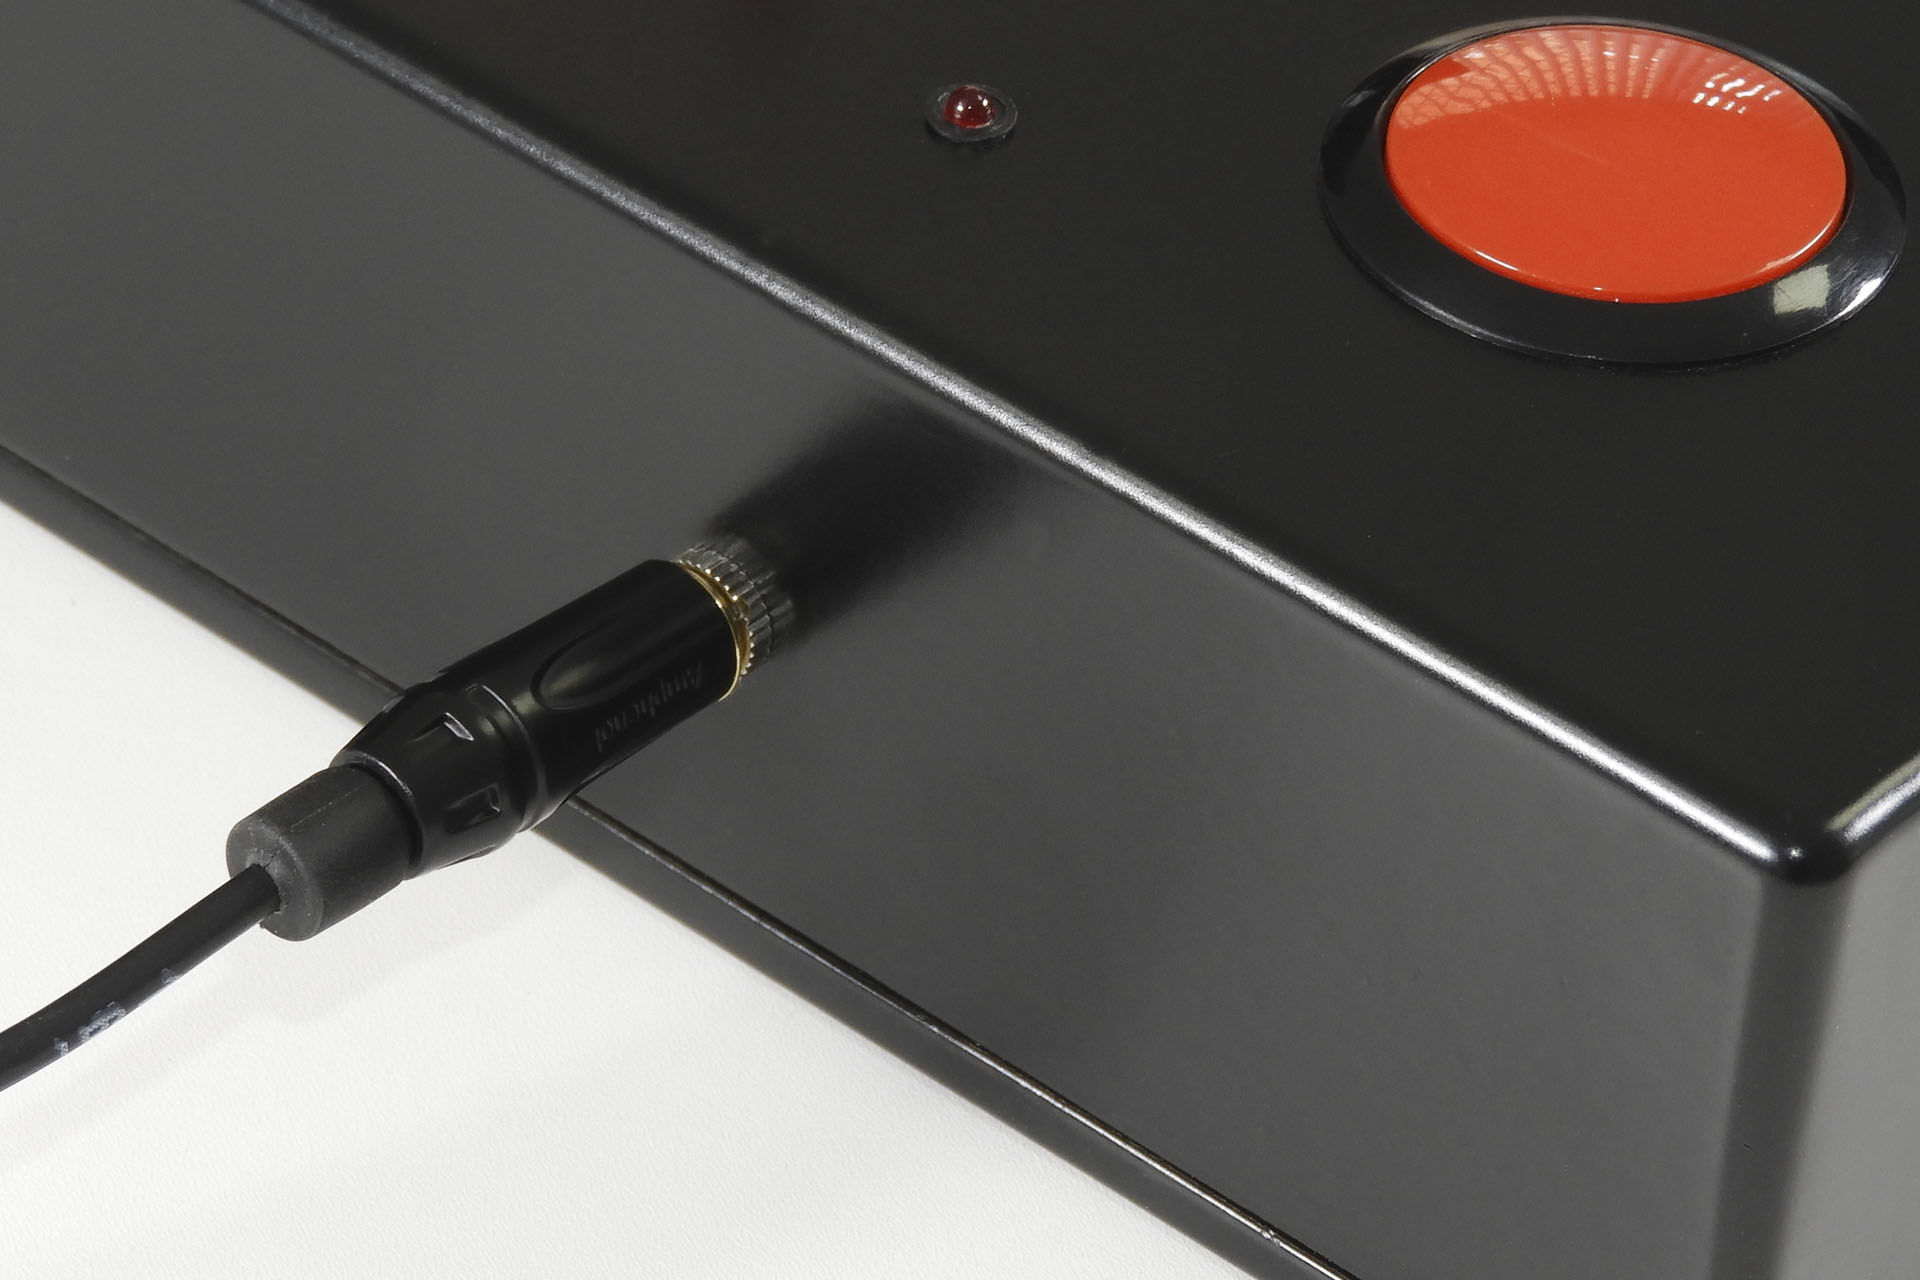
Connection to the desk is via a 3-pole (stereo) 3.5mm jack going into a 25-pin D-connector.
On top of the box, there's a status indicator in the form of an ultra-low current LED. If I just had the push button momentary switch, I probably wouldn’t have bothered with this but it does act as reminder, just in case you leave the toggle switch on.
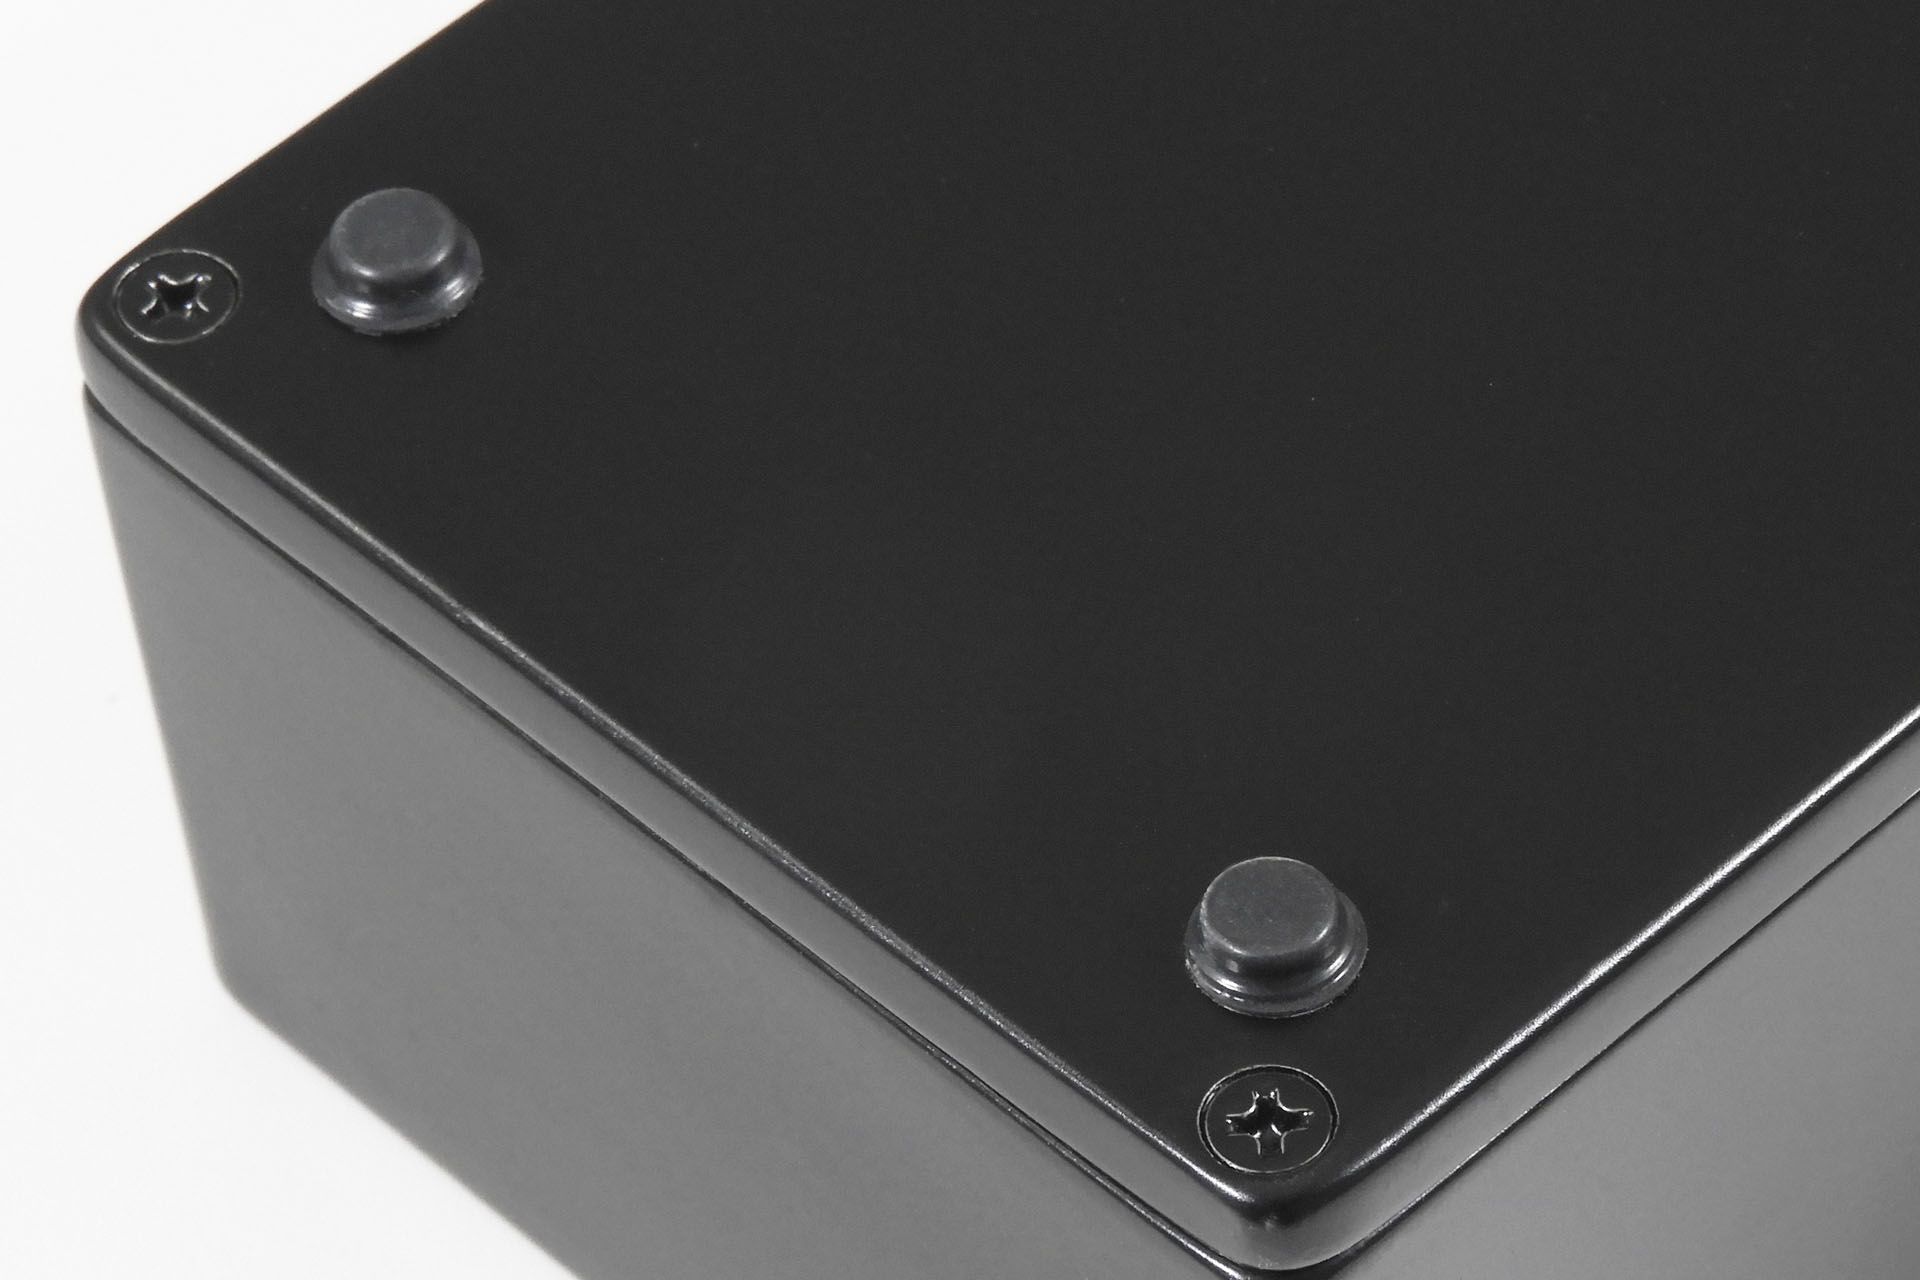
Cute little adhesive, no-slip feet on the bottom of the case, ensure Big Red Button is always where you left it!
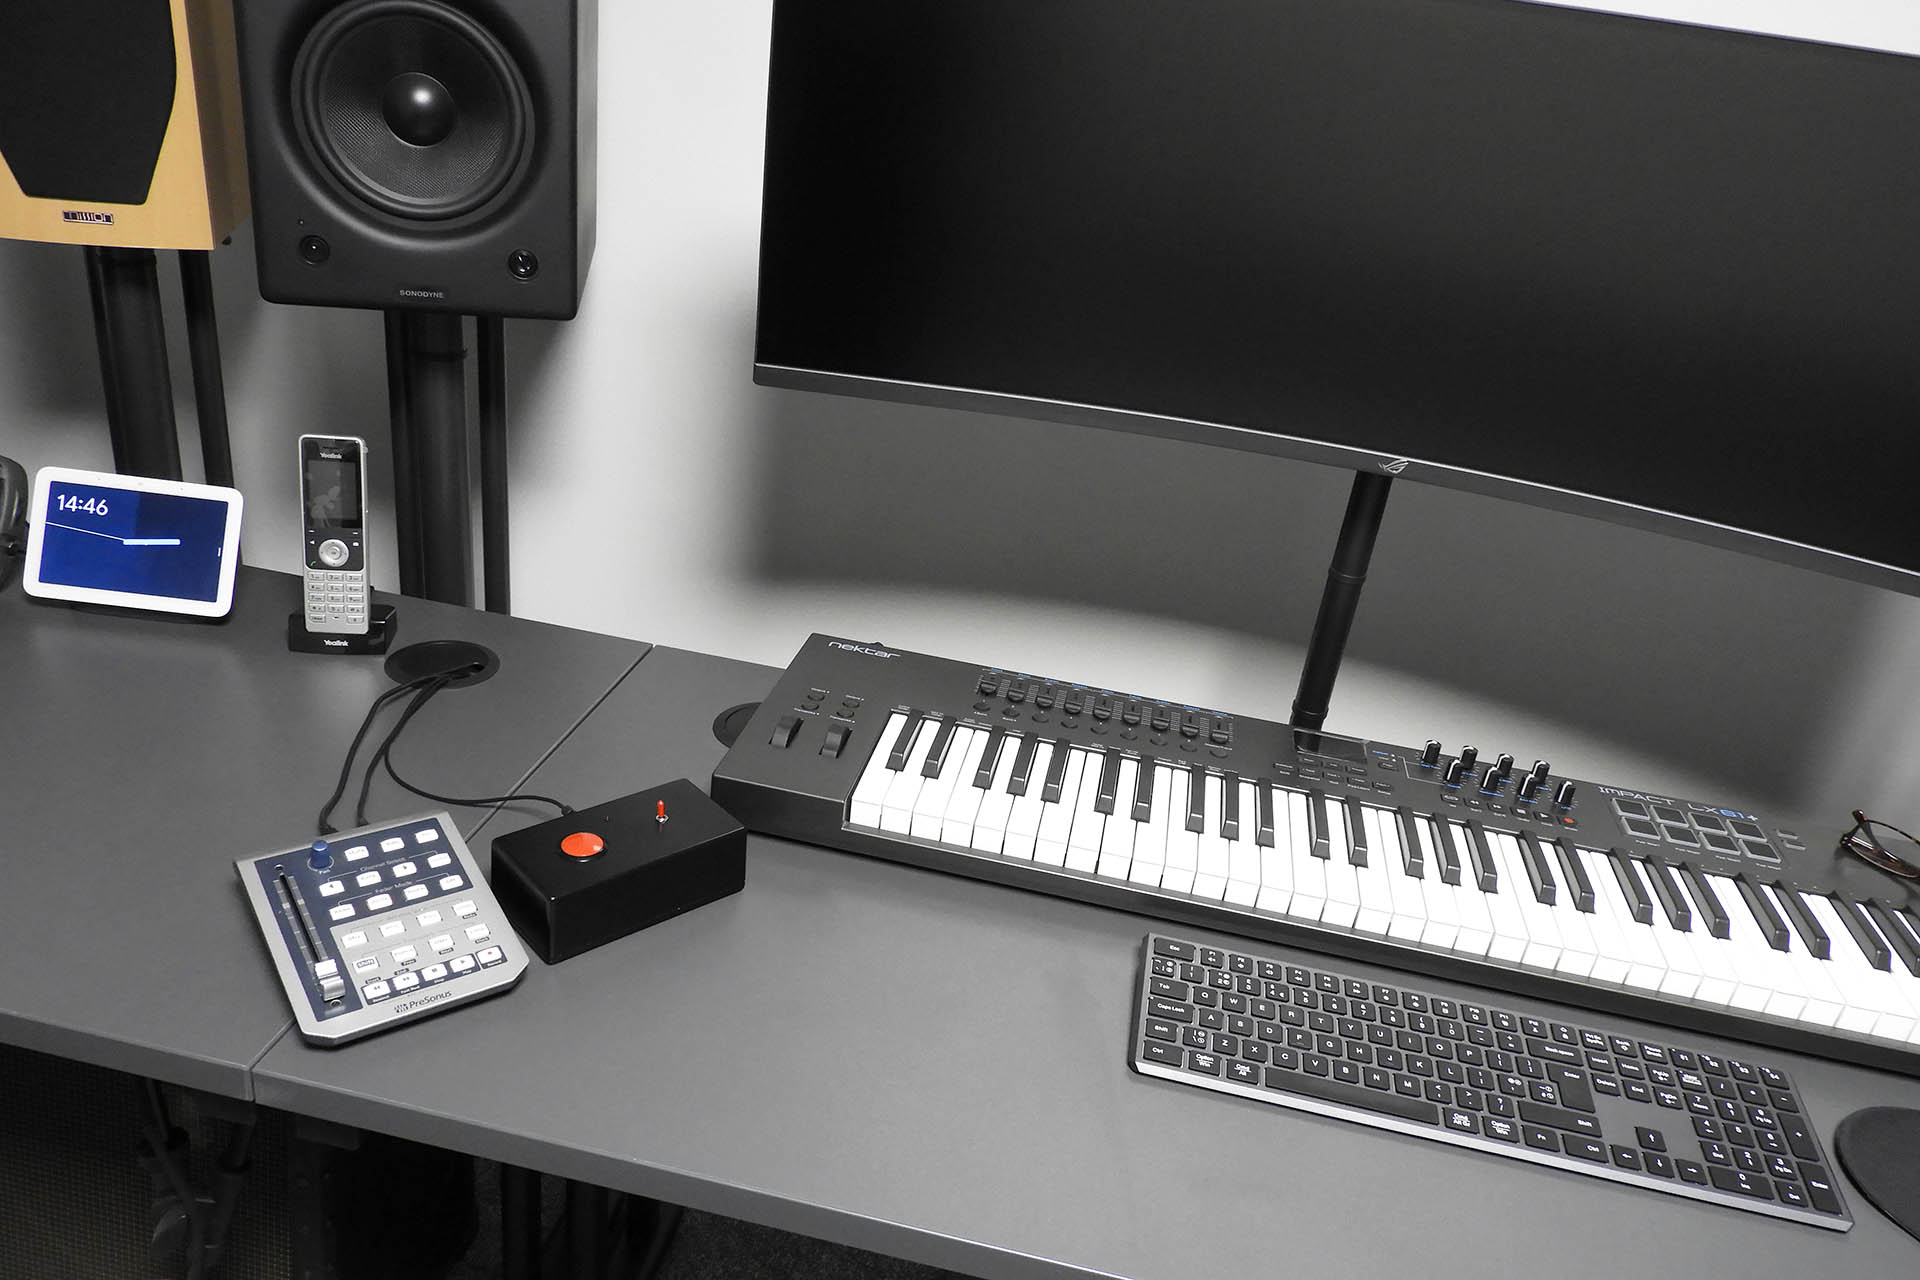
It's difficult to get a sense of scale so the picture below is where my Big Red Button normally sits. My overhead condenser microphone is on the right hand side of the monitor.
My Big Red Button remote talkback switch, is way to expensive to release as a commercial product. Just the push button switch alone, is 25 GBP. As the example shown is not a production item however, I can tailor things to suite your specific requirements. Hence, if you have a Yamaha GPI mixing desk and would like one of these or something similar, please don’t hesitate to get in contact. I can make several variations to accommodate varying requirements.
Below is an example of a more basic version with no status LED or talkback lock ON switch. Small Red Button, perhaps? 😂
Wait for the BIG RED BUTTON in this Compare the Market advert...
He's done it again! Fred was talking about this for quite some time but a few months ago, his talk became reality. Fred Vecoven's new digital PWM kit for the Roland Super-JX is just amazing. Simple, elegant and delivering great PWM for this much loved classic, this is a must have for every JX-10 or MKS-70 owner.
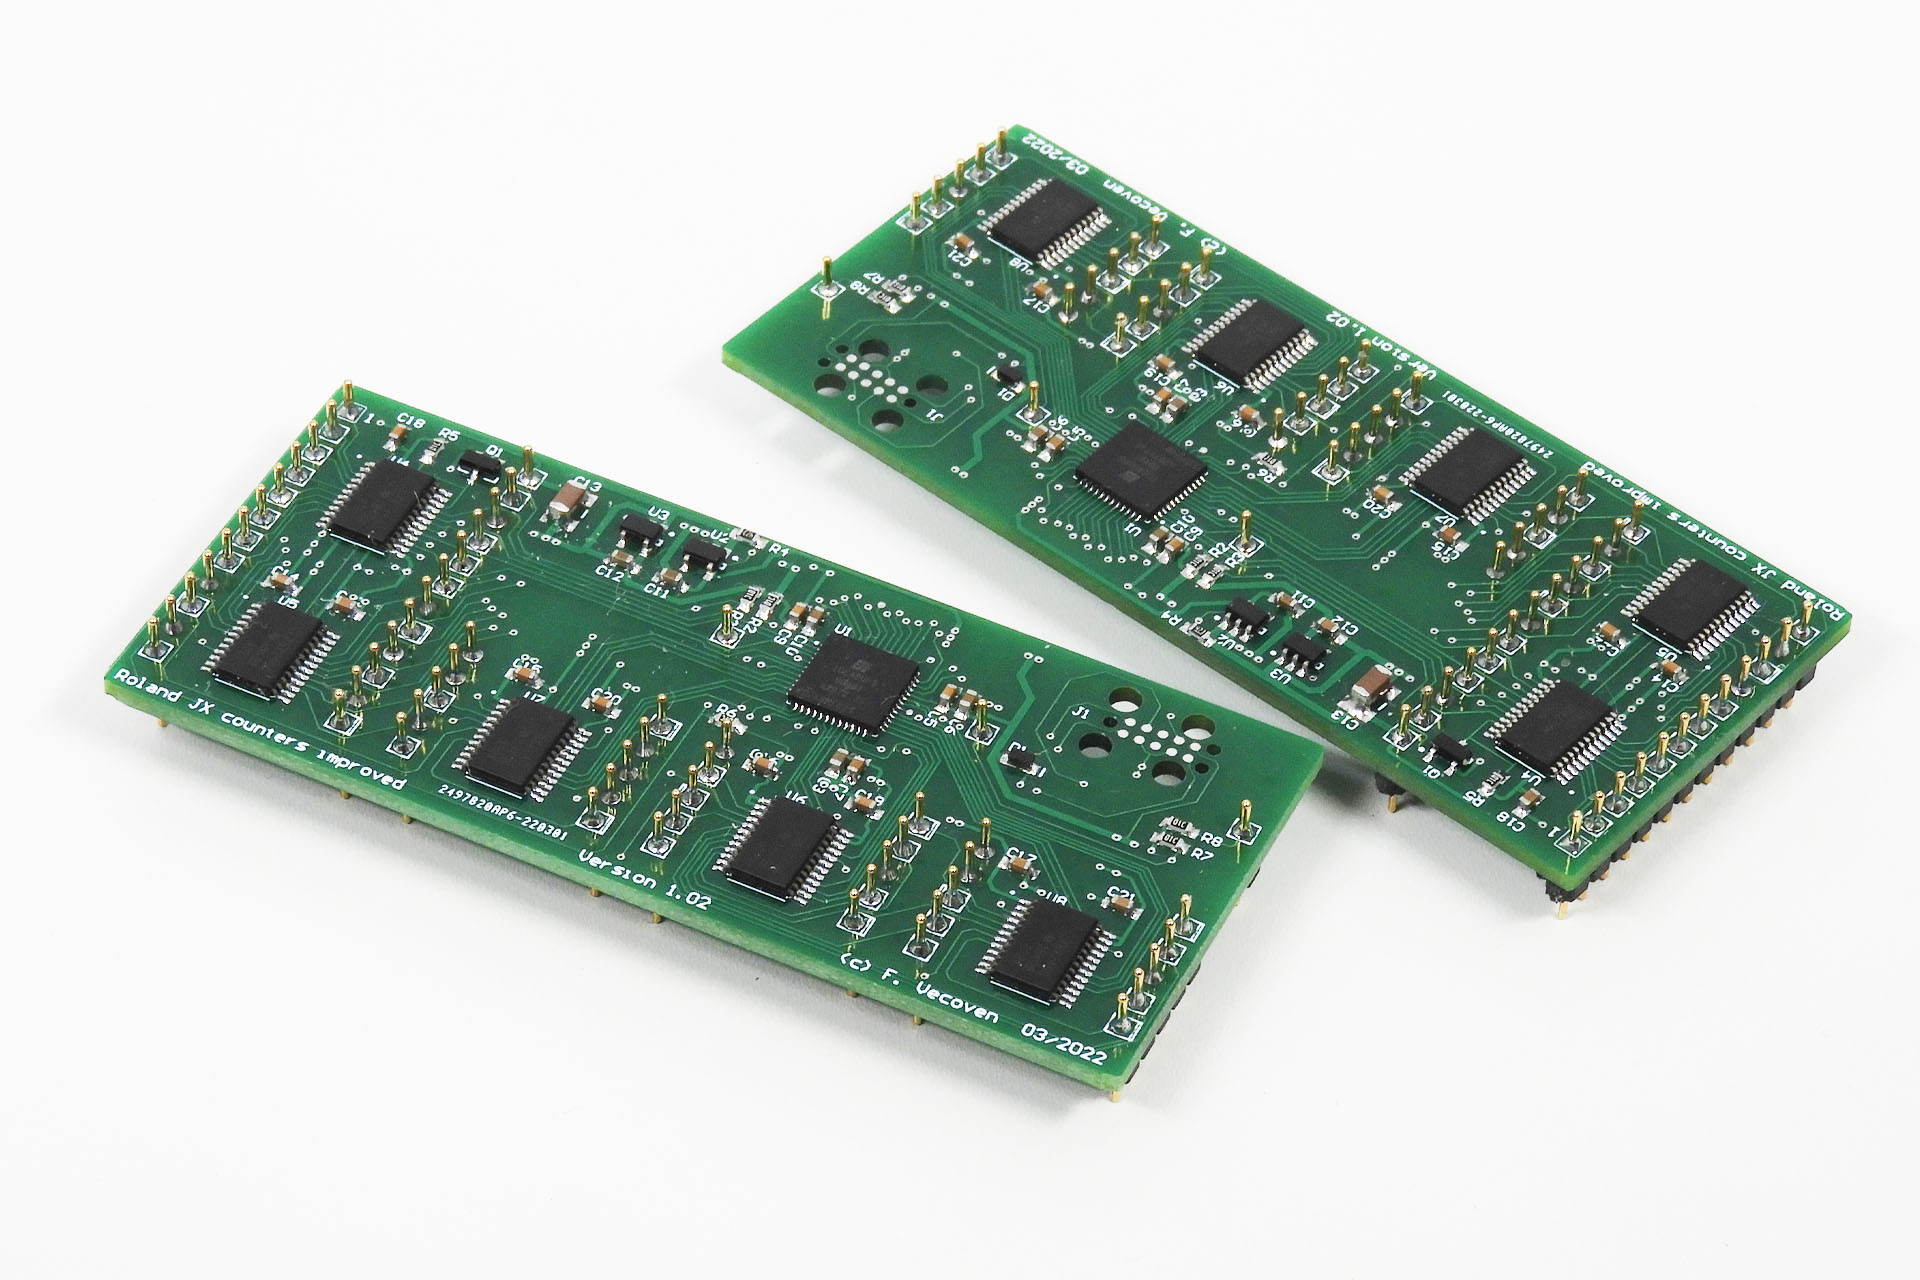
Much smaller than the original PWM daughter-boards and a whole lot easier to install.
Anyone familiar with installing Fred's original PWM upgrade, will be aware of just how involved it was. Without my V02 mounting bracket, the daughter-boards needed to be secured to the Super-JX's voice-boards which meant drilling holes! 🙁 Then there's the wiring... and there's a lot of it.
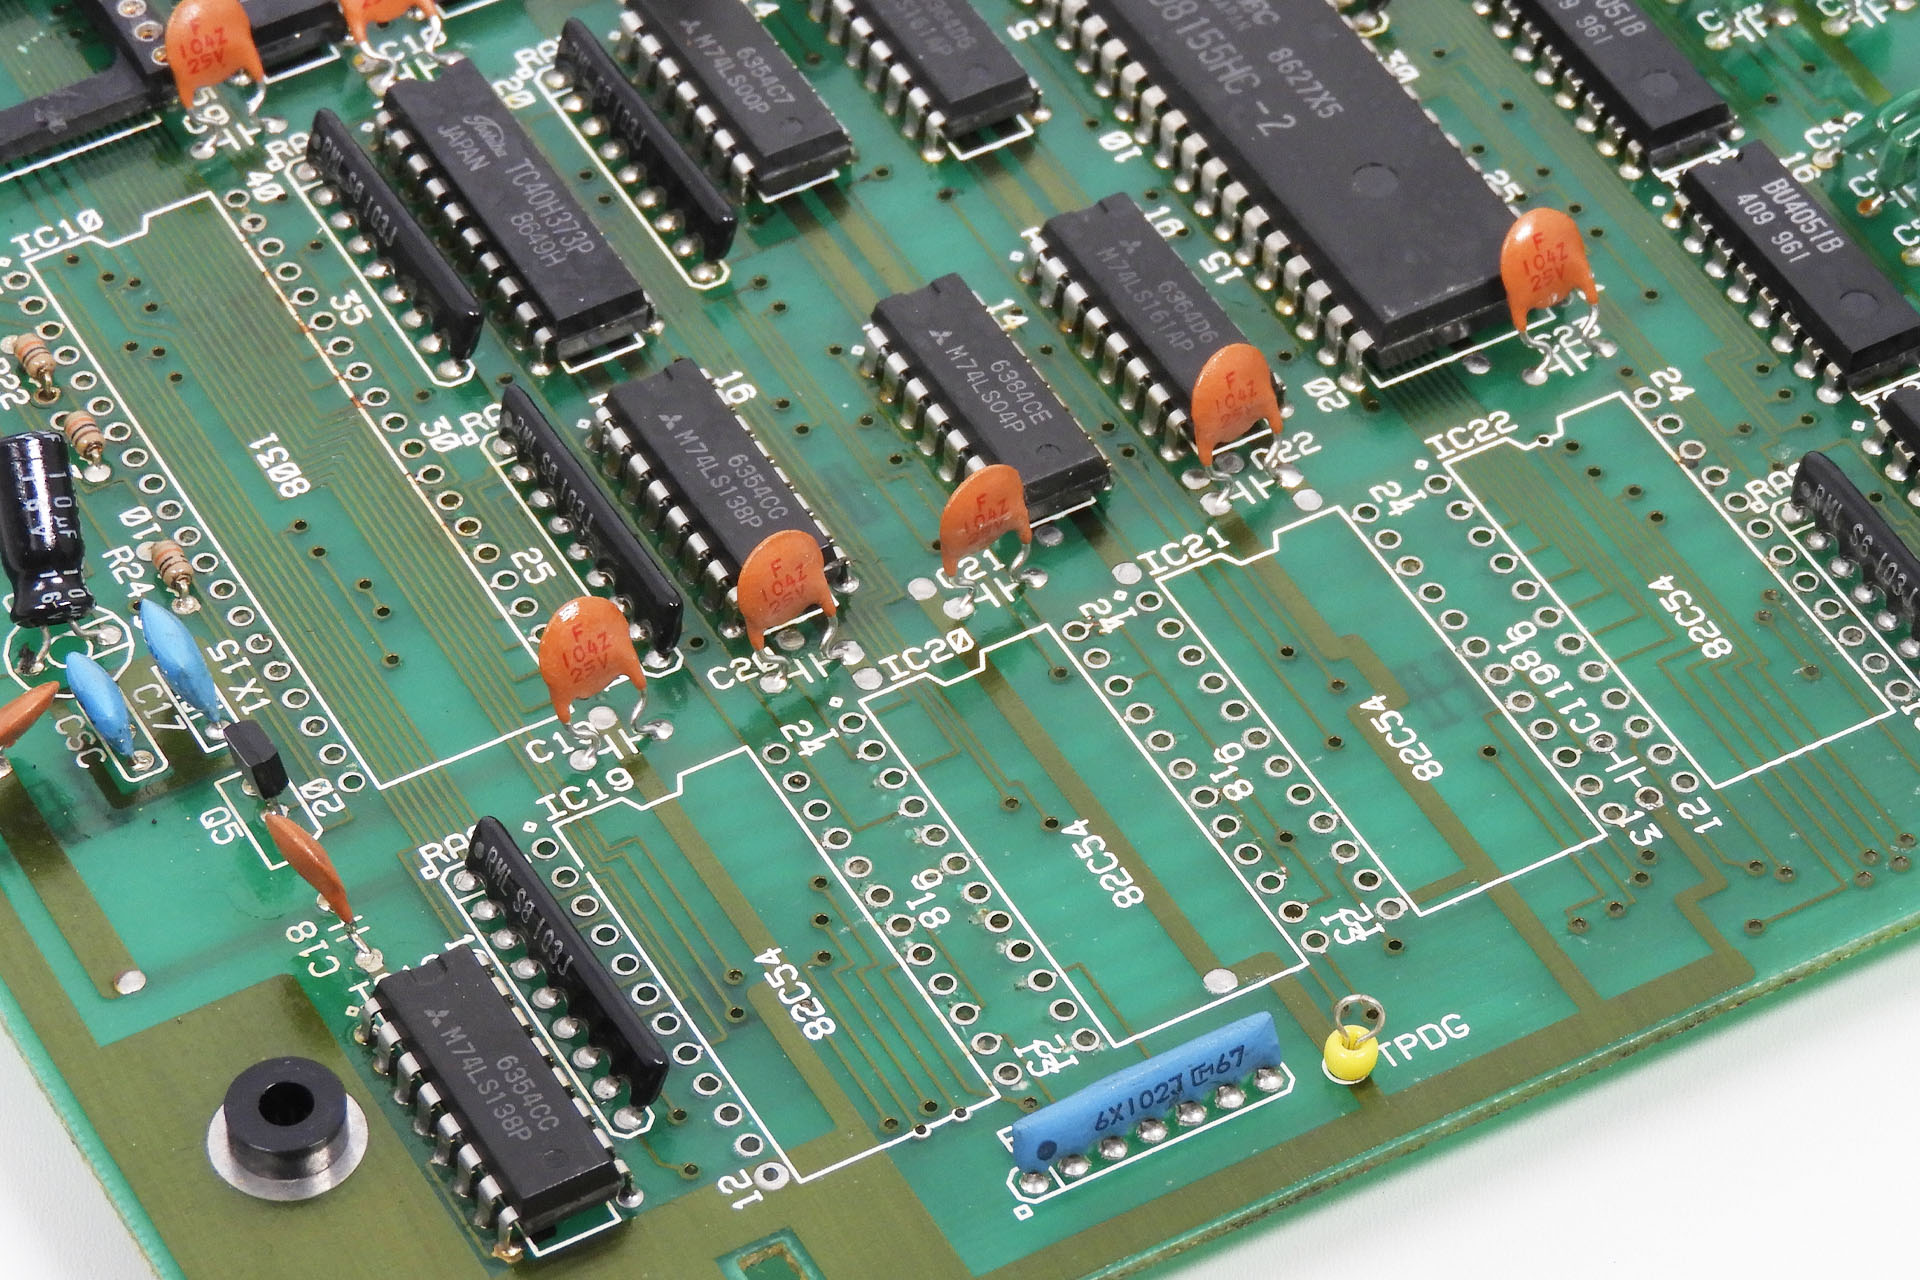
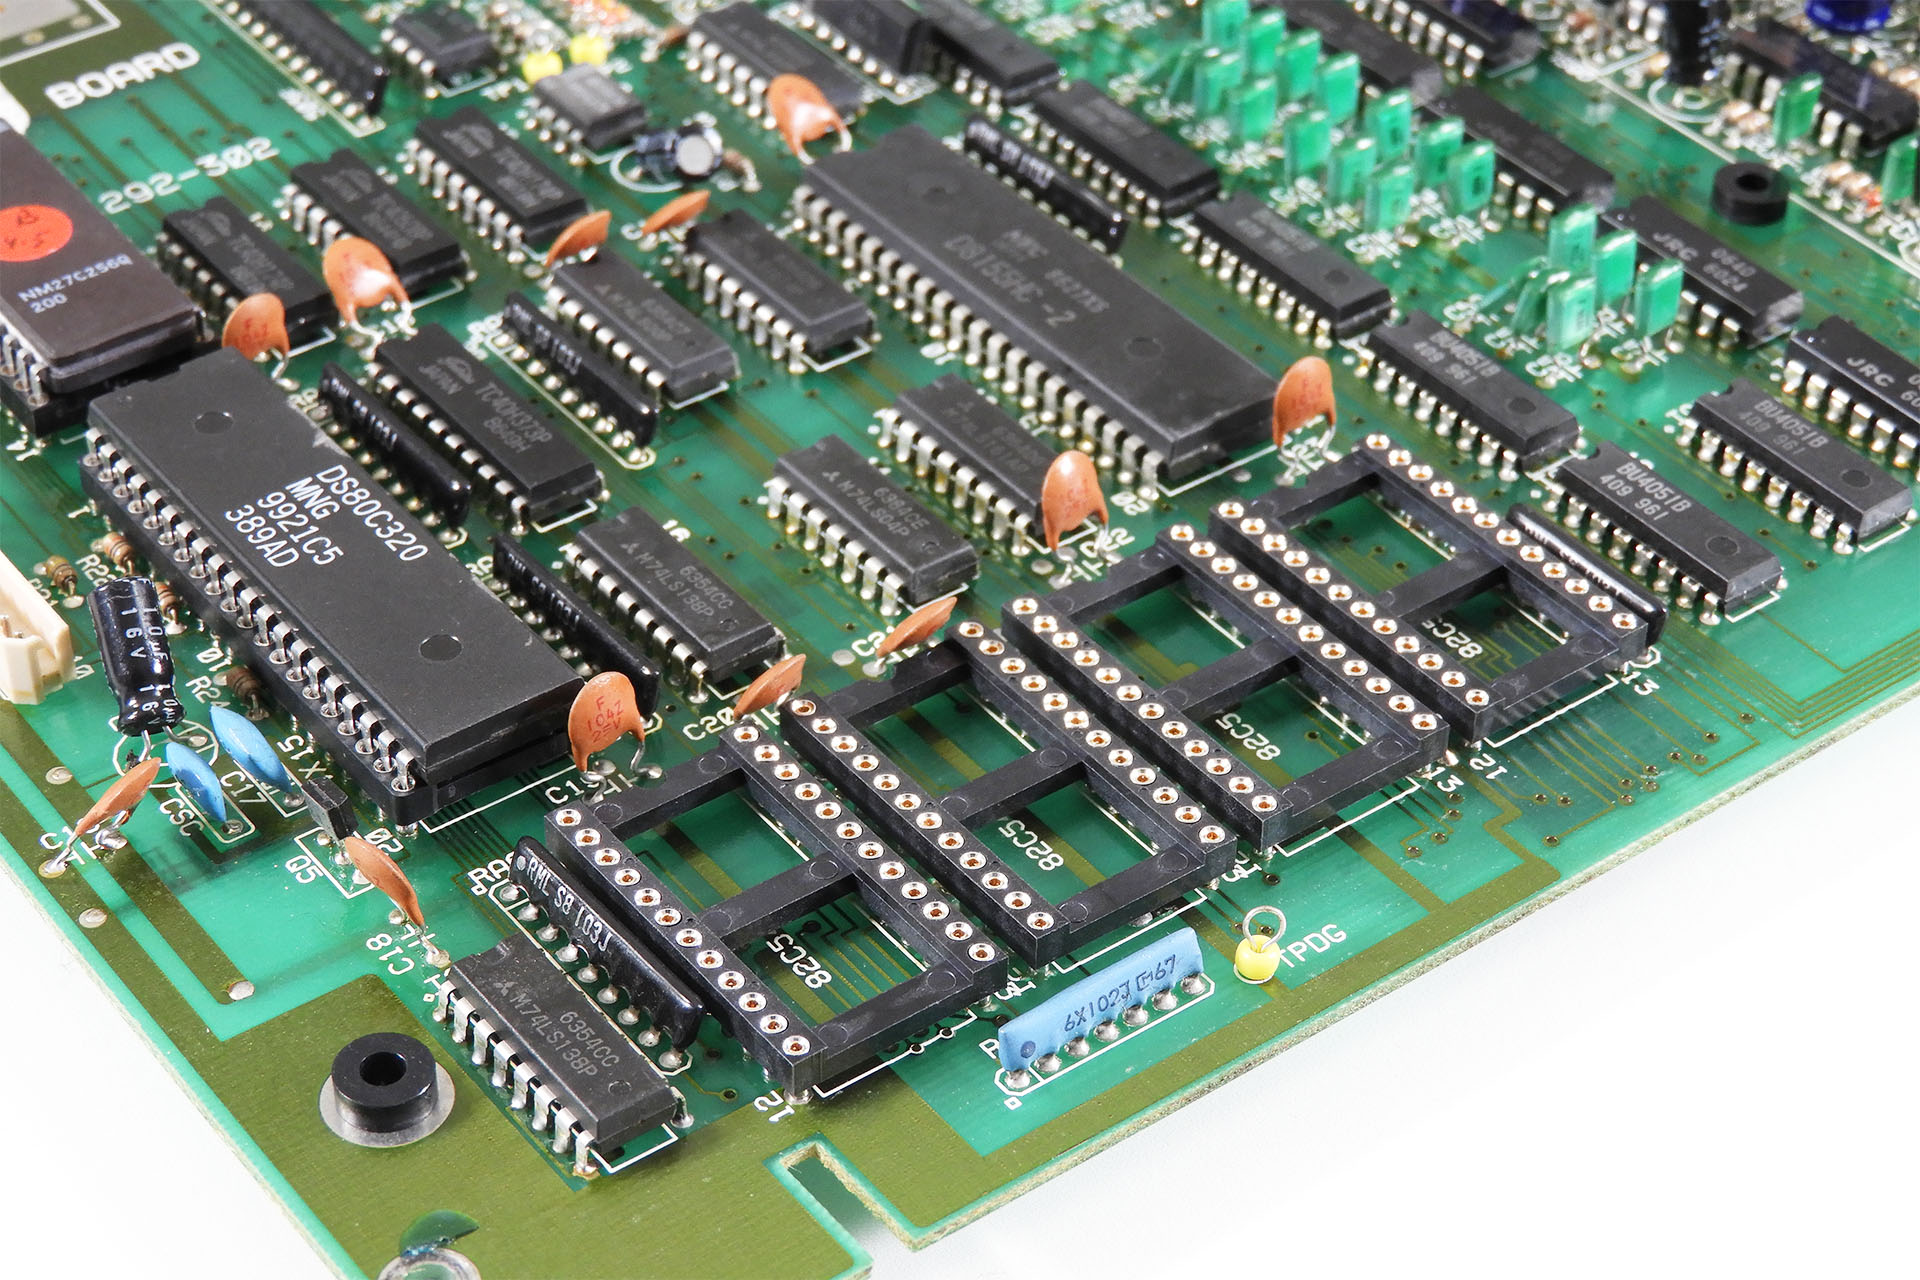
As its predecessor, the new digital PWM kit for the Roland Super-JX, still requires the changing of the 8031 processors on the Super-JX's voice-boards but the new daughter-boards only need to be fitted to the holes left after removing the 82C54s counters (IC19 - IC22) . Although straight-forward, it's still a very time consuming task.
In addition to removing the 8031 (IC10, top left), the four 82C54 ICs also have to come off each voice-board.
The daughter-boards generate square and PWM waveforms and as a side benefit, they consume less power than the original 82C54 counters, which isn't a bad thing.
As mentioned, installing Fred's new PWM kit for the Roland Super-JX is much more straight-forward than the original version. The simplicity of the installation also means that the likelihood of error is also greatly reduced . Extreme care however, needs to be taken when removing all those ICs!
My supply and installation service for the new PWM kit is therefore much cheaper than what I was charging for the original kit.
Fred is full of surprises and indeed things seem to be continually happening around the Roland JX-10 and MKS-70 and in the Super-JX community. To make fault diagnostics easier if anything ever goes wrong, is another reason why I put sockets in-place of the counters, thereby allowing Fred's digital PWM daughter-boards, to be snapped in and out (if necessary), from the voice-boards.
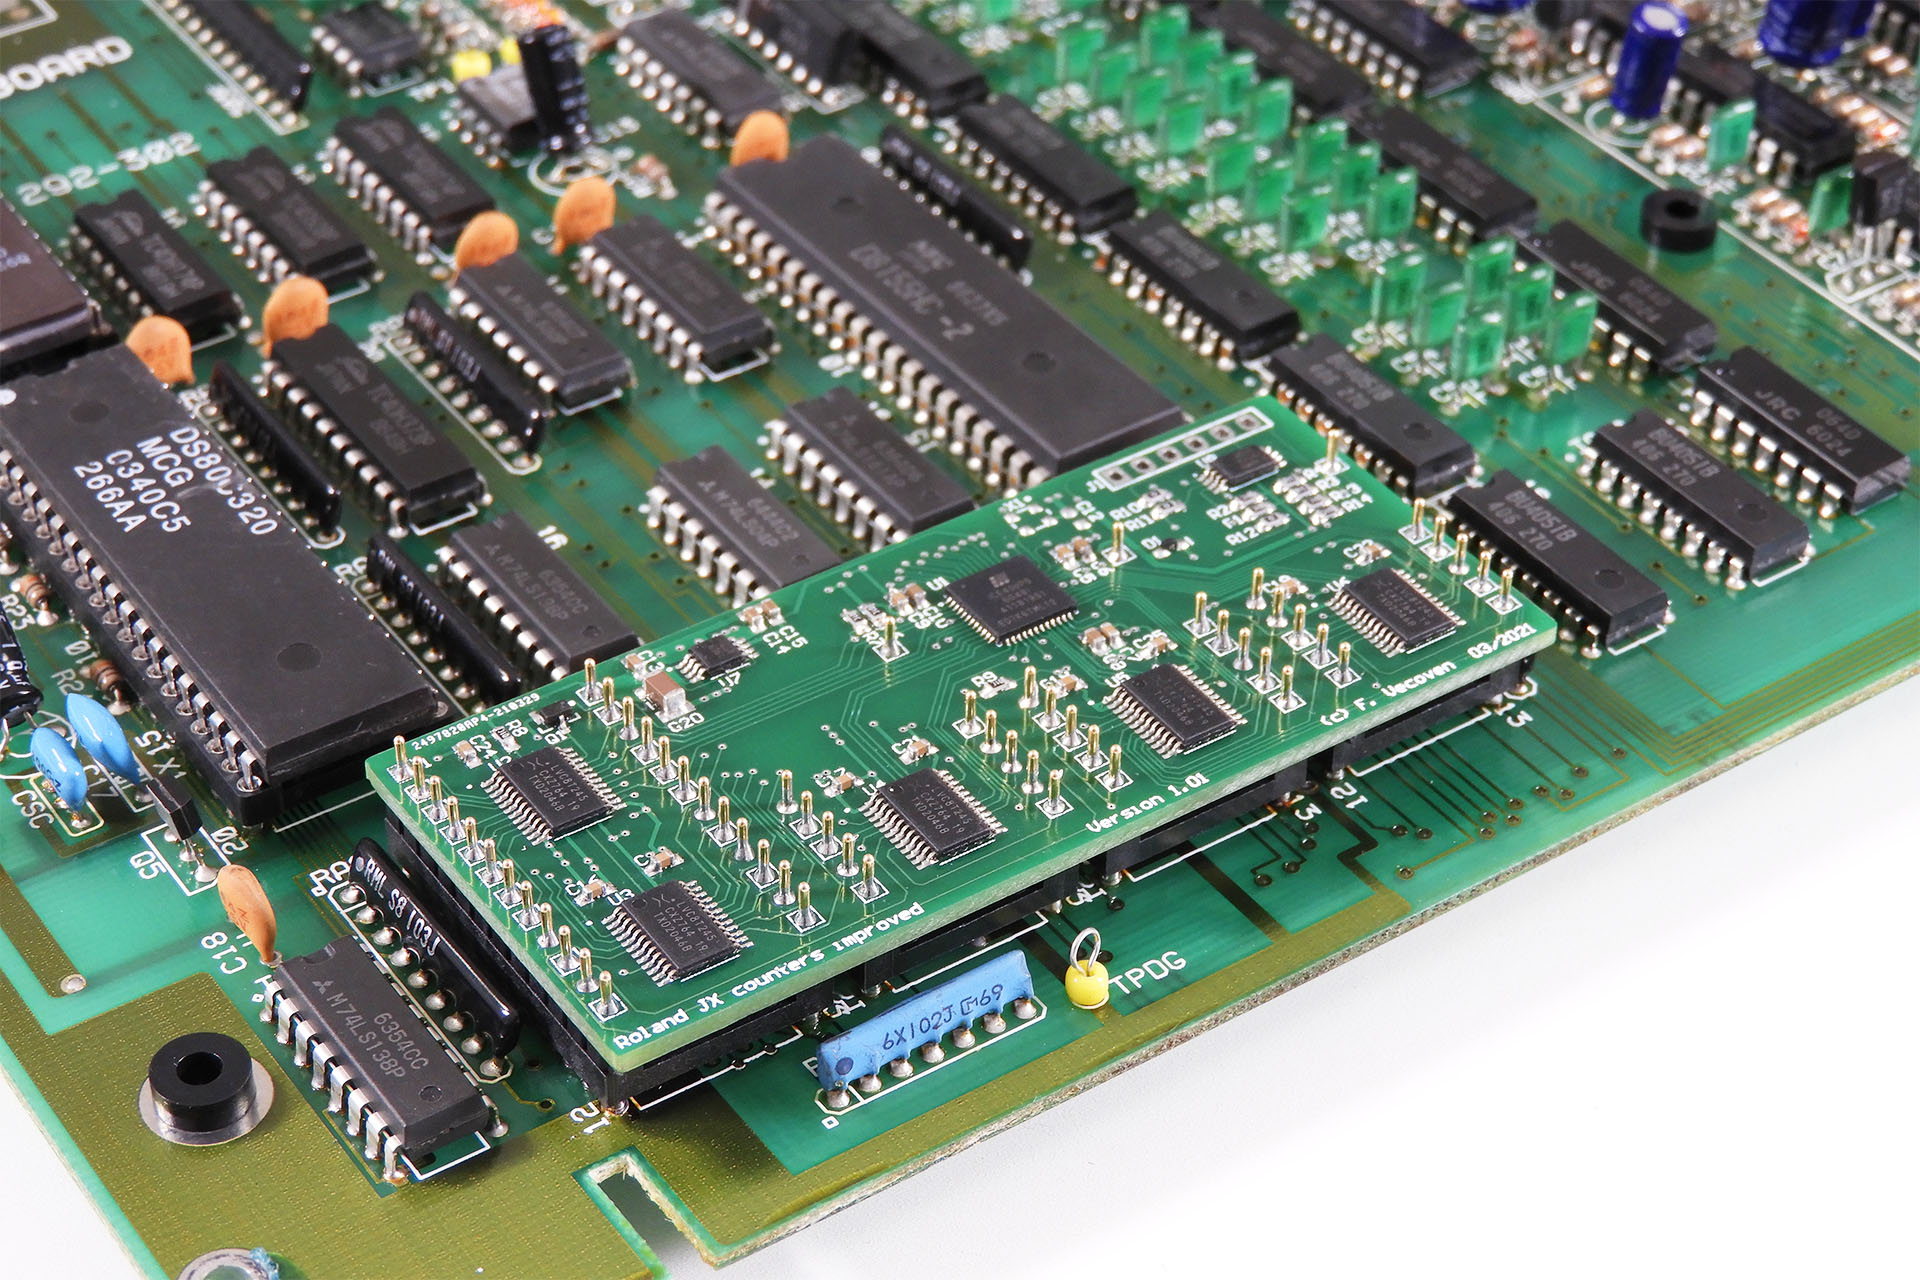
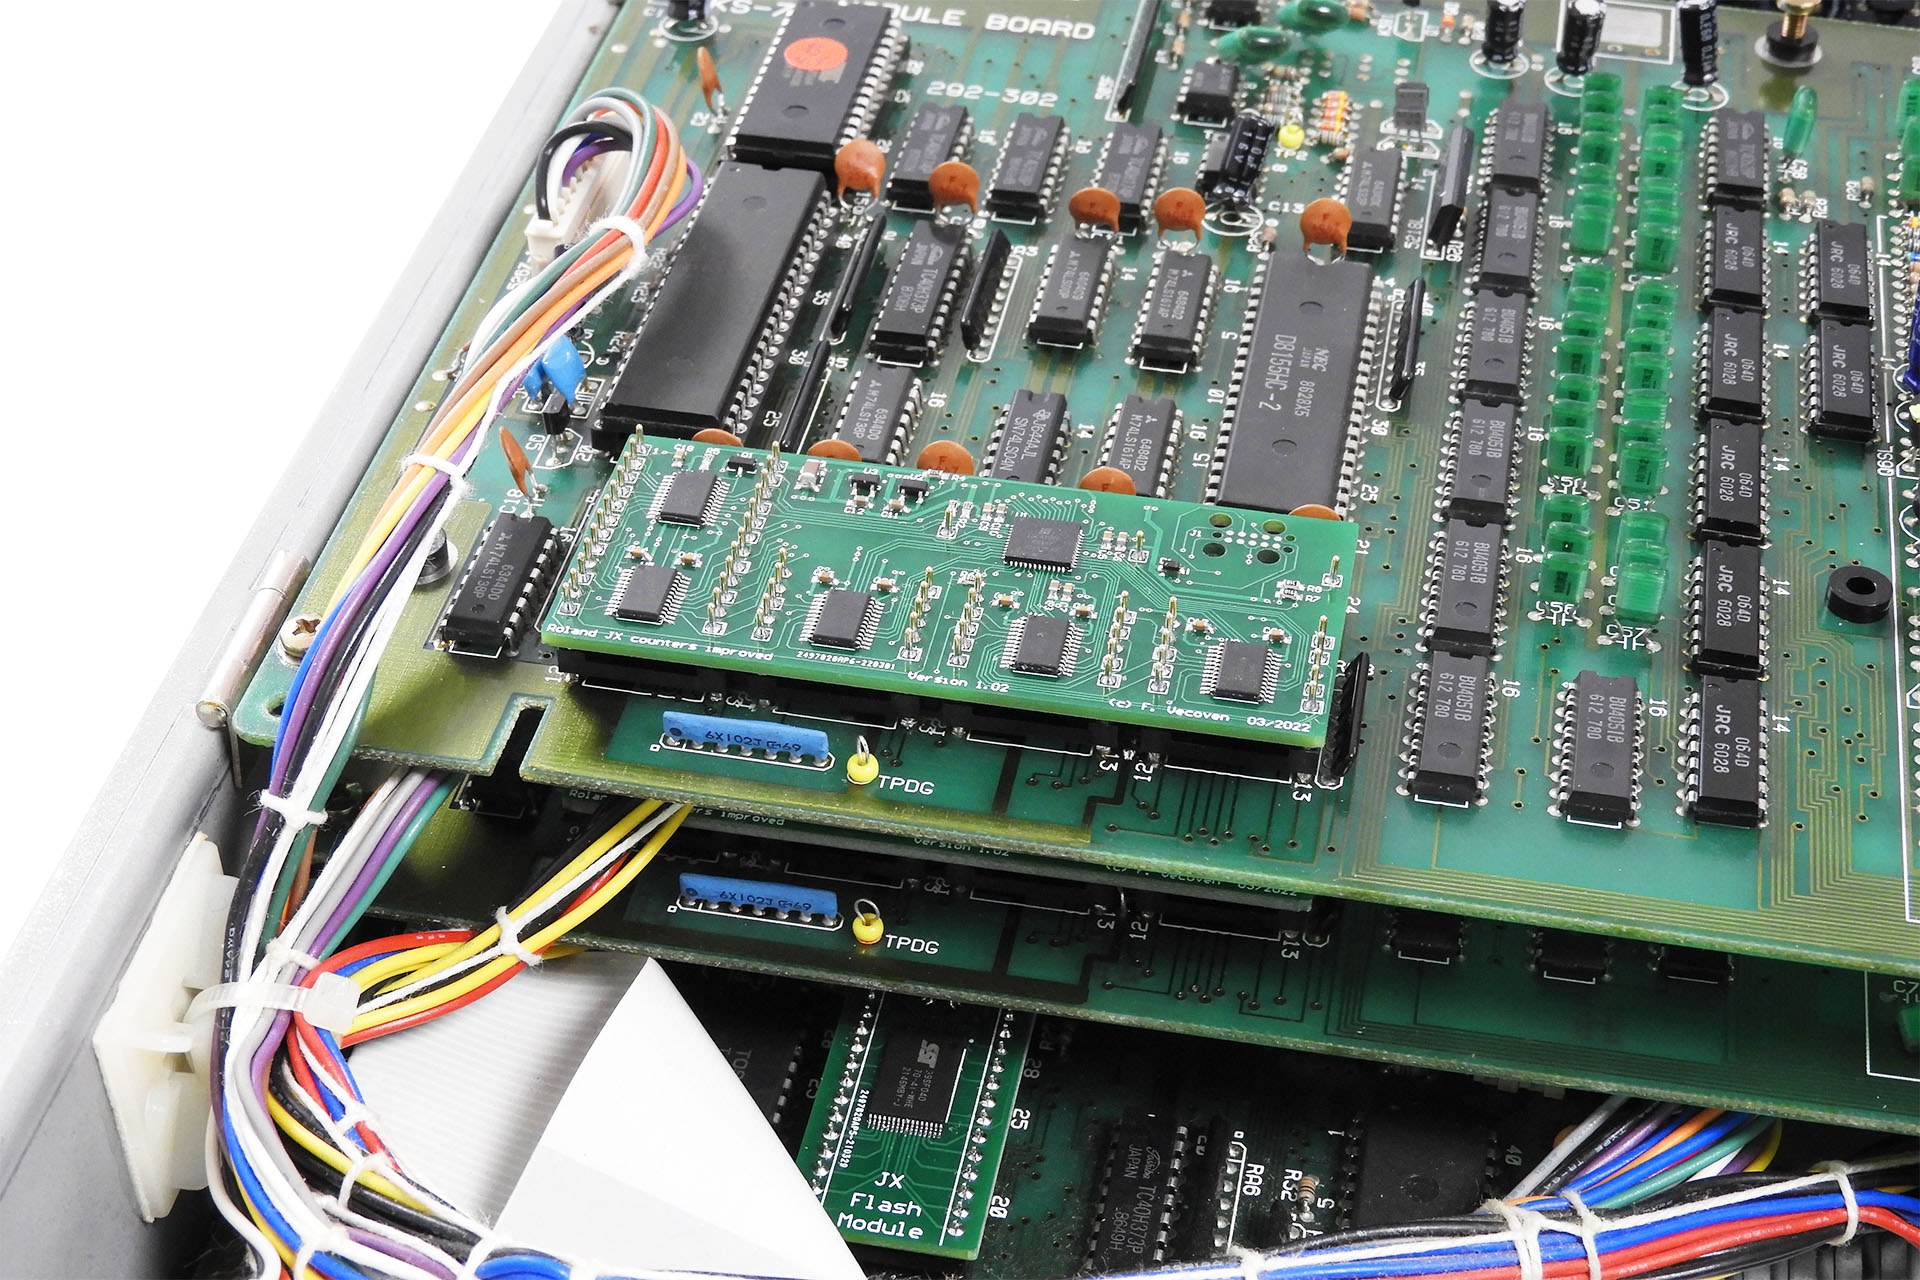
Socketing Fred's latest PWM upgrade makes installation a bit longer but future proofs your Super-JX and means that the daughter-boards can be easily removed, if ever necessary.Simple and elegant, Fred Vecoven's new digital PWM upgrade for the Roland Super-JX is quite simply beautiful.And here's the re-assembled MKS-70, showing a digital PWM daughter-board installed on the top voice-board.
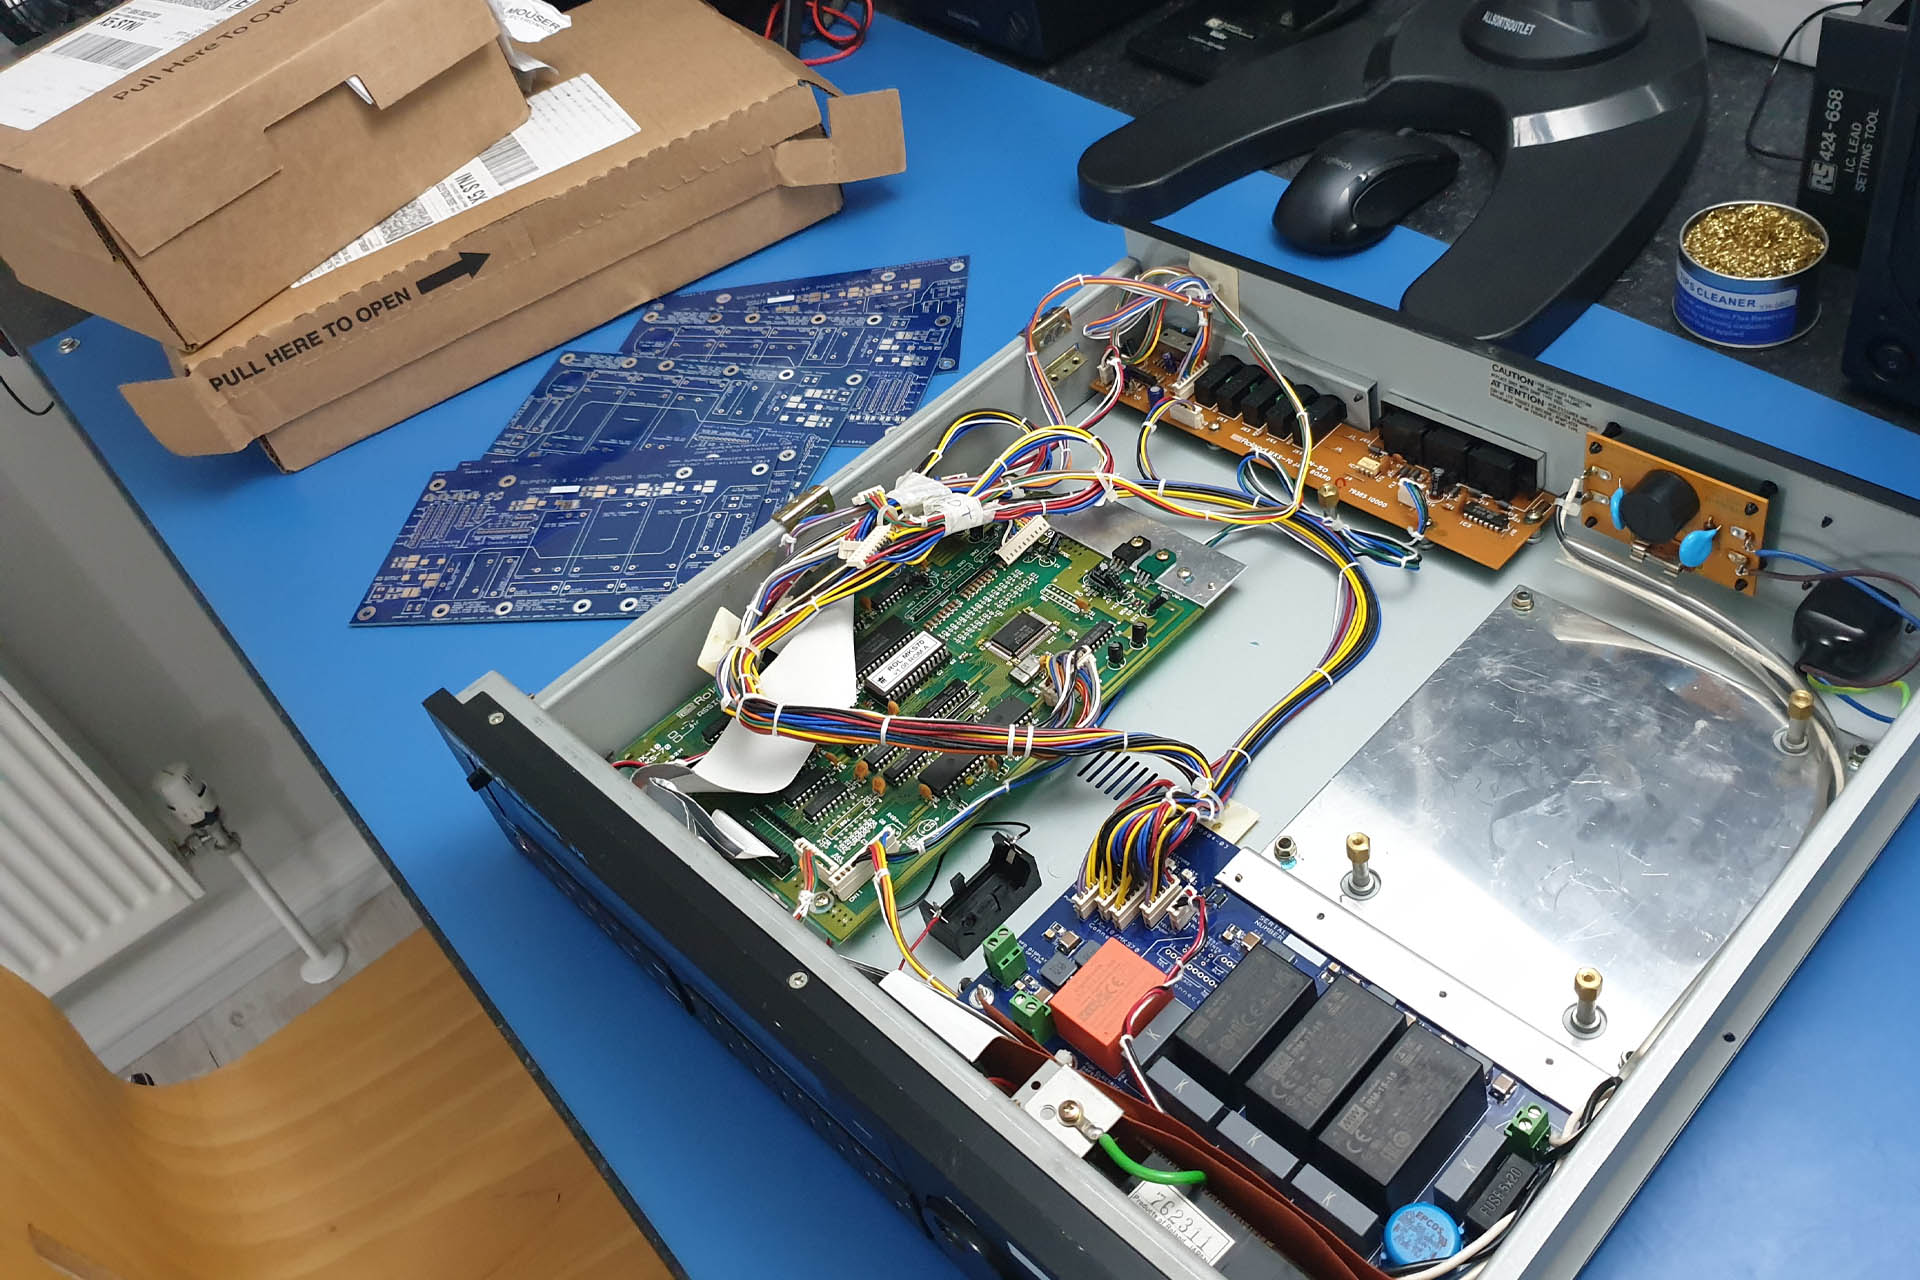
Ne batch of P0004 PCBs arrived from my dear friend Guy Wilkinson, this morning.
I'm wondering just how many MKS-70s Roland made! While I've been building P0004 power supplies for a while now, recently things have gone nuts and this weekend looks like it's going to be a P0004 weekend.
I've had so many orders that yet again, I had to ask my friend Guy Wilkinson to send me more PCBs, which all turned up this morning (THANKS Guy). 🙂
If you don't already know about this, you're seriously missing out, or rather your synth is missing out!
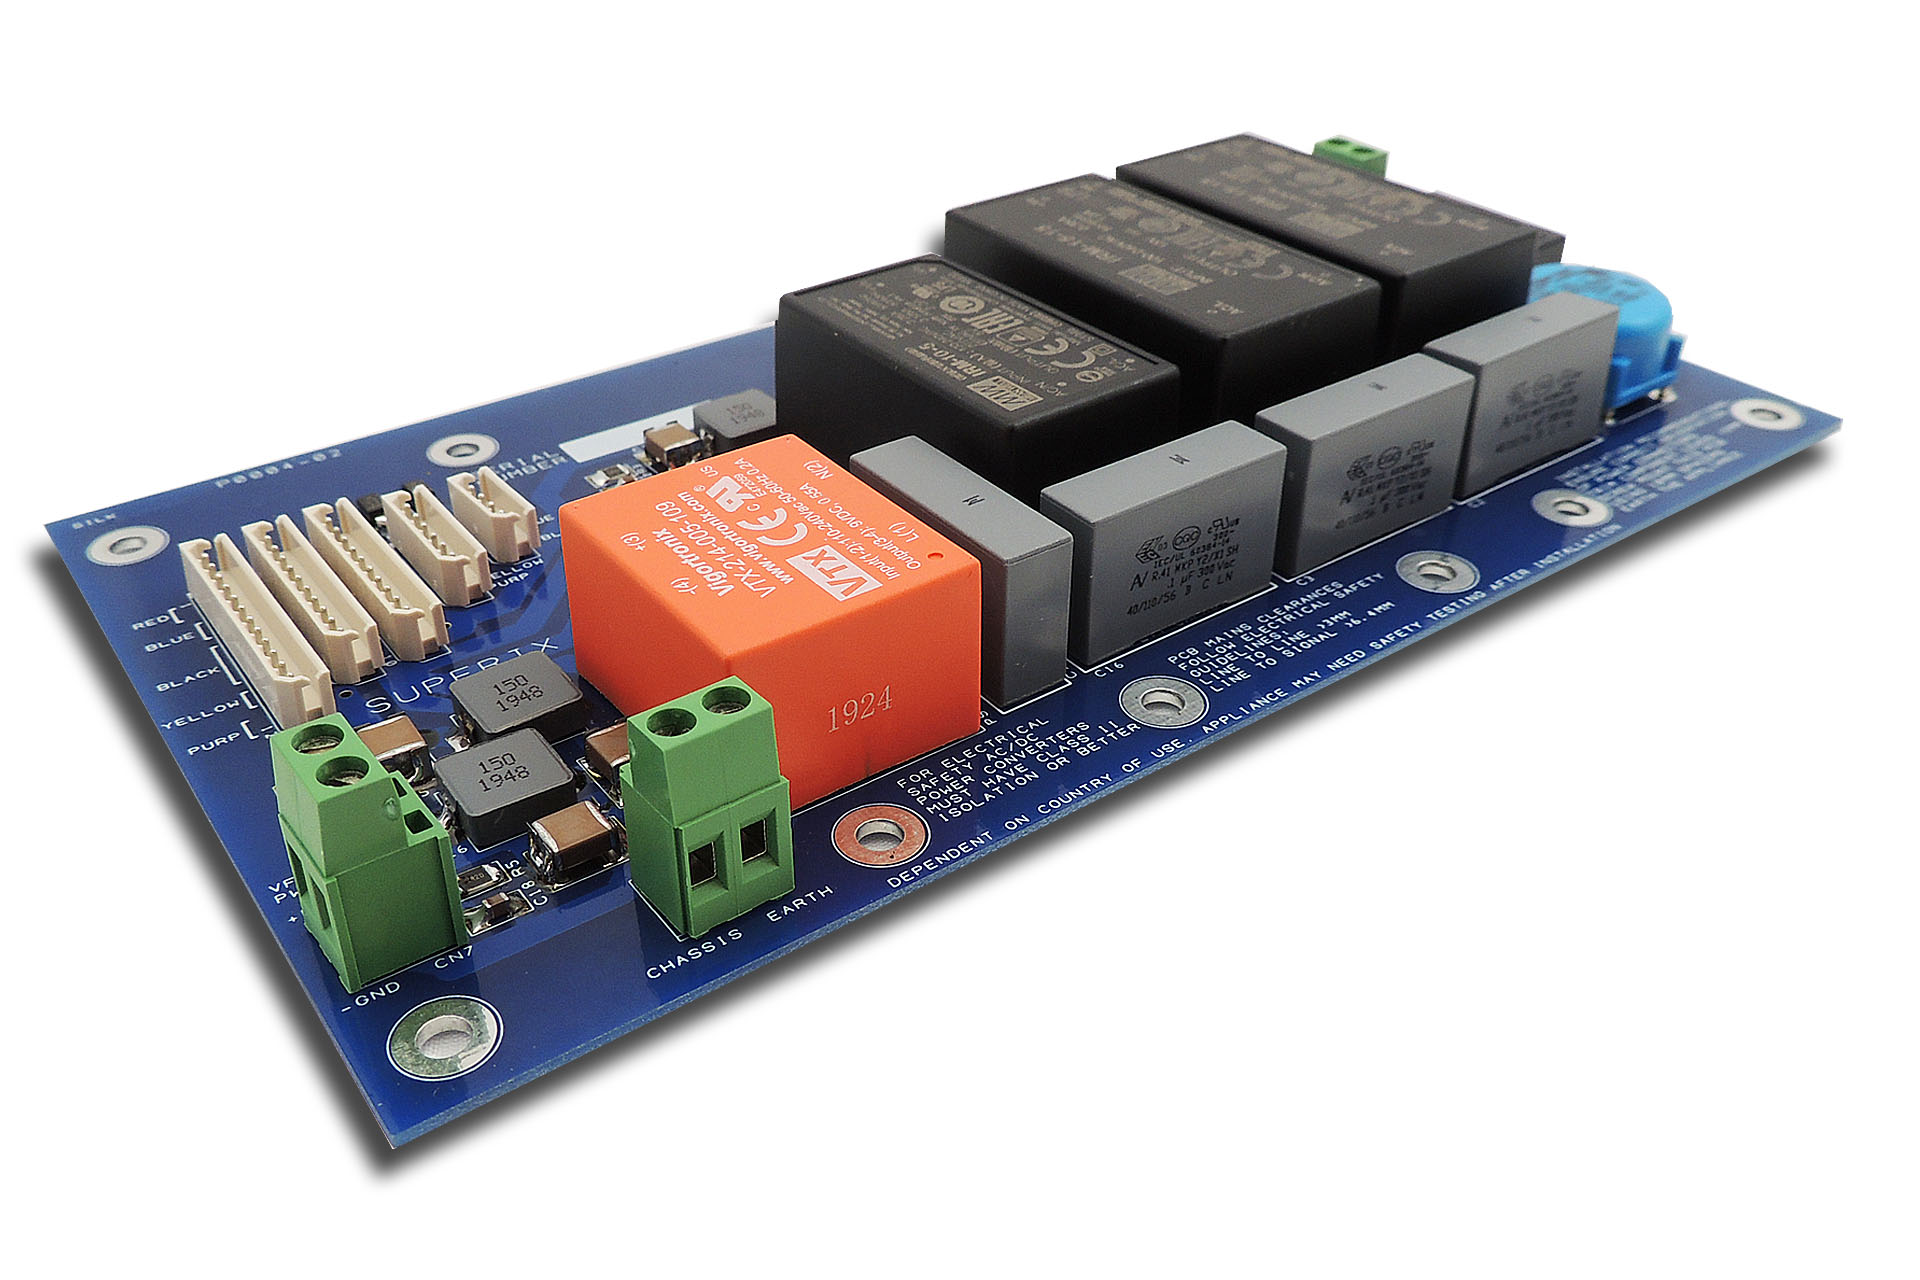
Guy's P0004 power supply for the Roland MKS-70, uses AC / DC converters and some very clever (and beautiful) filtering, providing nice and steady supply rails to the Roland JX-10, MKS-70 and the JX-9P.
Switched-mode power supply for Roland Super-JX and JX-8P.
Read more about Guy Wilkinson's P0004 power supply for the Roland Super-JX here.
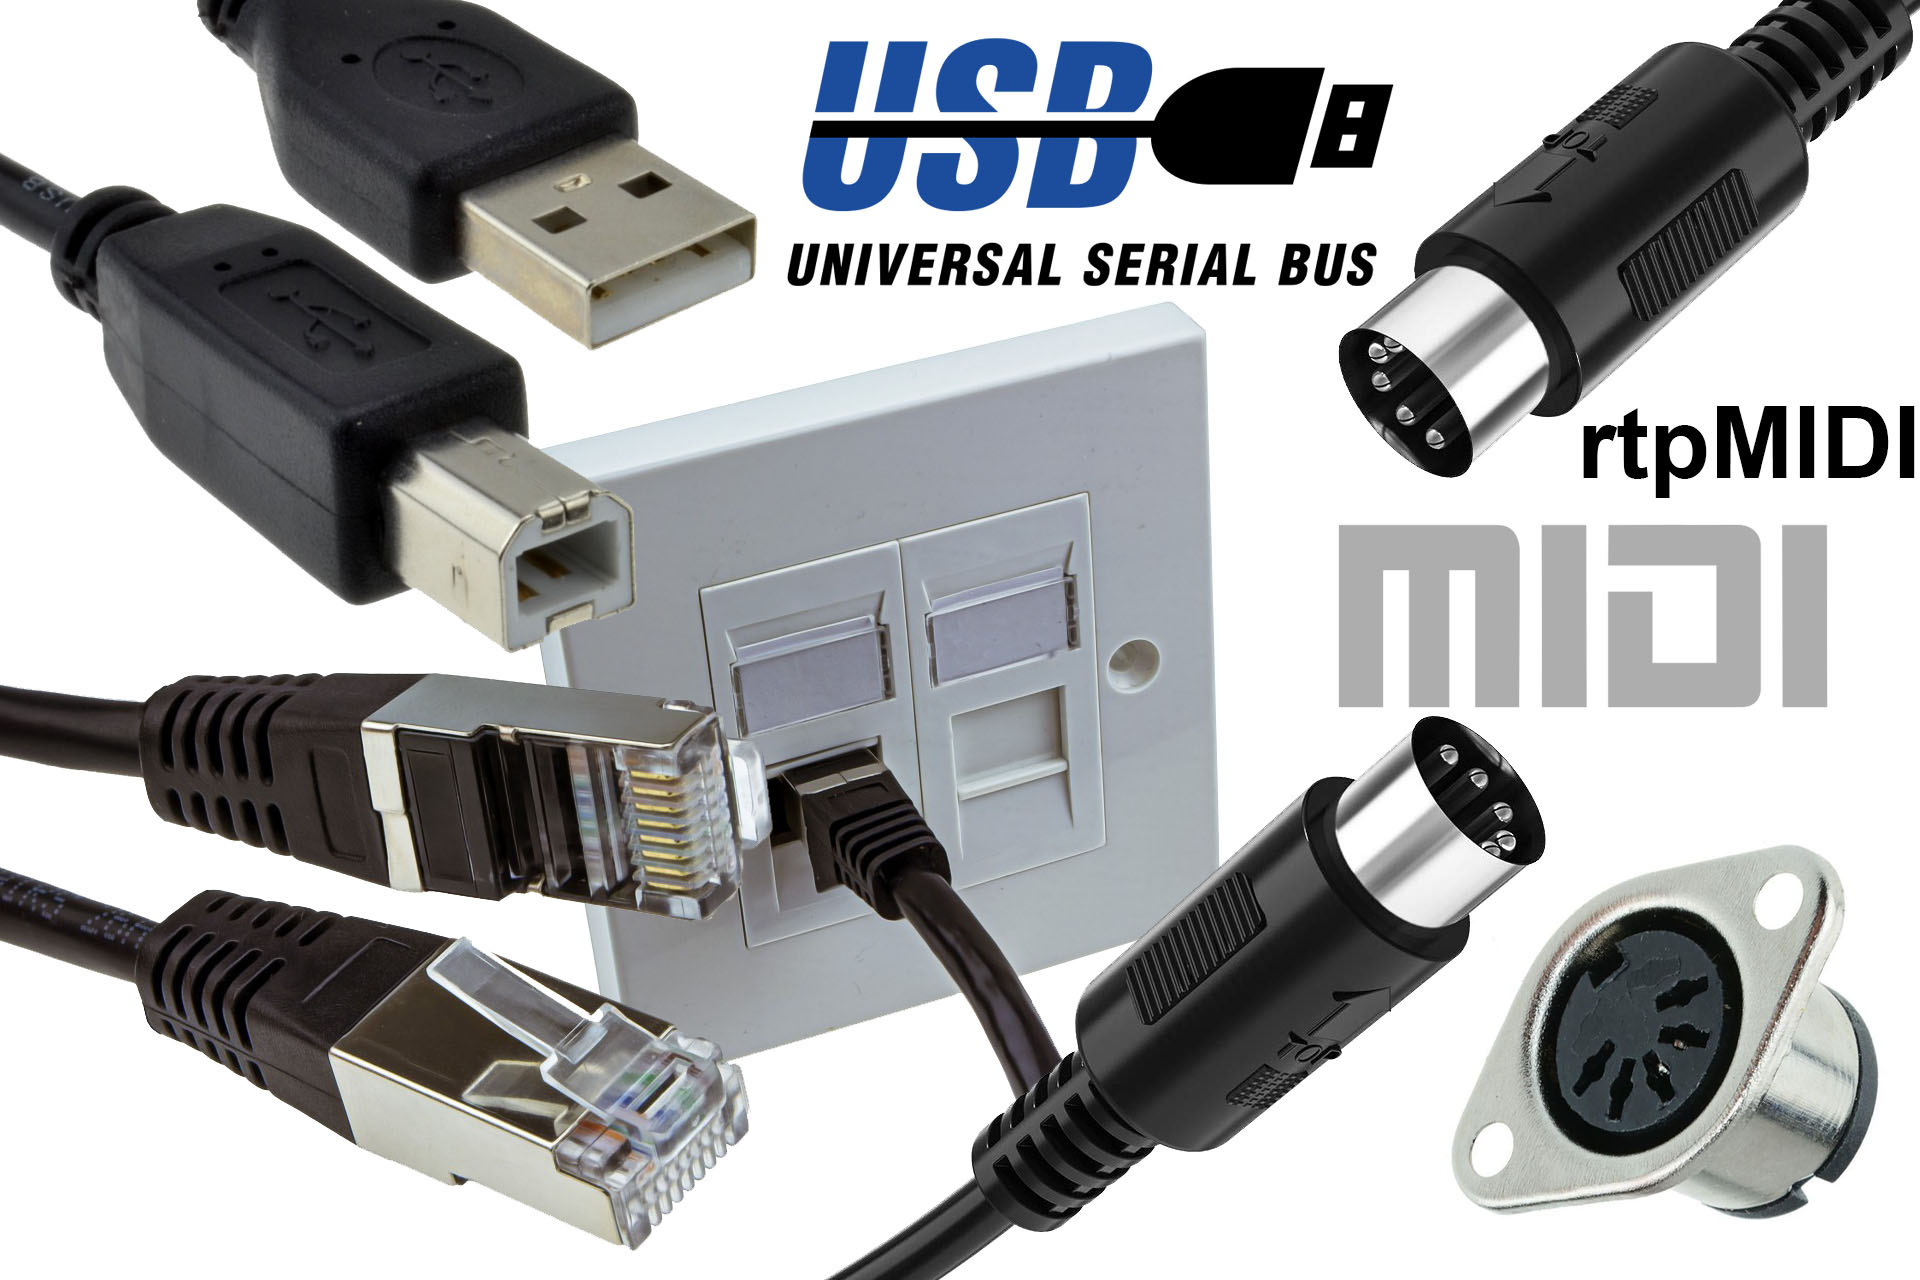
A year ago, I posted an article explaining the relatively new concept of the ‘USB host’. With so many modern MIDI controllers sporting a USB type B socket in place of a conventional 5-pin DIN socket (or sockets) for MIDI, the only way to address a lot of vintage equipment without having to switch on your computer, is through a USB host. Anyway, I'm now going a step further and here I'm going to tell you about my recent rtpMIDI adventures
Over the past twelve months, I’ve been working on my new premises (a lot of decorating, painting and stuff, which I hate) and a few weeks ago, I made the bold decision to move in my office and my studio. My lab went over a few months ago.
Well, of course it wasn’t that simple and several weeks were taken up with planning equipment placement, multi-cores, routings, etc. I’d already started building 19-inch rack enclosures, so I obviously had a rough idea of equipment placement and which rooms were going to be used for what.
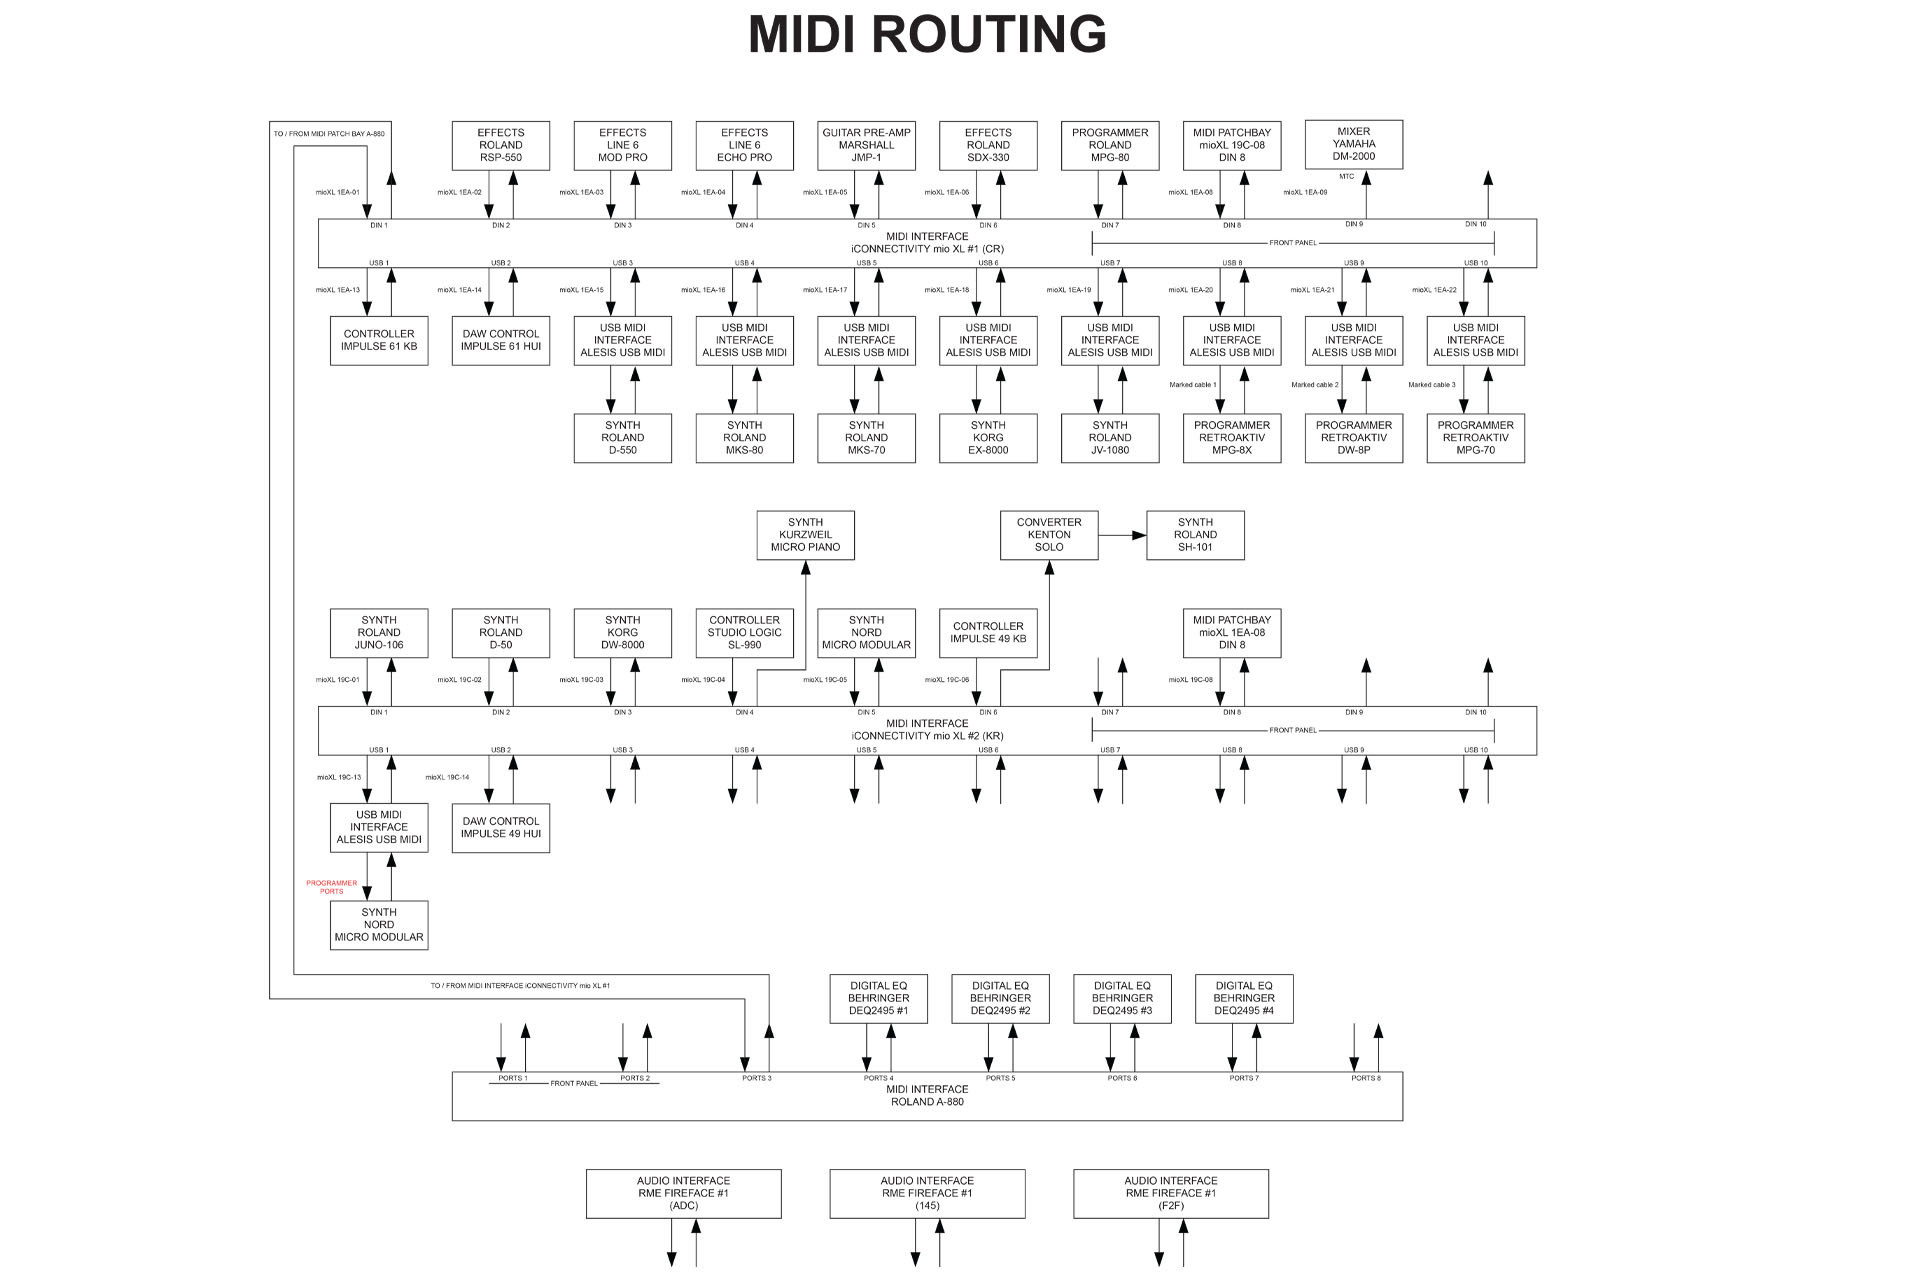
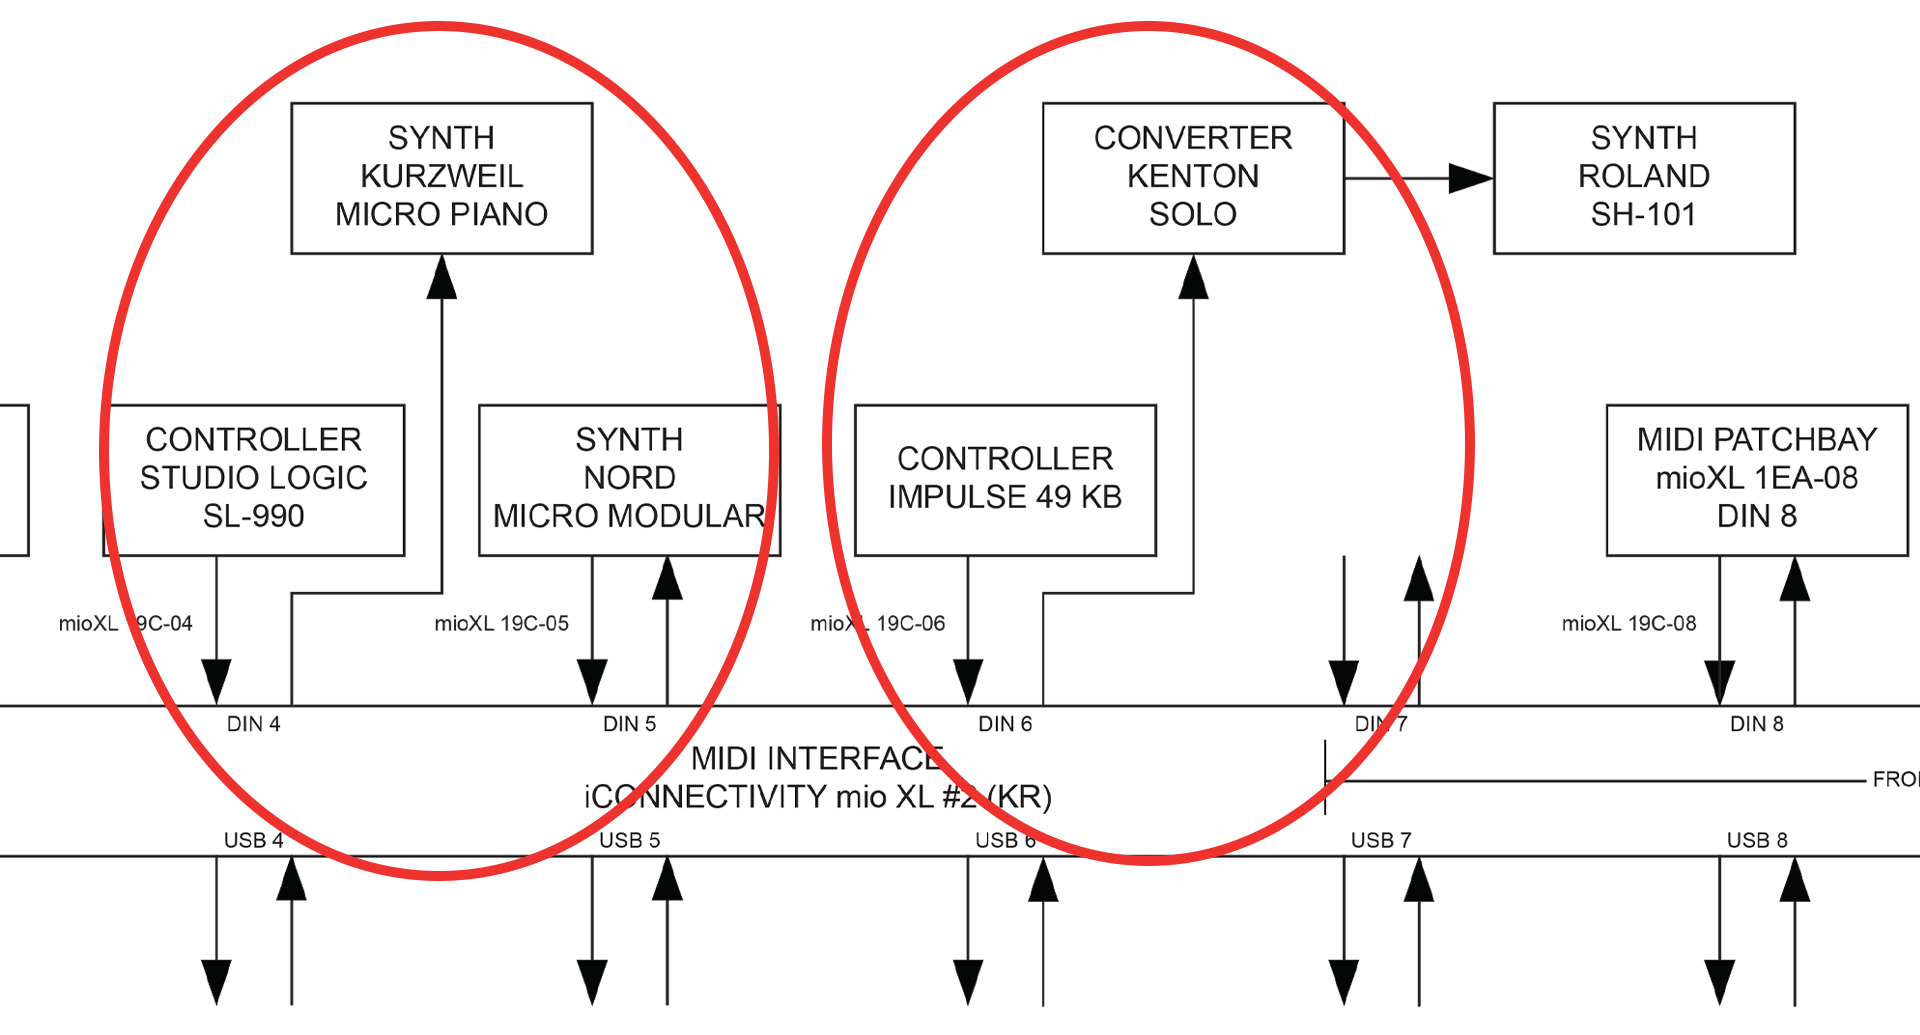
This schematic clearly shows how my two iConnectivity mio XLs are at the heart of my new rtpMIDI network.
To be honest, the set up wasn’t going to be too different from my previous studio, just a bit scaled down, really. Hey, perhaps that’s not such a bad thing. Indeed, the biggest change was going to be how I get MIDI into my computers (yes, I have two).
Due to the fact that I had to have a separate keyboard room (a bit weird when you consider that I’m a guitarist), I took another look at the iConnectivity mio XL and rtpMIDI.
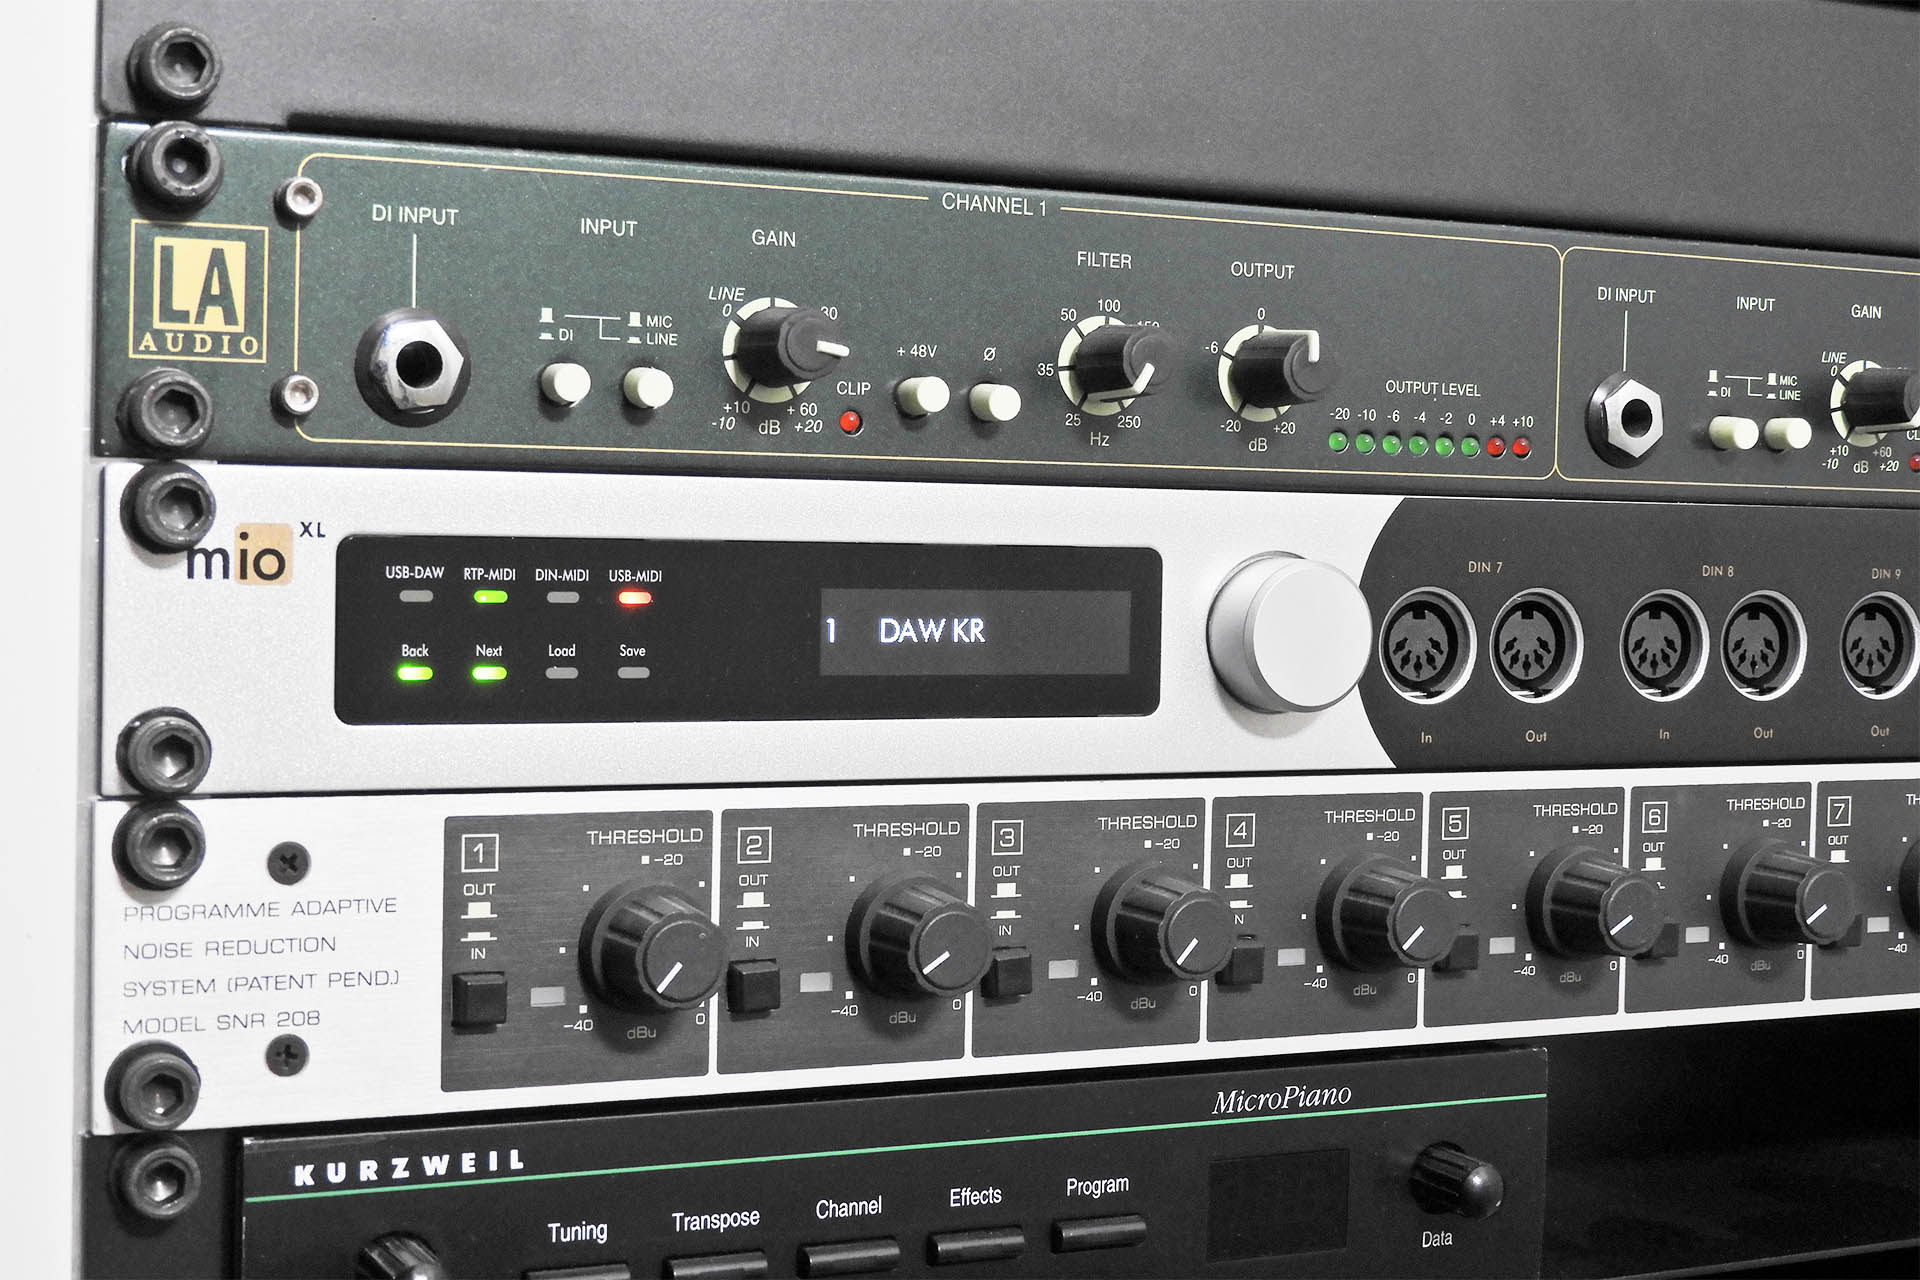
My second iConenctivity mio XL links up everything in my keyboard room to the computers in the control room. Before you ask, the very old Behringer SNR208 8-channel denoiser was modified by me in 1989 and works as an 8-channel, -10dBm to +4dBm unbalanced to balanced converter. I actually have two of these.
Hey, you know what, this kind of seems fairly straight-forward. The iConnectivity mio XL can support twenty-two MIDI ports, comprising eight pairs of DIN inputs / outputs, two additional DIN outputs and ten USB hosted ports, with lots of insane configuration options. So if I buy a few class compliant single MIDI interfaces, I’d have more than enough connections to go around, right? Wow! This sounded great!
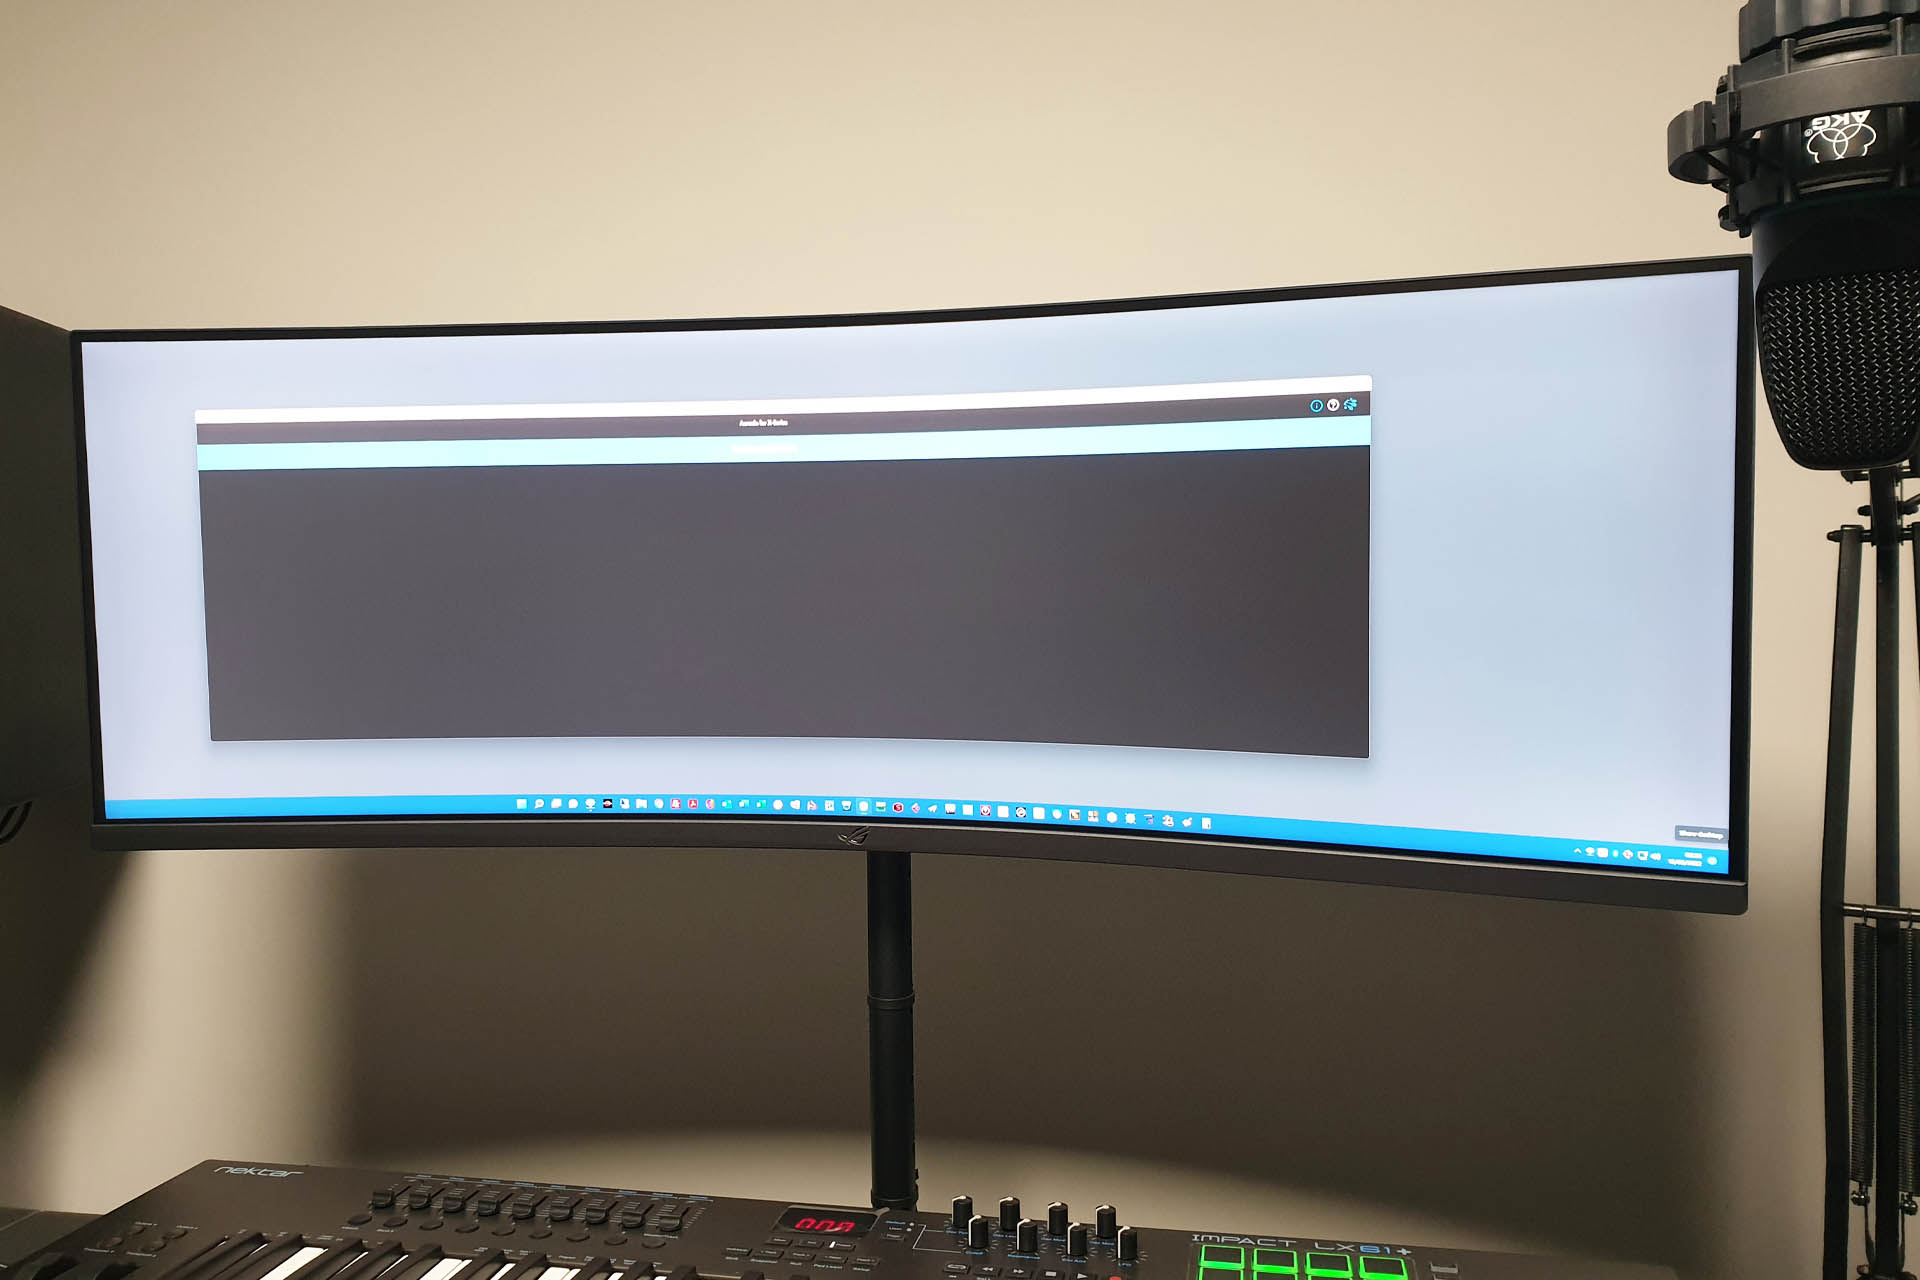
After a couple weeks, everything was in place. My Mac and my PC were ready to fire up. It took a couple of days to get comfortable with the computers as I had a new single (shared) desktop between the two computers and a new Asus 43-inch 3840 x 1200 curved monitor.
Anyway, things went relatively smoothly and it was time to look at my new rtpMIDI network. Suddenly I hit quicksand and everything slowed down….
Page 2 of the iConnectivity mio XL user manual, states that the minimum system requirement for OS X is 10.11 and above. Well, this wasn’t quite right, for a start. iConnectivity’s website states that Auracle-X, the software used to conveniently configure the mio XL (and others like the mio XM, for example), will only work on 10.12 up. Disappointed, I persevered and found another iConnectivity application called iConfig. Great! I’ll grab that instead. Err… NO!!!!! iConfig doesn’t support the XL series interfaces. Seriously?!?!!? So, you guys have got a bit a of a gap here. Hmm….
By now I was communicating with iConnectivity customer support and indeed the misinformation was acknowledged straight-away, with a huge apology. A couple of weeks later and the misinformation remains. Okaaay!!!!
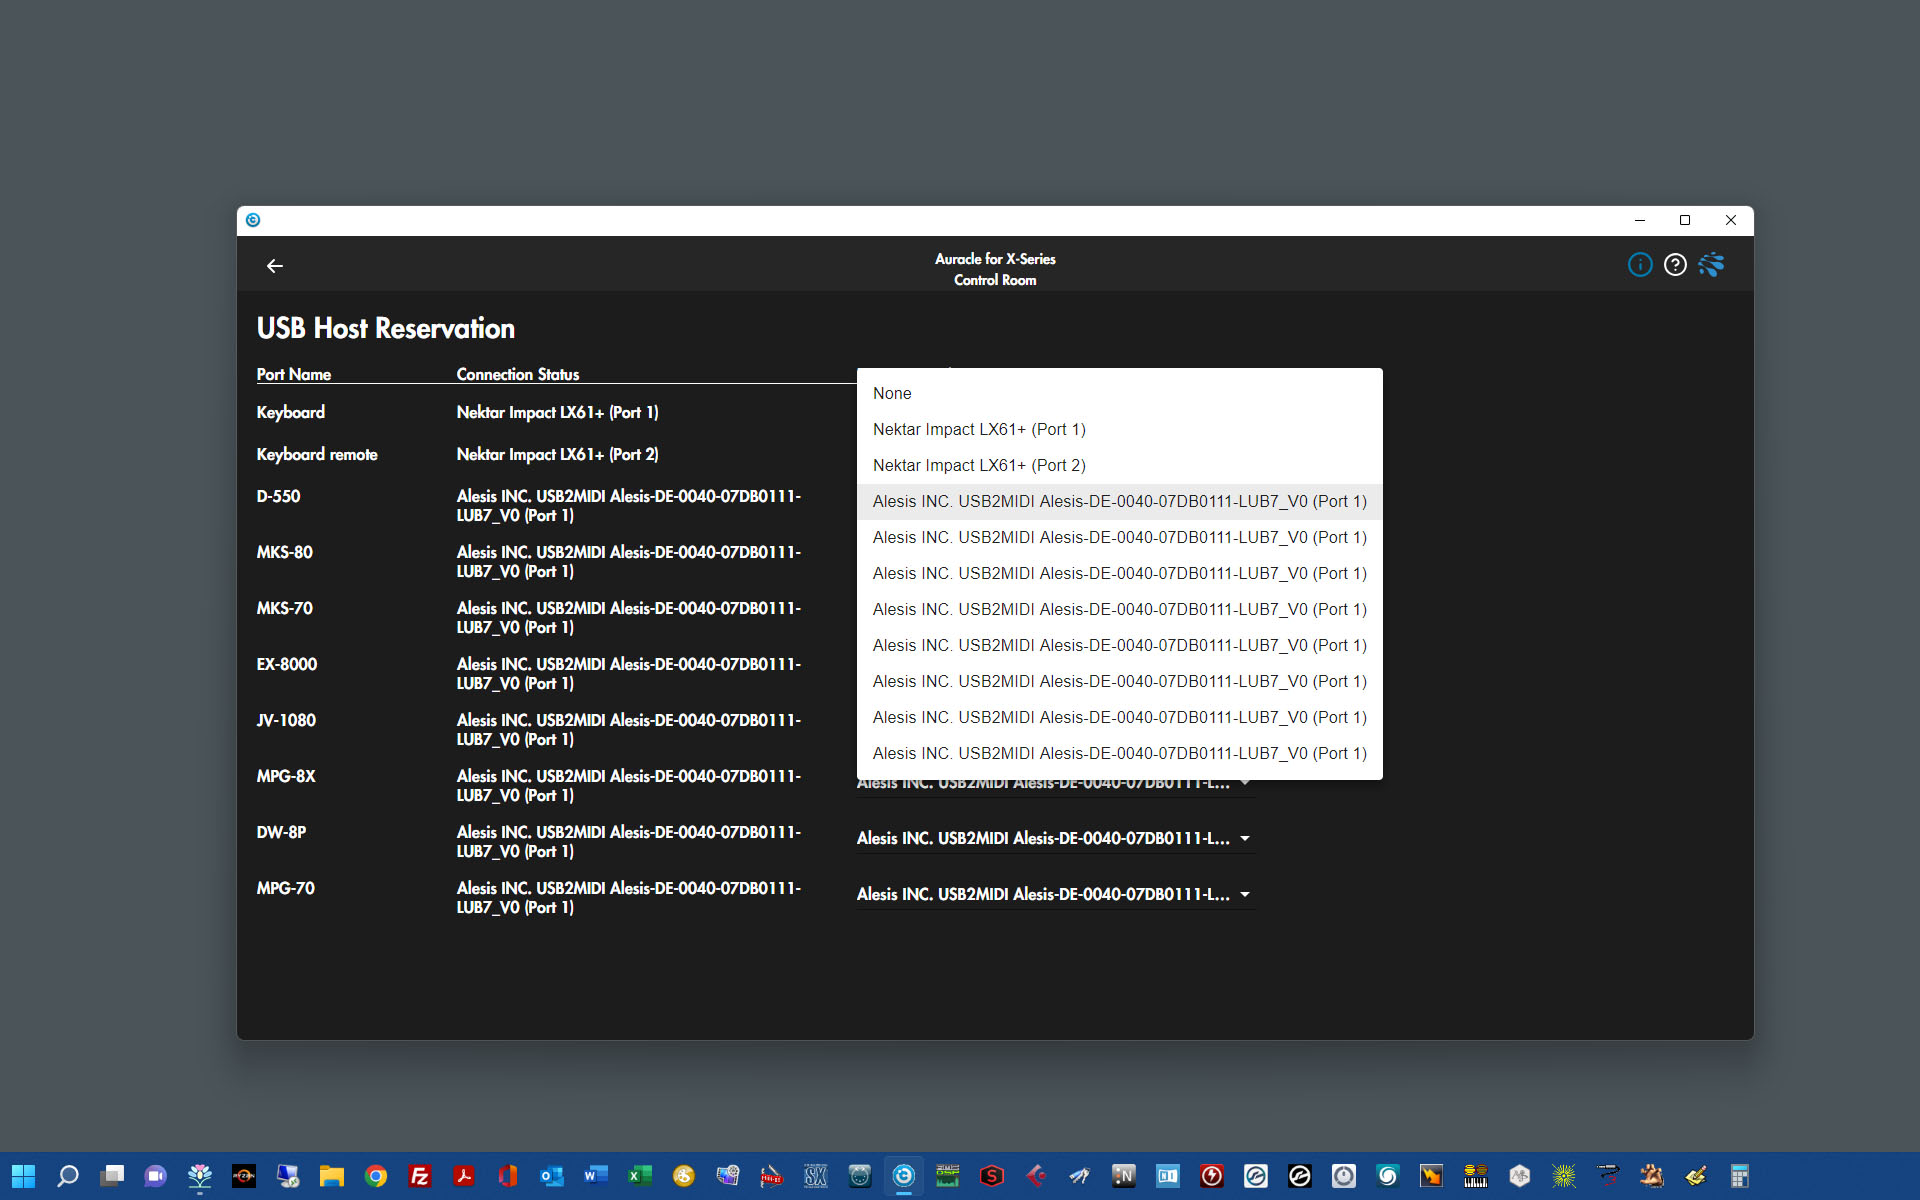
I was lucky though. I’ve also got another computer alongside my Mac running Windows 11 Pro and I was able to address my two mio XLs via Auracle-X, using Windows. I could do this easily on my new rtpMIDI network, without having to squeeze behind racks or crawl under desks to change connections.
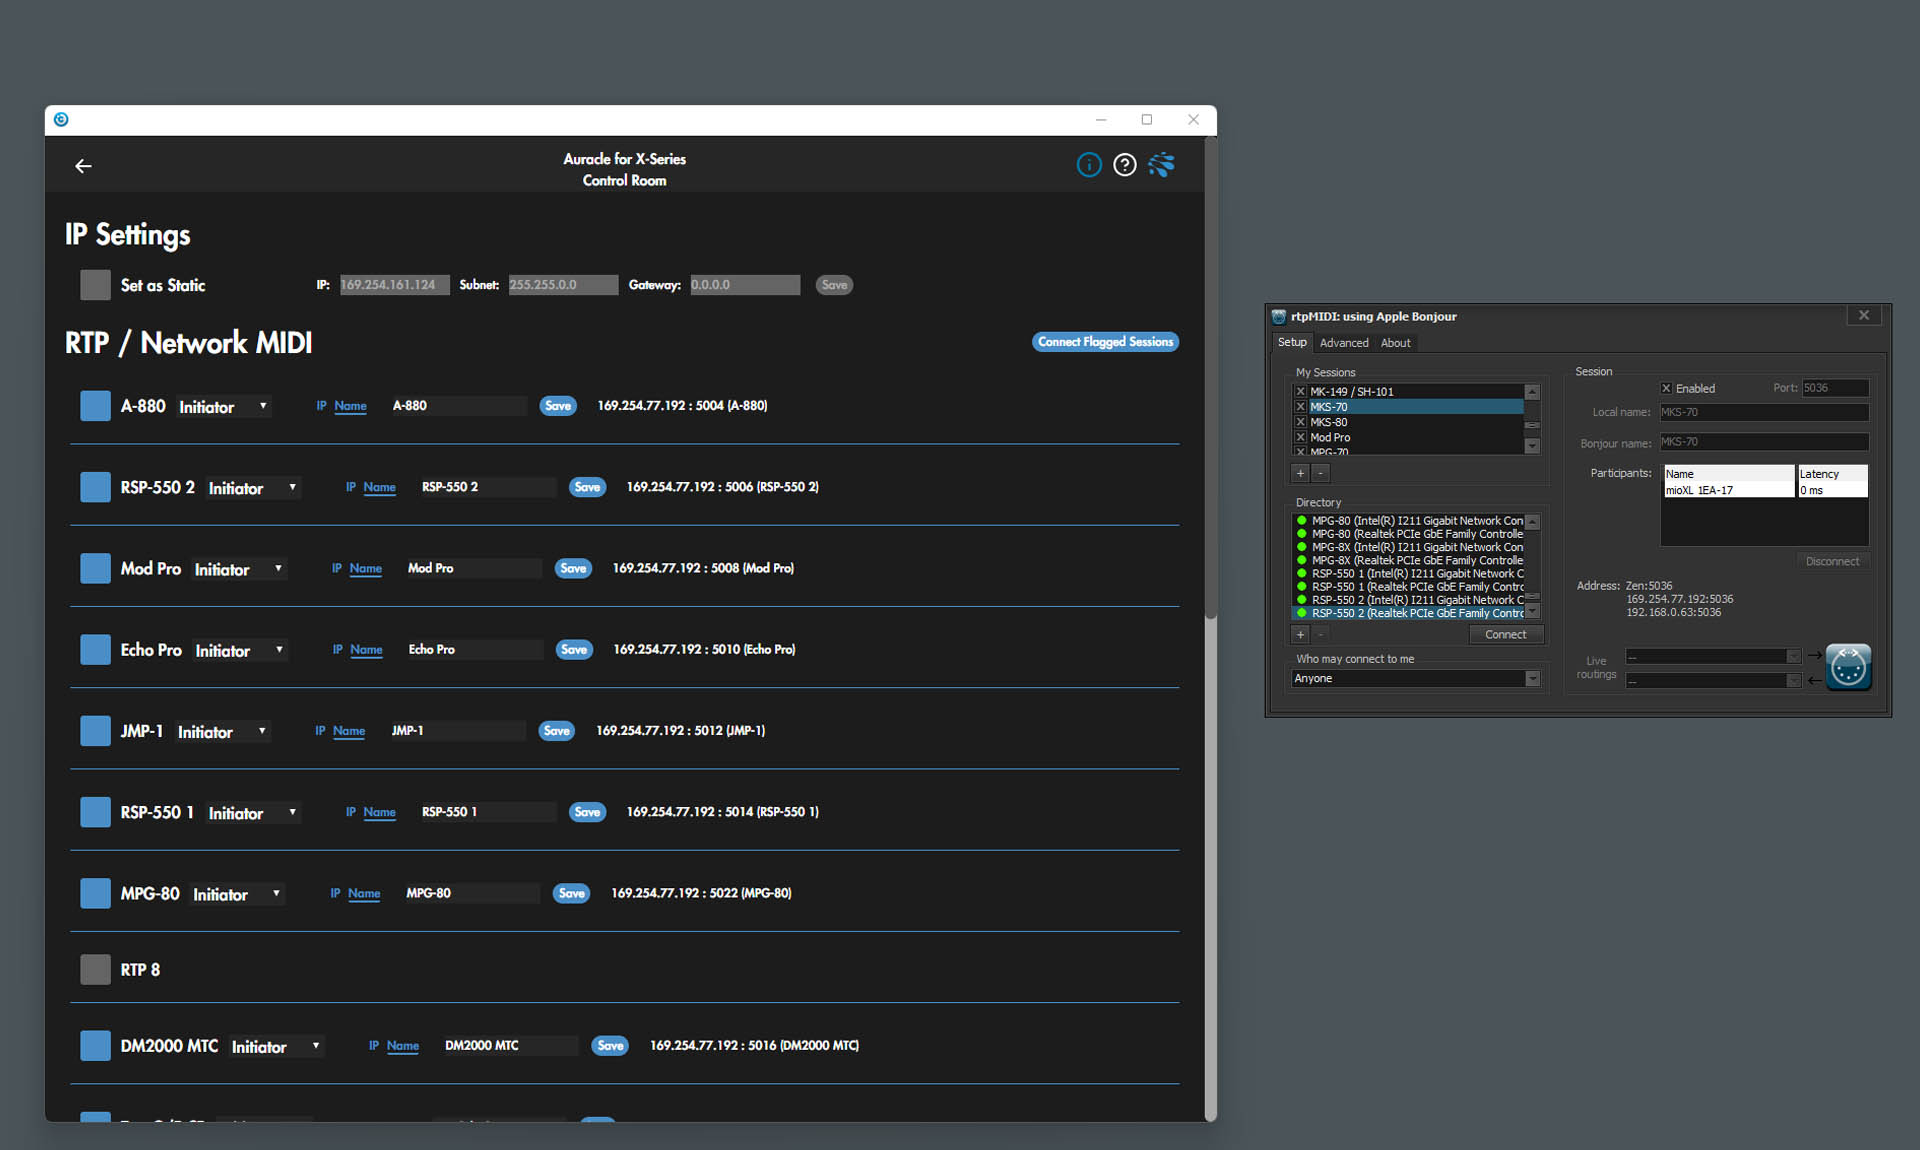
Auracle-X and rtpMIDI running on Windows 11 Pro.
rtpMIDI needs Apple Bonjour. A standard background service in OS X, you'll need to install it if you're running Windows.
Bonjour basically allows devices on a network to resolve names without the need for a Dynamic Name Server, or DNS. This makes setting up of things like rtpMIDI a breeze as you don't have to bother with configuring a DHCP server like on a router, for example or mess around with IP addresses. Plug in your rtpMIDI gear and Apple Bonjour makes sure that everything can see and talk with everything else. 🙂
It took a while (see later) but once the mio XLs were configured, setting up rtpMIDI in OS X was straight-forward enough.
After checking, double-checking and triple-checking, I switched on some gear to test the network.
Oh! What a disappointment. Lots of stuff just didn’t work! Items were showing up in the rtpMIDI configuration window and in Auracle-X but MIDI wasn't getting through to everything.
So let’s start with my Nektar Impact LX61+ MIDI controller keyboard.
Firstly, the LX61+ isn’t just a keyboard. Like many similar, modern keyboard controllers, it has a load of conveniently placed transport controls that interface with the DAW. These controls are usually on a separate virtual MIDI port which you need to assign appropriately in the mio XL and rtpMIDI and in the same way as if the keyboard was connected directly to your computer via USB. You have one physical connection but two virtual MIDI ports. This however, wasn’t the problem. The problem was that when I selected the rtpMIDI port assigned to the LX61+ transport controls in the remote section of Cubase, nothing happened.
The process of fault-finding led me to capture MIDI data generated from the transport controls on the LX61+, with a utility like SendSX. This proved that MIDI from the transport controls on my Nektar Impact, was coming into my computer. It was just that my DAW wasn’t responding to it.
After a few days of waiting for a reply from Nektar, I was told that the LX61+ transport controls will only work with a direct USB connection to the computer. The actual explanation was a little more involved but I won’t bore you with that suffice to say that the Nektar Impact LX61+ seems to be a class compliant MIDI device that err... does its own thing. Yeah, right. I'm starting to see a lot of this recently.
I've checked out a couple of other MIDI keyboard controllers and of course, many use standard protocols like HUI and / or Mackie, to interface with DAW transports. Some even use MIDI Machine Control (MMC), so I guess I'll be looking to change my Nektar Impact LX61+ to something a little more standard. Such a shame. 🙁
The next issue I had was that while at this moment in time, I wasn’t able to test any of my synth controllers like my Retroaktiv machines and my Roland MPG-80, addressing my synth modules from my LX61+ keyboard, through the mio XL just wasn’t working reliably. As previously mentioned, gear was showing up. It was just that MIDI wasn't getting through the system. Now this was a major problem.
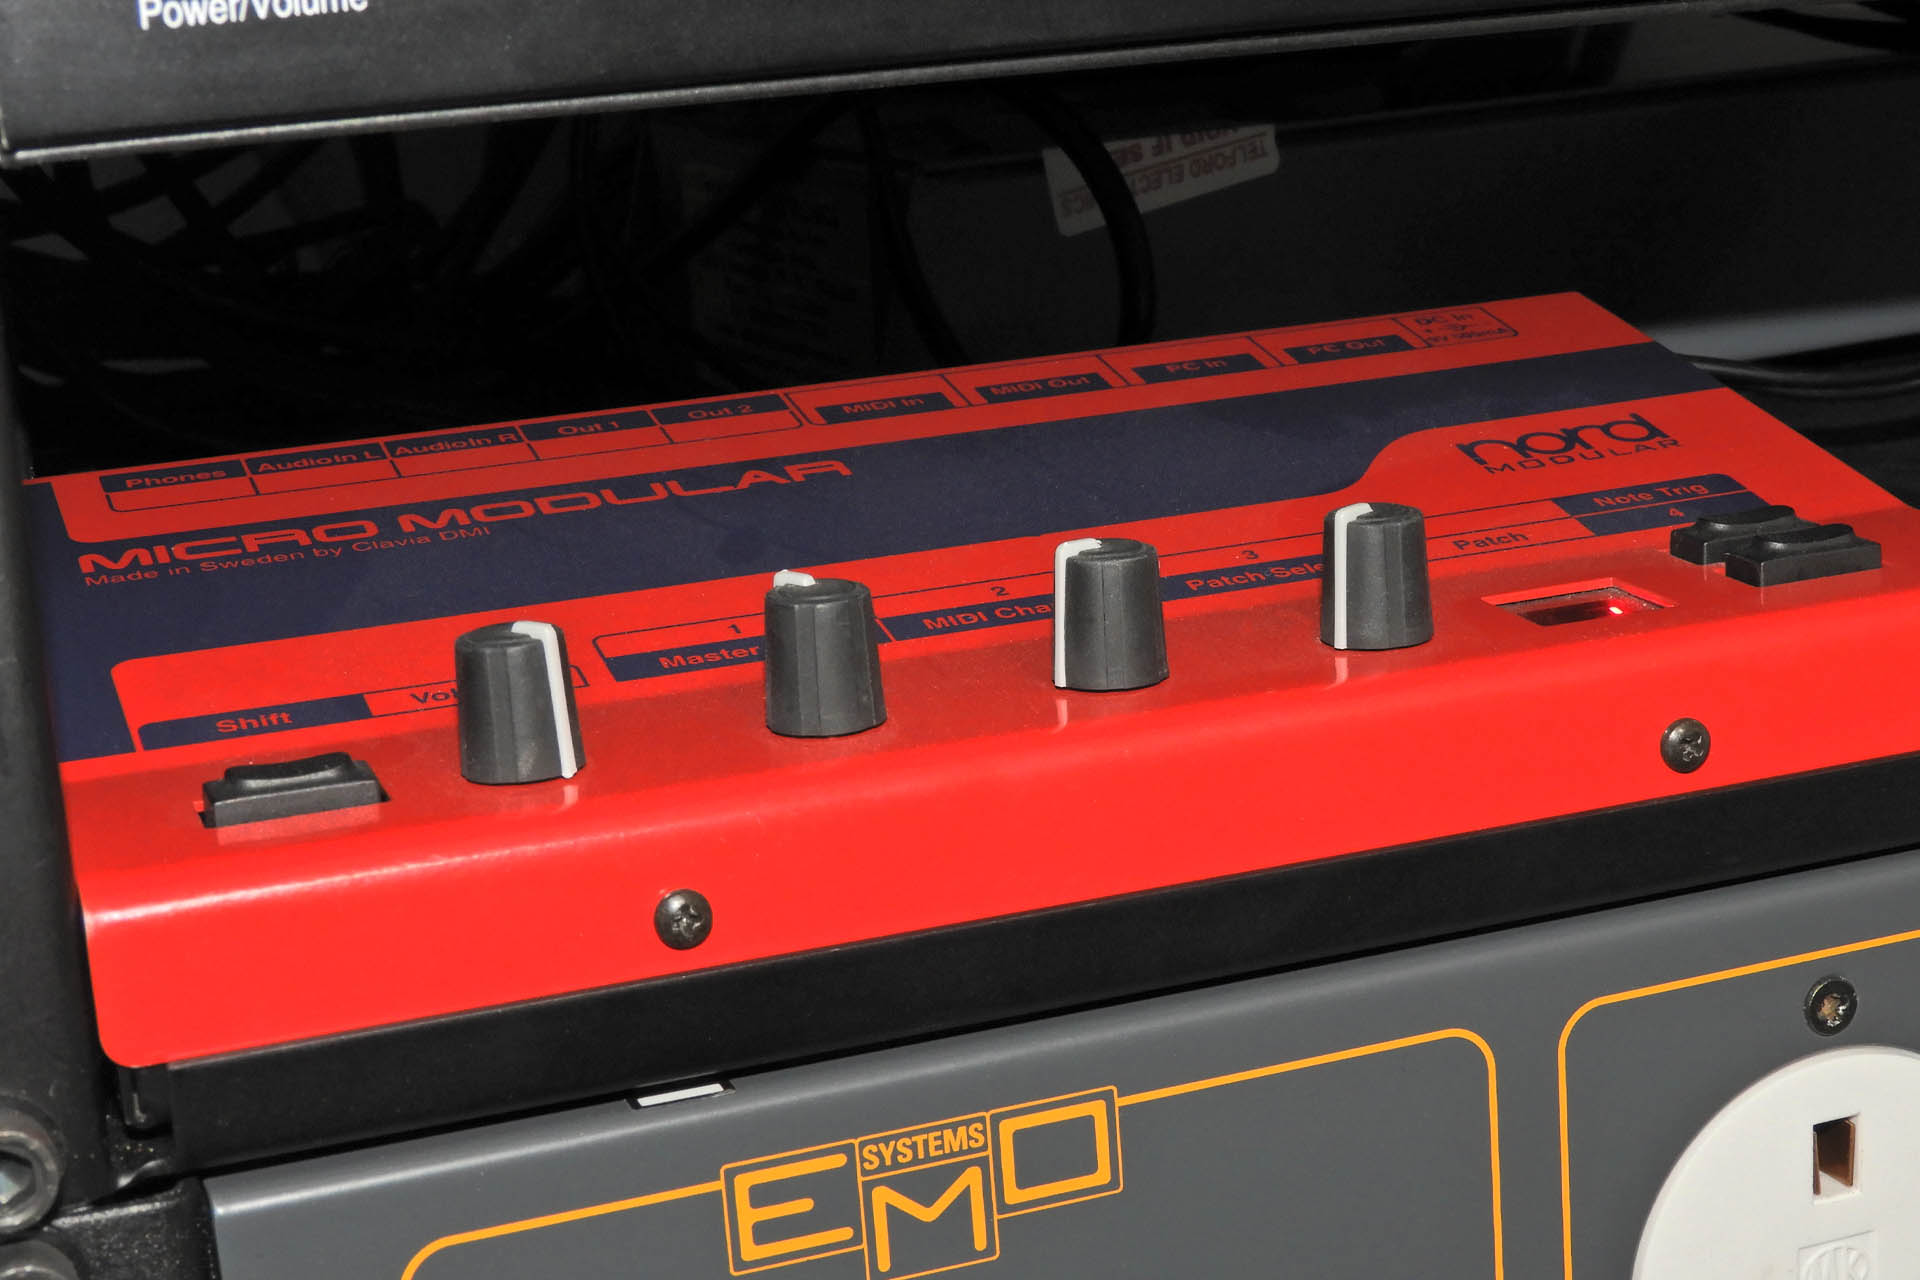
You’ll recall me mentioning earlier that I bought a few class compliant MIDI interfaces. The device I settled on was the ESI MidiMate EX. Well, I used these to connect eight of the USB host ports on my first mio XL, to my synth modules and programmer / editors. On the second mio XL in my keyboard room, I only needed one of the USB host ports, connected to the PC (programming) port on my old Nord Micro Modular.
I bought ten ESI MidiMate EX USB MIDI interfaces and although the mio XL and rtpMIDI saw them just fine, they didn't work with a lot of my gear.
The connections to my Korg EX-8000 and my Roland JV-1080, seemed to work okay but a lot of my gear didn't respond and was quite dead. That included machines like my Roland MKS-70, Roland MKS-80 and Roland D-550.
So I’m using class compliant interfaces which show up in iConnectivity Auracle-X. I can route them and assign them in rtpMIDI but… they're not talking to my gear. Grr…
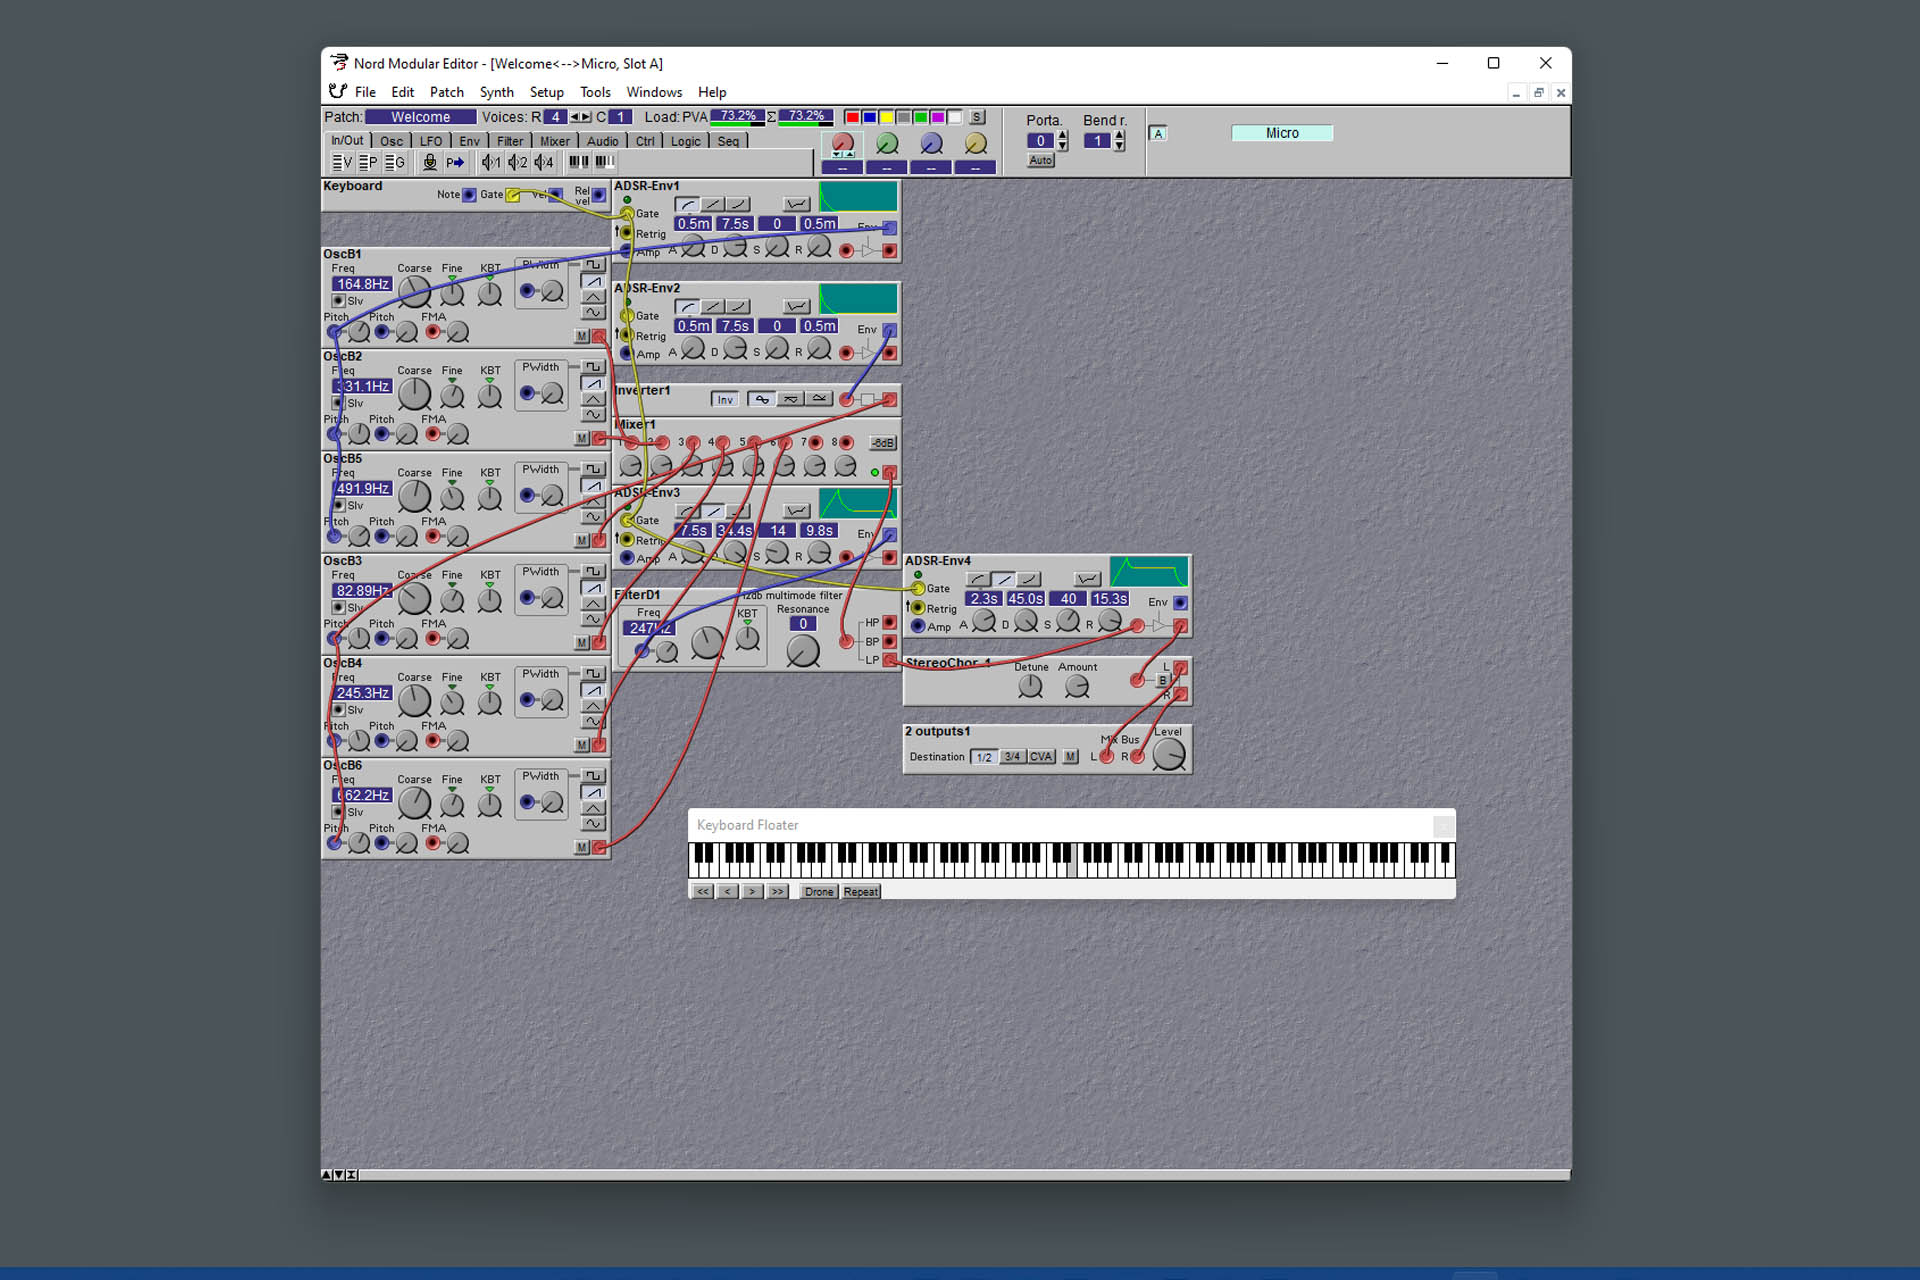
Side stepping for a moment, the software editor for my Nord Micro, still fires up on Windows 11 but as I recall, even under Windows XP and Mac OS, the editor could be flaky.
With the new set-up, the Nord editor would briefly acknowledge the Nord Micro hardware and then it would lose the connection after only a few seconds.
The exceedingly old Nord Micro Modular editor under Windows 11. Can I get this to work?
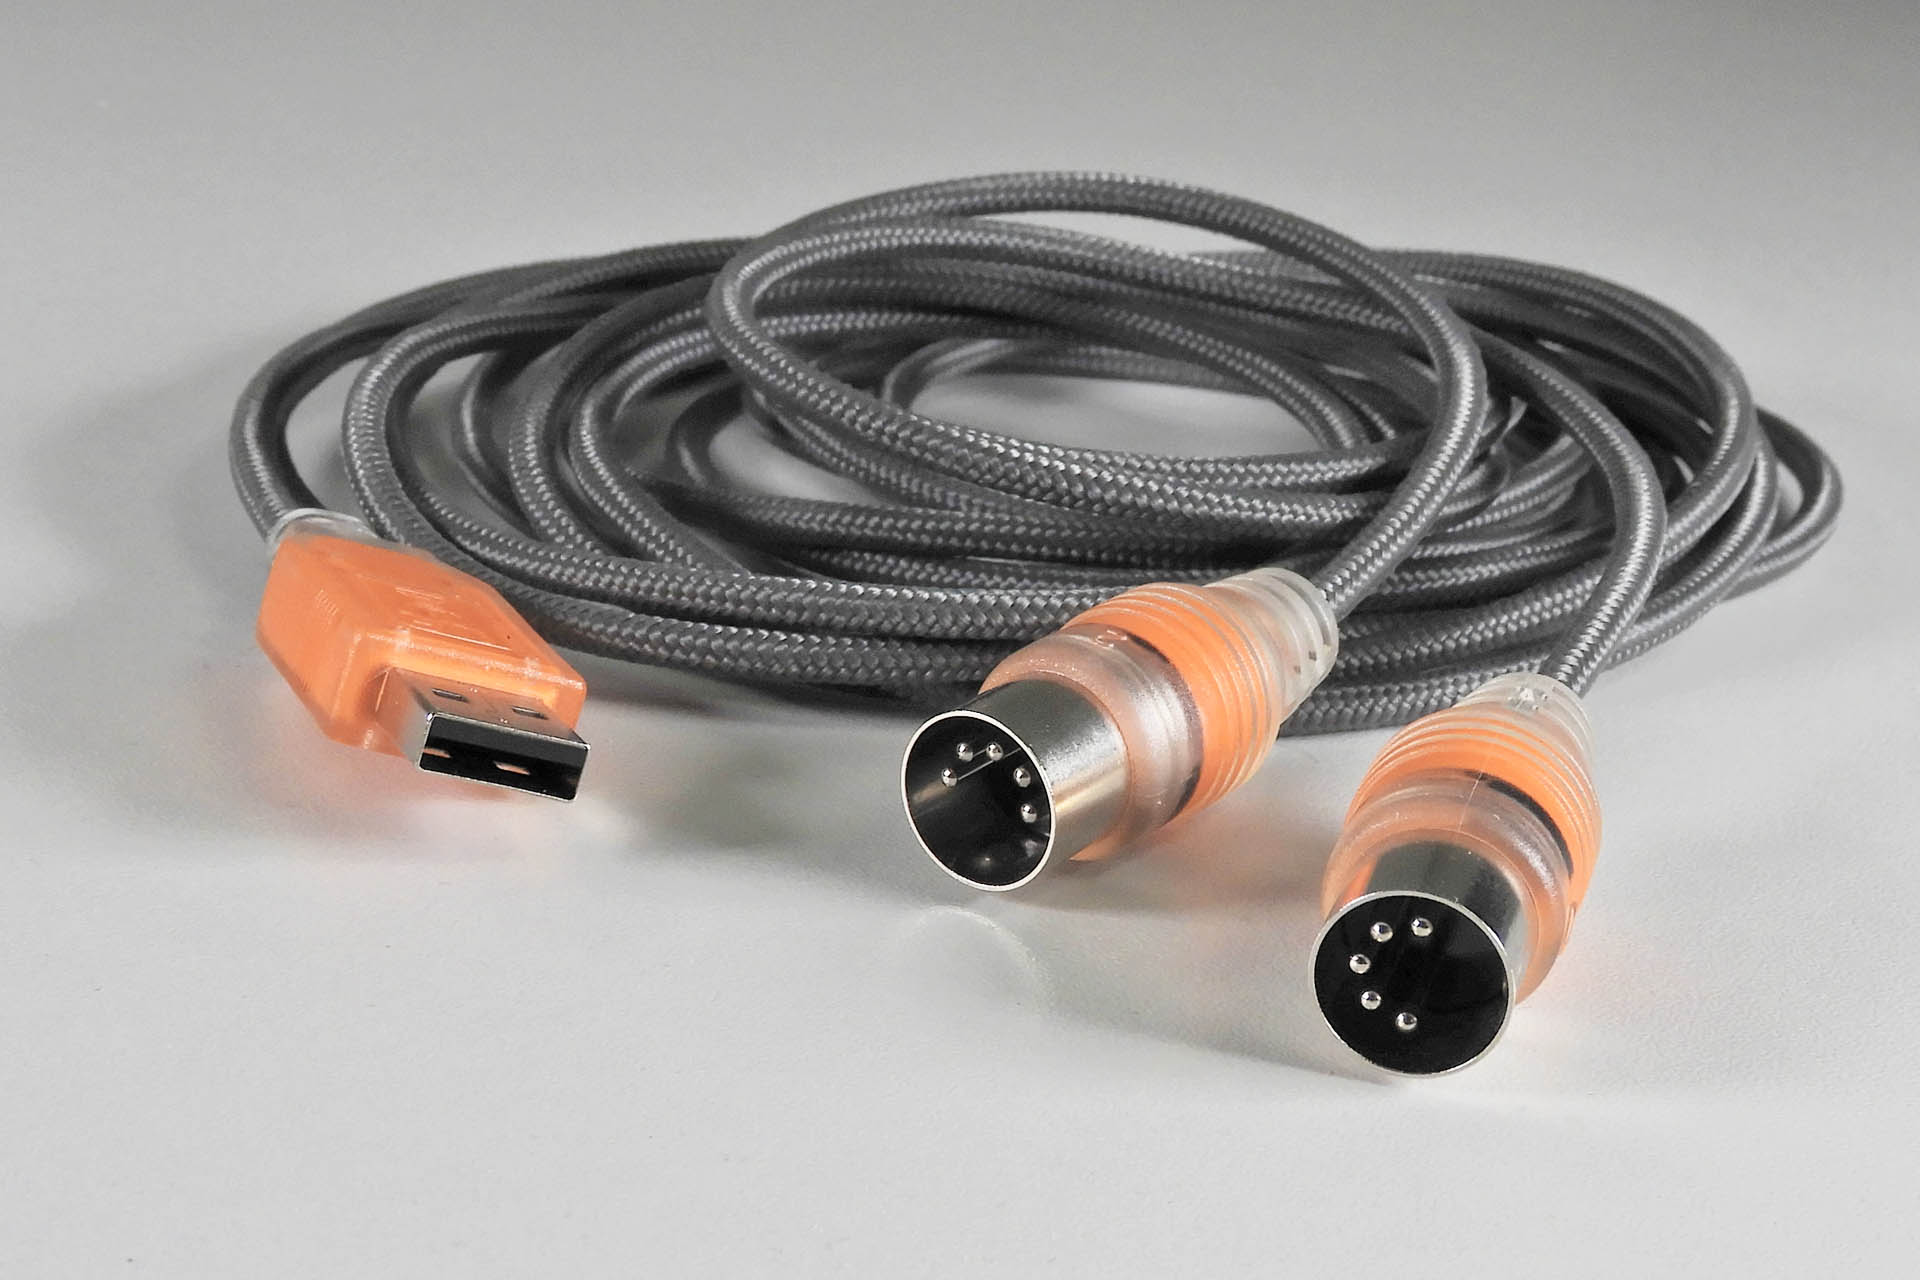
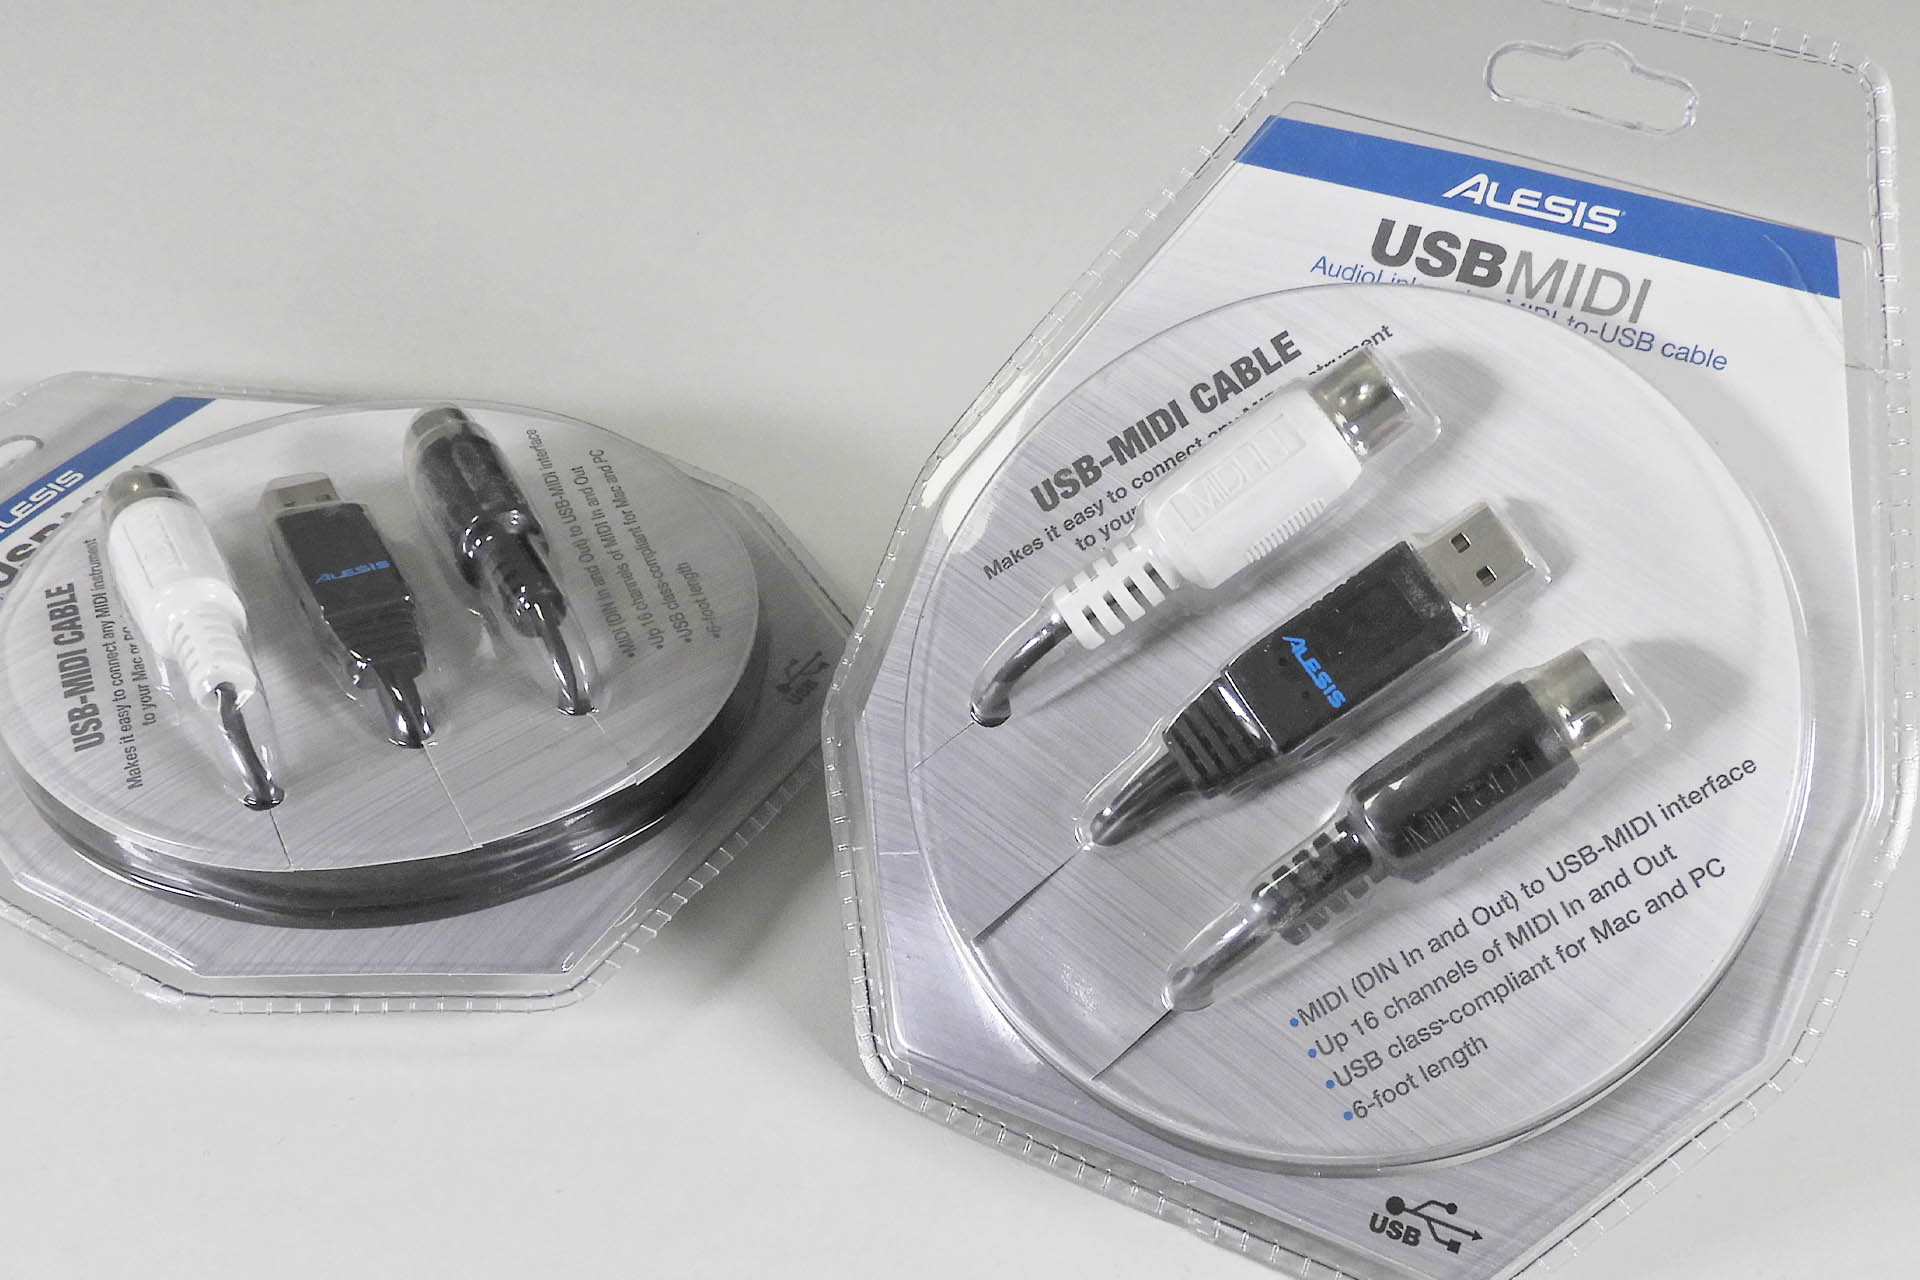
I went downstairs to the lab and pulled out an old M-Audio Uno and an Alesis USB-MIDI cable. I use these devices to back up memory on customers’ equipment, when it comes in for repair and they’ve been working for years. With the mio XL however, the M-Audio Uno didn’t work at all but the Alesis interface did.
I tried the Alesis USB-MIDI cable in-between my first mio XL and the synth modules that didn’t work with the ESI MidiMates and suddenly there was MIDI life! Oh wow, this is exciting. I then connected the PC ports on my Nord Micro Modular to the second mio XL using the Alesis USB-MIDI cable. YAY!!!! I have a connection.
A little vintage music tech, my Nord Micro Modular. I just love it.
I immediately pulled all the ESI MidiMate EXs and although it would seem that I’ve wasted like 200 GBP on these things, it would also seem that I have at least found a potential solution.
After removing the ESI devices, I noticed something weird; everything seemed a little faster, a little snappier. Hey, perhaps it was just my imagination.
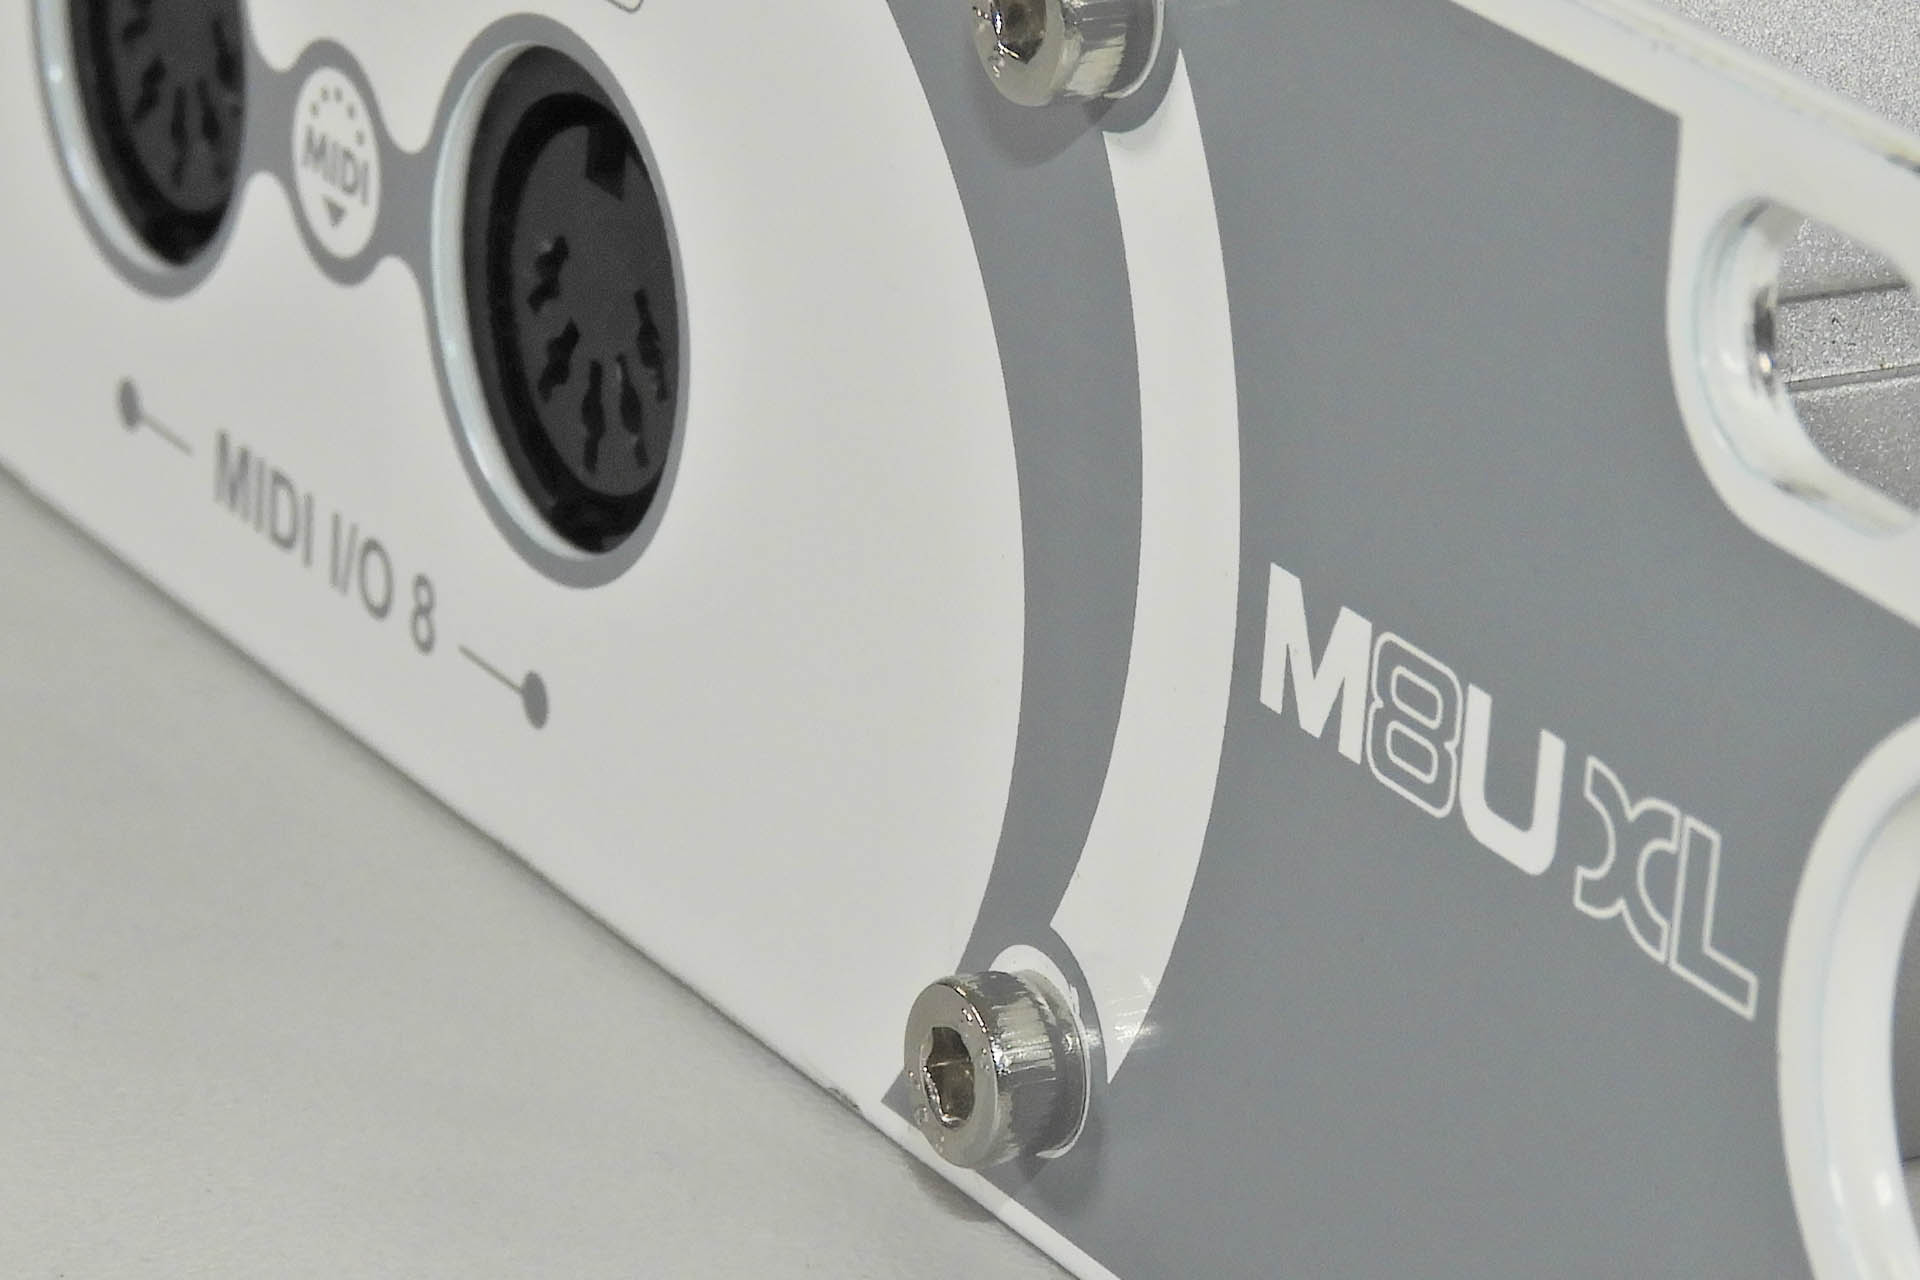
Before buying a load of these Alesis interfaces, I had a thought; somewhere in a cupboard, I had an old ESI M8U XL 8 x 8 MIDI interface which I used on my Windows box many years ago and if I remember correctly, it didn’t need any drivers. A quick look on-line and ESI indeed states that the M8U XL was class compliant. If I could plug this into one of the USB host ports on the mio XL, perhaps I could get eight MIDI inputs / outputs with just one USB connection.
Although driverless and described as being class complaint, my old ESI M8U XL wasn't recognised at all by my new iConnectivity mio XLs. It would have been amazingly convenient if it was... I think. Perhaps I should try another 1U multi-port USB interface.
To cut a long story short, it didn’t work. In fact, the M8U XL didn’t even show up in Auracle-X. That was a big shame but the concept is worth considering for anyone else thinking about buying this MIDI monster. Plugging in a class compliant, multi-port USB MIDI interface into the mio XL, should allow you to reserve MIDI ports corresponding to those on the USB interface, to the USB host ports on the mio XL, a bit like the virtual ports on the LX61+ that I mentioned earlier. Well, that’s the theory, anyway.
So back to the humble Alesis USB-MIDI cable which I soon discovered has long since been obsolete. Indeed, many websites that came up in my search, showed ‘Out of stock’, ‘Discontinued’ or ‘End of life’, blah, blah, blah. That wasn’t surprising, really but then one popped up suggesting that this particular company did have stock. I called them and not only did they have stock but they had lots and were also prepared to give me a 10% discount when I told them that I wanted to buy ten! The company in question was The DJ Shop in Southampton (UK).
I found it hugely ironic that out of all the MIDI interfaces I have, the now obsolete Alesis USB-MIDI Cable was the only one I could get to work in between my music gear and one of the most powerful, modern MIDI interfaces.
The next day was a Saturday. The weather seemed like summer had finally arrived. I have friends and family in and around Bournemouth, Poole and Christchurch (a few miles to the west of Southampton), so Julie and I decided on a mini south-coast tour for the day, starting at The DJ Shop in Southampton!
Julie and I had an awesome day hanging out with my sis' and later on, with some lovely Brazilian friends of ours who we hadn't seen for several years. In fact, we didn't get back ‘till early Sunday morning.
Well, I couldn’t wait to get my rtpMIDI network up and running. While unpacking my Alesis USB MIDI cables and connecting them to my gear, it dawned on me how amazingly ironic it was, that I could only get one of the newest, most powerful and most radical MIDI interfaces to work properly, with some USB interfaces that had been discontinued many years ago. Of course, other than the ESI MidiMate EX, I hadn’t tried any newer brands. Perhaps it’s something I can do over the next few weeks.
A WORD ABOUT AURACLE-X
I have to say that my initial experience with the mio XL editor, Auracle-X was terrible. So sorry iConnectivity but there you have it.
Auracle-X was intermittently clunky. Sometimes it would slow right down. Initiating a command via a mouse click for example, often resulted in a painful wait of several seconds before anything happened on the screen. This behaviour would last for a whole session and rebooting the mio XL or quitting and relaunching the editor didn’t fix the problem. Don't get me wrong, sometimes Auracle-X fired up and worked just fine... but not all the time.
Auracle-X was unreliable. The option to reserve MIDI devices against USB host ports is a great feature… if it worked properly. Selecting a device wouldn’t always select that device! When I was configuring the Alesis USB MIDI cables for example, I’d often get a device reserved, the name of which was a weird mixture between the Alesis device and the now completely disconnected ESI devices. Sometimes it was an abbreviated version of what actually appeared in the dropdown selection and sometimes it would get it right! It was as if some cache somewhere, was having issues.
Auracle-X would intermittently not connect to the hardware. Yes, that’s right. I had a couple of occasions when my mio XLs didn’t even show up in Auracle-X. I knew the mio XLs were there, as all the ports were visible in rtpMIDI and random tests showed that many were working in my DAW. Oh boy… This was seriously testing my patience.
rtpMIDI sees both of my mio XLs but once in a while, Auracle-X doesn't. I've tried logging out / logging back into Windows, rebooting both mio XLs and even restarting my computer. Oh and every time I launch Auracle-X, it opens it opens fuuuuuuuuuuuuuull size!
One minor GUI issue with Auracle-X, is that the program doesn't remember the window size when it was last closed. I have a 3840 x 1200 monitor and as you can see from the image above, Auracle-X opens up with a BIIIIIG window.... every time. Come on iConnectivity. That's an easy fix, guys.
I've already mentioned that the ability to 'reserve' specific USB MIDI devices against USB host ports on the mio XL, is just great. A problem arises however, when several of the same USB MIDI device are used. Trying to select specific USB MIDI devices becomes difficult as you just have a list of the same device in the reserve drop-down menu. This caused me lots of problems.
Multiple USB MIDI interfaces from the same manufacturer and of the same model, makes USB host port reservation difficult.
While I kind of get why this is (like the name is embedded in the USB MIDI interface), surely there must be a way of 'bluffing' the system. Perhaps iConnectivity could consider another window which allows USB MIDI interfaces to be 'renamed', just for the user and in Auracle-X. Just an idea.
So, I really didn’t like this software, well not on Windows anyway and I couldn't run it under my version of OS X. 🙁 Luckily however, you only really need Auracle-X to initially configure your mio XL and if you wish, back up / load mio XL pre-sets to / from your computer or write / recall pre-sets to / from memory locations within the mio XL. I have to admit that I didn’t have any issues saving and loading pre-sets.
The good news is that once everything’s set up on the mio XL, rtpMIDI runs in the background on your computer and you don’t have to cross paths with Auracle-X ever again.
I tried to research rtpMIDI and the components I intended to buy, to make my rtpMIDI network, as best as I could but there was so little information out there. That's why I decided to write this post; a small attempt to potentially help anyone who’s considering going down the same path.
I guess that before you decide going rtpMIDI, you should ask yourself why. What are the advantages of rtpMIDI and is it worth it?
In my situation, the layout of the studio at the new premises, meant that my previous USB MIDI patch bays would potentially be some distance from my computers. rtpMIDI offered a solution. As it turned out, the distance between interfaces and computers wasn’t as much as I thought it would be. By the time I realised that however, I was already committed.
Alternatives to the iConnectivity series of rtpMIDI MIDI interfaces, are very thin on the ground. In fact, at the time of writing, I could only find the Bombe BombeBox, the MIDI2TR and CM-MIDI2 by KissBox and the Cinara MidiGateway. All these products are frightfully expensive and simply don’t have the port count of the iConnectivity mio XM, let alone the mio XL.
One last comment about the iConnectivity mio XM and mio XL is that they can both be connected to your computer, via USB. In fact, firmware updates can ONLY be done via the USB connection. Unfortunately, the USB B socket on both machines, is on the front panel. Guys, I get it, like you’ve got a lot of stuff going on ‘round the back, so not much space but it’s really inconvenient!
Be warned however, if using the USB to computer connection, then the MIDI port count is reduced simply due to the bandwidth of USB 2.0. For me, I was specifically looking for a rtpMIDI solution so a USB connection was irrelevant.
So if you’re considering going down the rtpMIDI route, here are some points to consider, :
Do you need it? Think carefully. MIDI is a simple, serial data protocol. Due you really want to potentially complicate things?
I installed separate network cards in my computers and used a separate switch for my rtpMIDI network but retrospectively, that really wasn't necessary. In fact, this was a mistake!!!! After I had set up the two mioXLs and rtpMIDI, I thought I'd try plugging the hardware into my normal network. I expected to have to do some reprogramming but NO, everything booted up fine. The IP addresses assigned to all my gear shown in the RTP / Network MIDI pages of Auracle had changed and now sat on the same subnet as my standard network (192.XXX.XXX.XXX). To be honest, I think things felt smoother and a little more stable. If you don't have DHCP / DNS running on your RTP network, it's no big deal. Remember, the whole idea of Bonjour is that you don't need DHCP and DNS. You must however consider security and how modern computer operating systems look at 'undefined' networks as potentially unsafe connections.
If you’re going to take advantage of USB host ports on something like the iConnectivity mio XM or mio XL, then make sure that your USB / MIDI interfaces are PROPERLY, ACTUALLY, DEFINATELY class compliant. Borrow, beg or steel and test them with your MIDI gear, if you can!!!
Keep things simple and don’t even consider big, fat, elaborate USB MIDI interfaces that can make tea! Some modern interfaces auto-configure input and output by detecting the direction of the MIDI data stream on each connection, for example. While class compliant, the ‘MIDI’ (DIN) end of some interfaces, won’t work with a lot of equipment. I have a feeling that this is why the ESI MidiMate EX didn’t work. I'm also aware that some USB MIDI interfaces don't even comply with the MIDI hardware standard by omitting the opto-isolator on the MIDI IN port. Hang on a second; if the ports on a MIDI interface are auto-configuring, then there can't be an opto-isolator on the input circuit... because either DIN connector can be MIDI IN. So again, just make sure you do a little research and if you can, try before you buy!
rtpMIDI is part of OS X but you’ll need to download it for Windows here.
I learnt the hard way but although you can have one device like a keyboard, connected to the ‘IN’ port of a pair of DIN MIDI ports and another device connected to the ‘OUT’ port of the same pair of ports, at the moment, rtpMIDI doesn’t allow you to name them separately. rtpMIDI only allows you to assign one name per pair of DIN ports.
Take a close look at DIN ports 4 and 6 on my mio XL #2, in the diagram below.
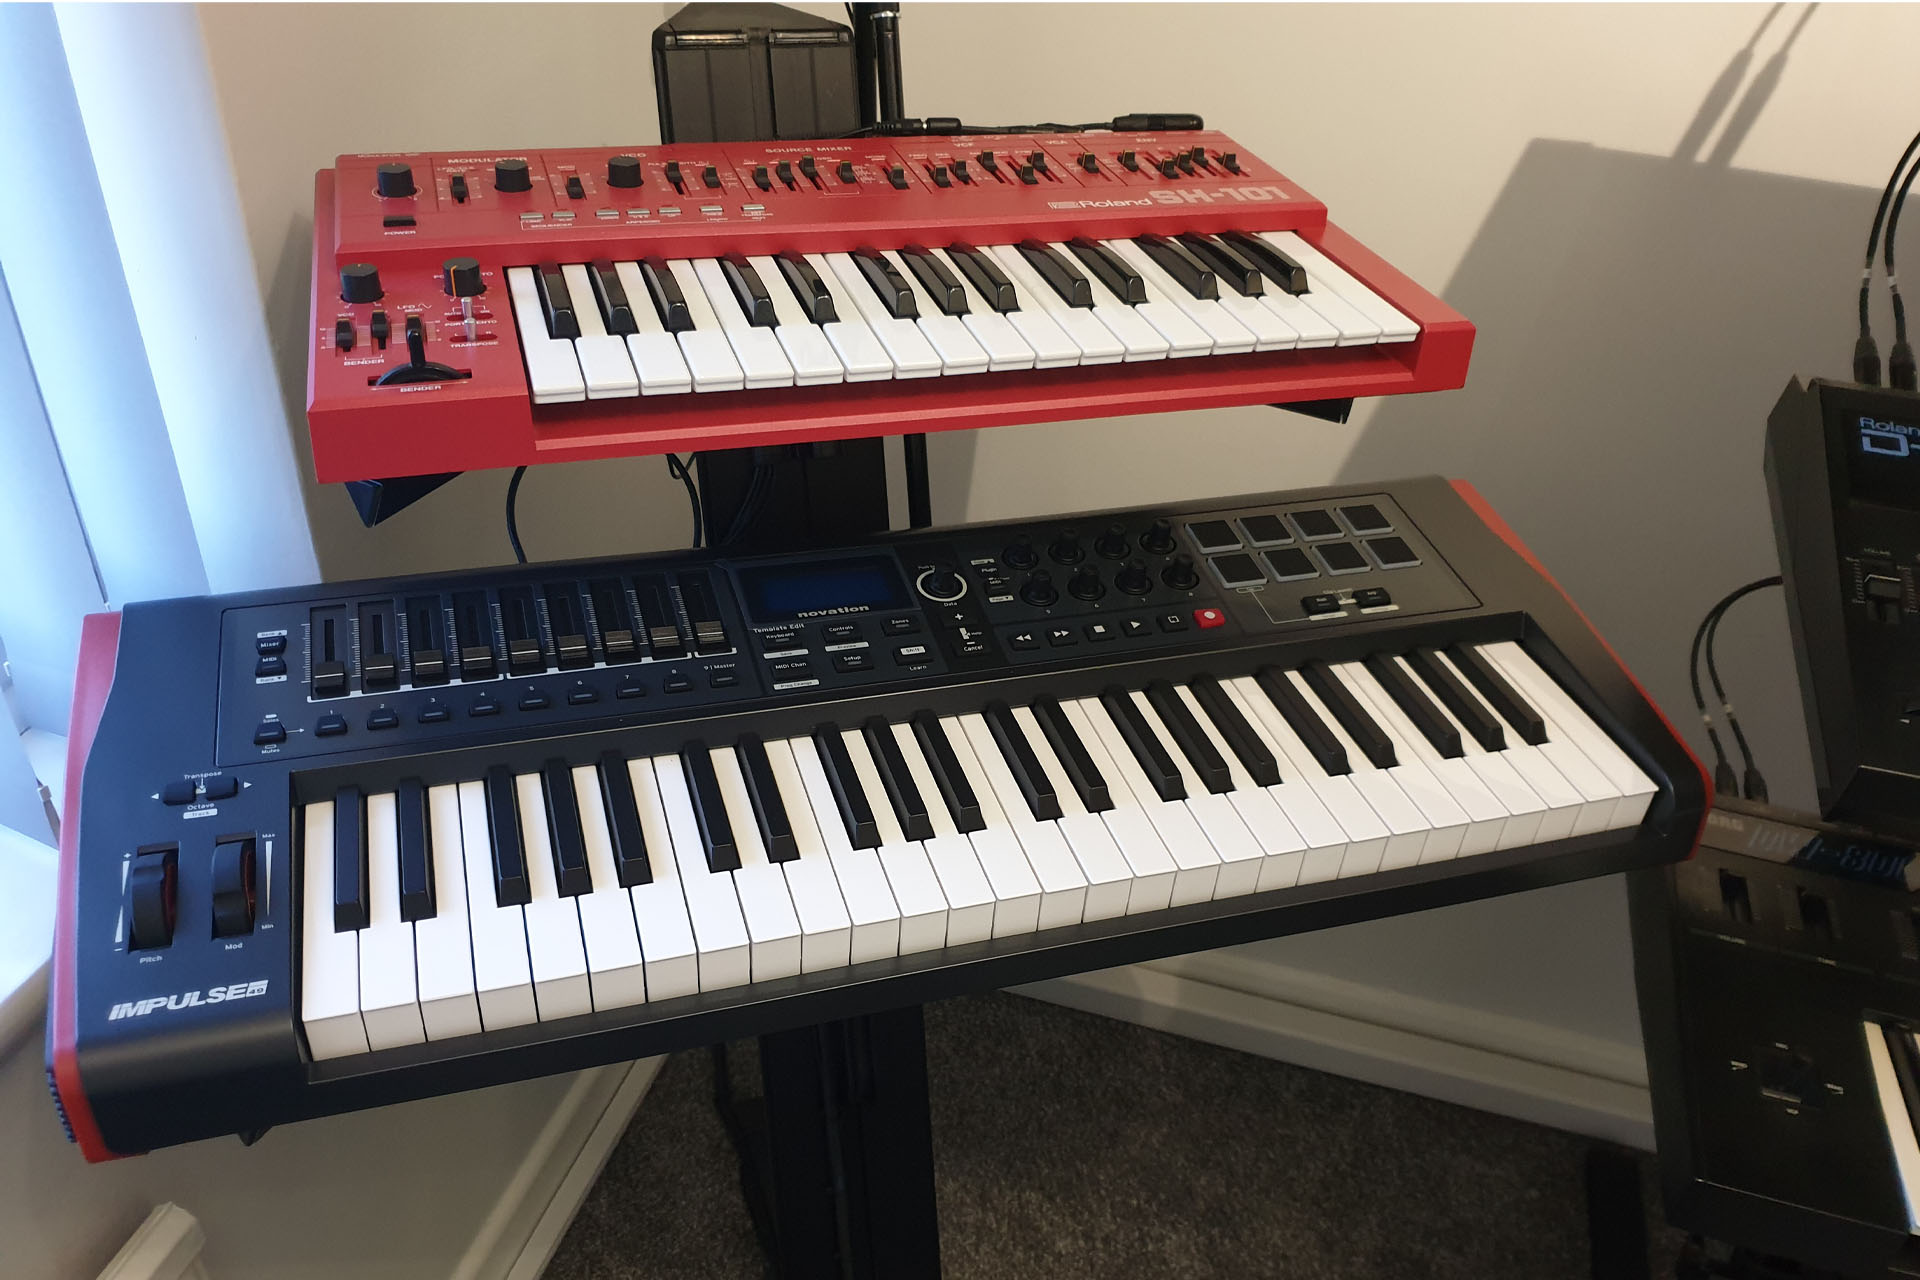
I have a Studio Logic SL-990 88-note keyboard going into the input of DIN 4 and a Kurzweil Micro Piano connected to the output of DIN 4. Similarly, I have a Novation Impulse 49 keyboard connected to the input port of DIN 6 and a Roland SH-101 connected (via a Kenton Solo) to the output port of DIN 6. I have had to name DIN 4 ‘SL-990 / Piano’ and DIN 6, ‘Imp 49 KB / SH-101’. Yeah, I know, not too much of a big deal but annoying, non-the-less. Everything works just fine of course but it would have been tidy to be able to separate the input and output devices.
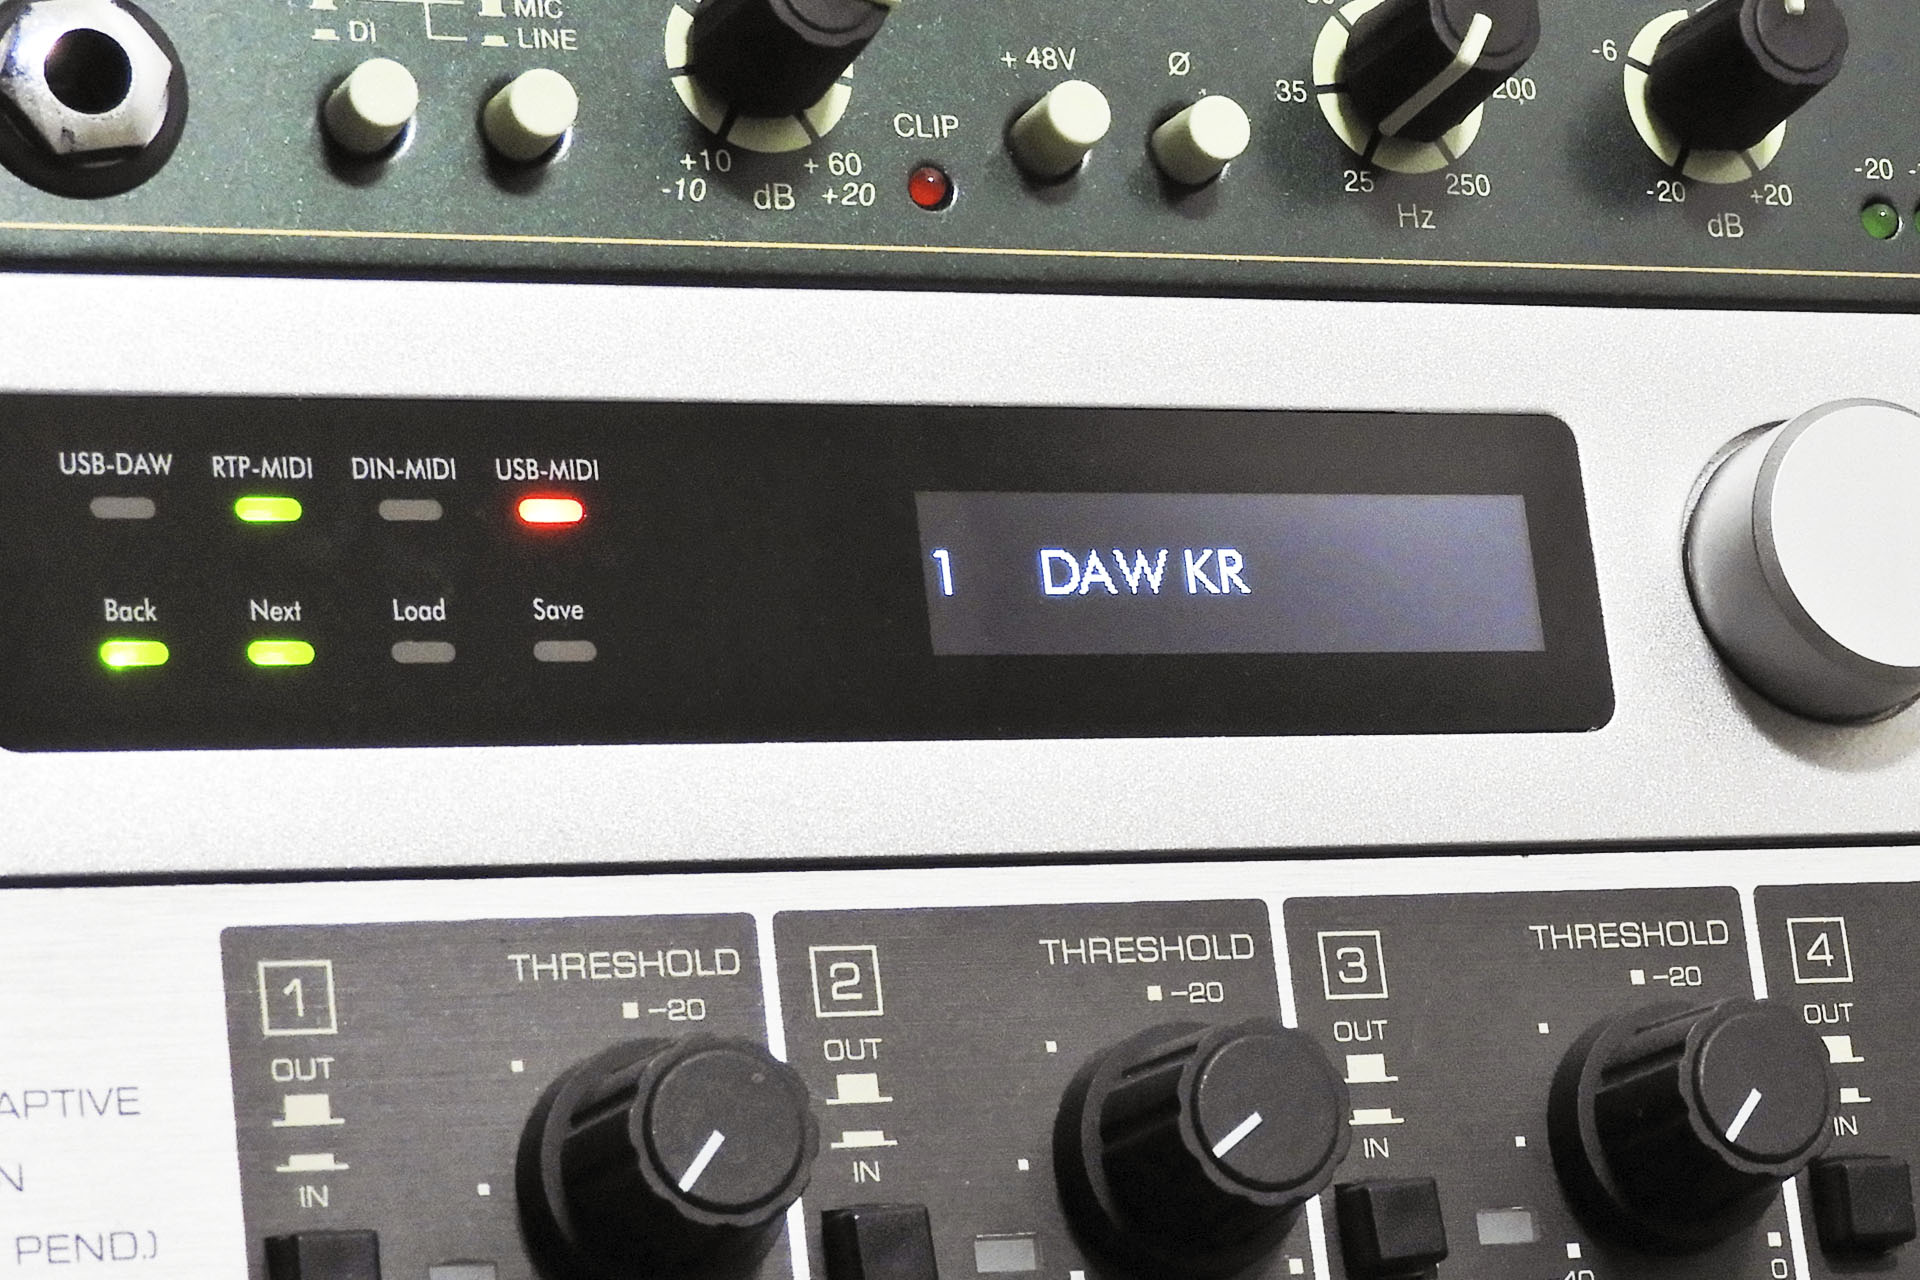
One really handy feature of the iConnectivity mio XL specifically, is the easy-to-use pre-sets. So why on earth would you need pre-sets in a MIDI patch bay / interface?
As an example and on my system specifically, I have one pre-set when using my DAW and another when I need to play devices from keyboards without switching on computers. You remember? For a bit of fun!
Pre-sets; a handy feature and easy to use on the iConnectivity mio XL.
Back in 1996, my very first MIDI computer interface was an Opcode 2-port box which seamlessly connected to my Apple Power Mac 9500, via the serial port. Several years prior (back in the eighties), I had boxes like the Roland A-880 but that was a MIDI patch-bay and not a computer interface.
Anyway, eventually, I saved up enough to buy the huge (at the time) Mark of the Unicorn Midi Time Piece A/V USB. By then, my DAW hardware had changed to an Apple G4 and I recall having big problems with MIDI over USB. The intermittent connection between the computer and the MTP A/V resulted in Apple giving me (yes, giving me... for free) another computer. That didn't help of course and in the end, I connected my MYP A/V via serial by installed a G-Spot serial interface in place of the modem port in my G4. It wasn't until I bought a G5, that USB MIDI started to work properly. Indeed, my recent rtpMIDI adventures have reminded me very much, of those early MIDI over USB days.
How things have moved on... 😀
I'm quite aware that this post might appear to be rather critical of the mio XL but in my opinion, if you can accept the minor failings as I've mentioned here in this post and which I like to think that iConnectivity will address, this is one of the best MIDI interfaces out there (at the time of writing). Also note that this post is about rtpMIDI and most of my observations concern rtpMIDI itself and NOT the mio XL. I've also highlighted the apparent lack of compliance to the MIDI standard by many manufacturers, like what does class compliant mean and how can self-configuring ports adhere to the MIDI hardware standard?
CONCLUSION: In my humble opinion, the iConnectivity mio XL proves that rtpMIDI works sufficiently well to pull a reasonably large MIDI studio together. HOWEVER....
With silly omissions and mistakes and what seems like less than stringent adherence to standards, people may be forgiven to think that the iConnectivity mio feels like it's been designed by kids and built to last a fashion-trend. iConenctivity however, has started something with it's series of rtpIMIDI interfaces and I very much hope that other manufacturers will follow suite. If that happens, hopefully rtpMIDI will evolve to iron out its niggling issues.
For larger studios, rtpMIDI is the way to go and for the time-being, I'll be keeping my iConnectivity mio XLs.
UPDATE - 27th October 2022
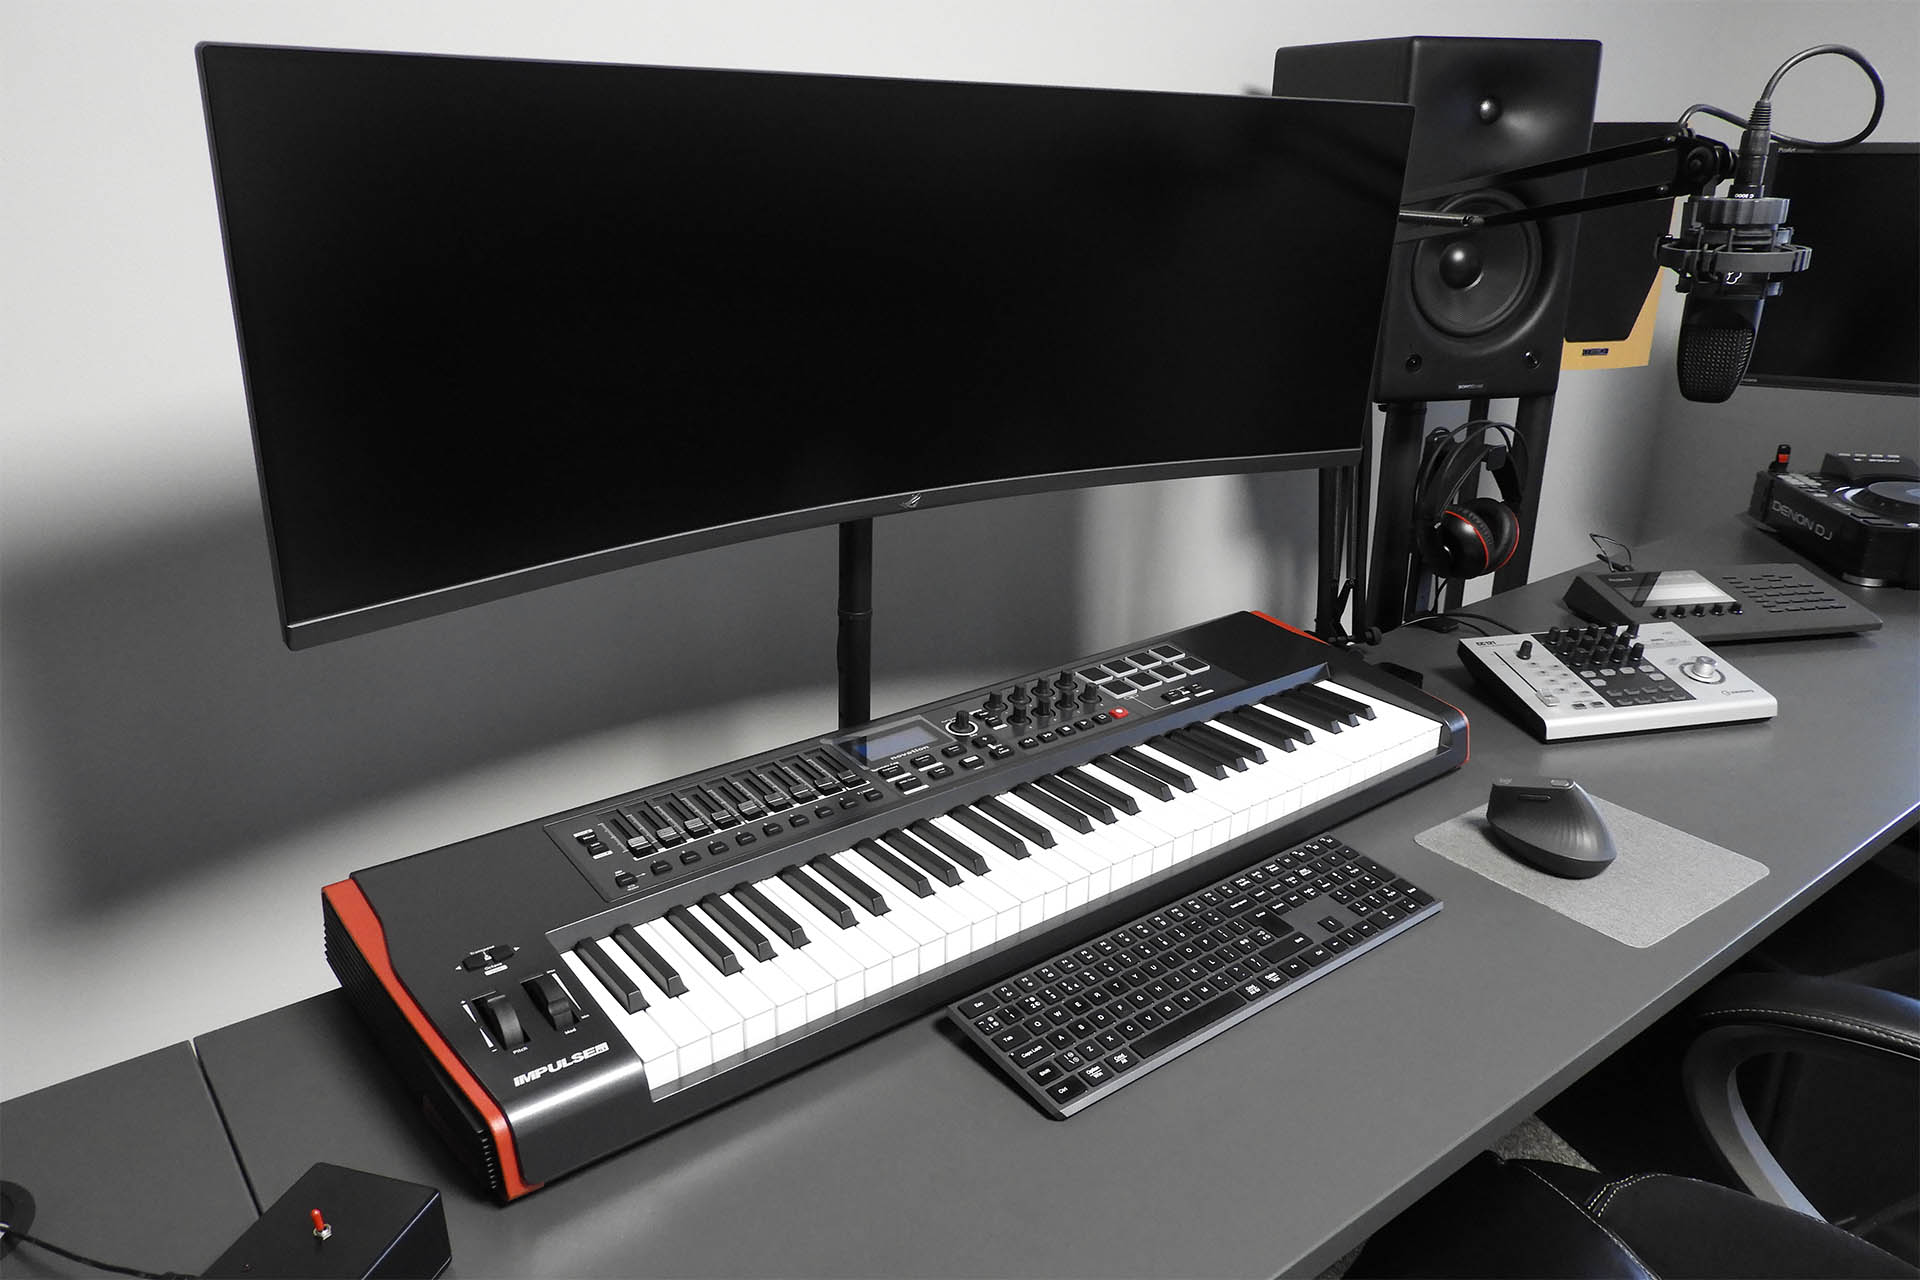
Near the beginning of this post, I mentioned the issues I was having with my Nektar Impact LX61+ with regards rtpMIDI and how I was surprised that this otherwise quite well equipped MIDI keyboard controller did not have a class compliant interface. Well, after a little hunting around (okay, a lot of hunting around) for something that would suit my needs and actually work, I ended up replacing my Nektar Impact LX61+ with a Novation Impulse 61.
My new Novation Impulse 61. A very cost-effective, class compliant keyboard MIDI controller. It's exceedingly intuitive. The keyboard feels great, unlike the budget knobs and sliders on the Nektar I had before.
Wow, what a great decision! Subjectively, the Novation Impulse is wholly intuitive making it much easier to use and delivering for me anyway, a faster workflow than the Nektar.
You don't get any bundled software with the Novation controller unless you register and then you can download a couple of Novation's plug-in synths. Hold on a minute... they're free, anyway!
No drivers, no fancy software is included. Oh, that's because the Novation Impulse 61 is err... CLASS COMPLIANT!
Hooking up the Impulse 61 was a breeze. My iConnectivity mio saw it straight-away. A little editing of names in Auracle and rtpMIDI and I was good to go.
DAW control can easily be done using either MIDI Machine Control (MMC) or MIDI continuous controllers (CC). Then I discovered that Novation had a version of firmware that included Mackie HUI compatibility so I downloaded it, hooked up the Impulse directly to my Windows box, followed the bootloader procedure, ran the update and then reconnected the Impulse to my rtpMIDI network.
The Impulse is physically connected to the mio XL's first USB port. Normal (keyboard) MIDI functions from the Impulse can be assigned by selecting 'Port 1' on the mio XL's port reservation page.
After upgrading the Impulse's firmware, a new port (Port 3) appeared in the drop-down menu on the mio XL's port reservation page and by assigning 'Port 3' to USB port 2 (which isn't physically connected to anything), Mackie HUI commands can be sent to my DAWs.
I then set up a new (Mackie HUI) remote control in Cubase, assigned the appropriate rtpMIDI ports and BANG... I had transport control from my new keyboard. The whole set up took a few minutes and everything worked just flawlessly.
Leaving Windows, I switched on my Mac and did the same on Cubase under OS X.
Now that's more like it! 🙂
UPDATE - 27th January 2023
It's been a few months since I wrote this post and I feel obliged to report...
For a start, do NOT think that you are making things better by putting rtpMIDI interfaces on a separate network!!!!! After connecting my mio XLs to my regular network which has DHCP and DNS, a lot of the niggling connection issues were resolved. I think this has to do with operating system security.
I guess if you really want to, you can have a separate network but you will need to 'tell' your operating system that it's safe, like private and not public, for example.
Secondly, I was really impressed with the Novation Impulse 61, so much so in fact, that I replaced my rather old Evolution MK-149 with an Impulse 49, which I use to play my Nord Micro Modular. It also doubles up as a DAW transport controller in my keyboard room.
On top is my old Roland SH-101 and underneath is my second Novation Impulse, the 49-note version.
I also thought I'd have a quick look on line to see what's cooking regarding rtpMIDI and iConnectivity's range of MIDI interfaces.
Well, I'm delighted to report that there are just zillions of videos out there now, detailing just about all aspects of rtpMIDI and iConnectivity's mio interfaces. iConnectivity even has a load of videos, which is soooo helpful for newbies.
The video below helped me to link my two mioXLs so that I can send MIDI from one mioXL to the other, via the network. This allows me to play gear in one room, from a keyboard or drum pads in another... without having to switch on and route through a computer!
It seems that this is definitely the way to go!
UPDATE - 10th February 2023
Okay, so I know many of you are simply busting to know if I managed to get either of my computers to reliably hook up to the PC ports on my Nord Micro Modular. Well, not quite but I am using my Nord and you can read all about how I did it here.
Over the past couple of decades, close friends and relatives will be familiar with my half-joking, self-reference as a “Cold War Child”. Born in 1958, I was 4 years old when the Cuban missile crisis occurred. In the sixties and seventies, images of the war in Vietnam were sadly commonplace as 'we' fought the threat of communism spreading throughout southeast Asia. Many will also remember the Warsaw Pact invasion of Czechoslovakia in 1968.
1968 - Warsaw Pact invasion of Czechoslovakia. I was 10 years old but I remember it well.
My industrial training was linked closely to defence and many of us leaving university in the eighties, simply took it for granted that we'd do our stint in the defence industry. Why? Because I was brought up not to trust the Chinese and the Russians. Of course I refer to respective regimes and not people!
Like the rest of the world, I rejoiced when the Berlin wall came down. It was a new dawn. People of the world could finally get on with their lives. I'm saddened to admit however, that decades later, buried under hope, promise and optimism, that mistrust still sits deep down in my soul.
Unfortunately, we have a situation whereby the leader of one of those old adversaries (Russia) is also a cold war child but unlike me, he’s able to act on his programming of mistrust and hate and bring fear and misery to millions of people.
Over thirty years (almost half of my lifetime) have passed since the fall of the Soviet Union and the collapse of the Warsaw Pact alliance and many people across the world simply have no idea of the environment my (pre) generation grew up in.
I remember the ‘Protect & Survive’ training at school. Indeed, living a stone’s throw away from HMS Victory, the NATO Allied Maritime Command base in Northwood, even as a child, the idea of painting the dining room table white and hiding underneath it, when the four-minute warning went off, seemed positively absurd and quite futile.
Despite the potential for fear, no one imagined M.A.D. (mutually assured destruction) would actually happen and so we just got on with our lives. In fact we had a great time!
Like millions of people around the world, I am shocked at the events of the past few days and pray that sanctions, which will adversely affect the new generation of Russian millionaires and billionaires, will help them somehow get rid of Putin and his cronies.
Sadly, Russia seems to have lost its opportunity for democracy and Putin has plunged his country back into the dark ages of communist dictatorship, threatening his own people with arrest and imprisonment if they voice objection. This crazy man now has his finger on the button and it would appear, that's he's also threatening the rest of the world. 🙁